
OpelBook.ru
Cars AvtoVAZ Cars Mitsubishi Cars BMW Cars Mercedes Cars Nissan Cars Toyota Cars Chevrolet
English Русский
Български
Беларускі
Український
Српски
Hrvatski
Română
Polski
Slovenský
Magyar
 |  Sitemap  |  Contacts  |    


Main Astra Corsa Insignia Kadett Omega Vectra Zafira Others Articles
Omega A (1986-1993) Omega B (1993-1999) Omega B2 (1999-2003)
  • Main
  • Omega
  • Omega B2
  • Body
  • Body elements
  • Door — removal, installation and adjustment

Door — removal, installation and adjustment (Opel Omega B2)

            0

Contents: Removal ⬇ Fitting the door ⬇

Removal


1. Unscrew the door opening limiter bolt (see illustration).
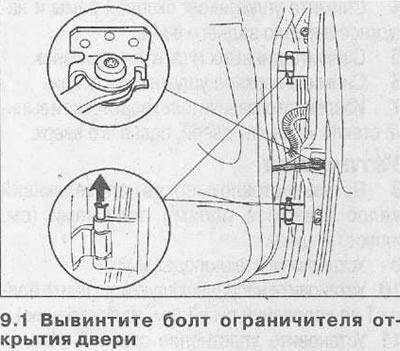
1. Unscrew the door opening limiter bolt (see illustration).


Caution: When removing the rear side door, knock out the bushing.


2. Disconnect the door wire harness plug by turning the gear to the left 90° and pulling out the plug.

3. Remove the protective rubber caps from the door hinge pin heads and knock out the pins and rubber covers from both door hinges. To facilitate the removal of the hinge pins, use a special puller, such as the HAZET 1970. Ask an assistant to hold the door while performing this operation.

The door is installed in the reverse order of removal.

Fitting the door


To adjust the door, the door lock bracket must be removed.

Original article on the web portal: OpelBook

The door position is adjusted by adjusting the hinges. This requires some experience, so it is recommended that the adjustment be done in a workshop.

When adjusting the door, a uniform gap must be provided between the door and adjacent parts of the body. The gap 2-2 should be approximately 5±1.3 mm, the gap 1-1 - 4±1 mm (see illustration).
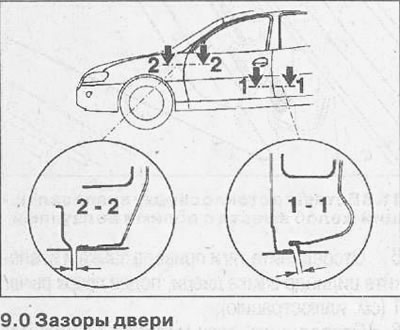
When adjusting the door, a uniform gap must be provided between the door and adjacent parts of the…


To ensure the door fits and matches its contour with the contour of the body, loosen the bolts securing the hinges to the body and move the door outward or inward. The rear side door may fall in relative to the contour of the front doors by no more than 1 mm.

4. Install the door lock bracket.


This article is available at russian, bulgarian, belarusian, ukrainian, serbian, croatian, romanian, polish, slovak, hungarian
Checking the article: Shapovalov Yaroslav

Share information:

Previous articles
Opel Omega B2: Body elements
Next articles

Hood — removal and installation
Front fenders — removal and installation
Fairing — removal and installation
Rear bumper — removal and installation
Front crossmember — removal and installation
Front bumper trim — removal and installation
Door trim — removal and installation
Door glass — removal, installation and adjustment
Door handles — removal and installation
Door lock — removal and installation
Center console — removal and installation
Rear Tailgate — Removal and Installation


See similar ones from other Opel car manuals:
▶ Removal, installation and adjustment of the door Opel Corsa B (1993-2000)
▶ Front door adjustment Opel Insignia A (2008-2017)
▶ Door lock — replacement and adjustment Opel Zafira A (1999-2005, petrol)
▶ Distributor belt — removal, installation and adjustment Opel Astra F (1991-1998, petrol)
▶ Adjustment and check of carburetor Solex 35 PDSI Opel Kadett E (1984-1995)
Link to this page in different formats

Visitor comments


No comments yet


How much will 44 + 19 =


Omega B2 (1999-2003) 
  • General information
  • User manual
  • Maintenance
  • Troubleshooting
  • Power unit
  • Petrol 4-cylinder
  • Petrol 6-cylinder
  • Engine overhaul
  • Diesel engines 2.0 l
  • Diesel engines 2.5 l
  • Cooling and heating
  • Injection system (gasoline)
  • Fuel system (diesel)
  • Fuel system
  • Exhaust system
  • Ignition system
  • Transmission
  • Clutch
  • Mechanical gearbox
  • Automatic gearbox
  • Main gear and shafts
  • Chassis
  • Brake system
  • Car suspension
  • Steering
  • Body
  • Body elements
  • Electrical equipment
  • Equipment and devices
  • Electrical circuits
Omega B (1993-1999) 
  • General information
  • User manual
  • Tips for the car owner
  • Maintenance (gasoline)
  • Maintenance (diesel)
  • Power unit
  • Petrol engine SOHC 2.0 l
  • Petrol engine DOHC 2.0 l
  • Petrol engines 2.5 and 3.0 l
  • Repair of gasoline engines
  • Diesel engine 2.0 l
  • Diesel engine repair 2.0 l
  • Diesel engine 2.5 l
  • Cooling and heating
  • Power system (petrol)
  • Emission reduction
  • Fuel system (diesel 2.0 l)
  • Fuel system (diesel 2.5 l)
  • Launch system
  • Ignition system
  • Transmission
  • Clutch
  • Mechanical gearbox
  • Automatic gearbox
  • Drive shafts
  • Chassis
  • Brake system
  • Wheel suspension
  • Steering
  • Body
  • Exterior
  • Interior
  • Doors and windows
  • Electrical equipment
  • Equipment and devices
  • Wiring diagrams (early)
  • Wiring diagrams (late)
Omega A (1986-1993) 
  • General information
  • User manual
  • Maintenance
  • Changes and additions
  • Troubleshooting
  • Power unit
  • Gasoline engines
  • Diesel engines
  • Cooling system
  • Fuel system (gasoline)
  • Fuel system (diesel)
  • Ignition system
  • Transmission
  • Clutch
  • Mechanical gearbox
  • Automatic gearbox
  • Cardan shaft
  • Drive shafts
  • Chassis
  • Brake system
  • Car suspension
  • Steering
  • Body
  • Exterior
  • Interior
  • Electrical equipment
  • Power devices
  • Lighting and appliances
  • Electrical circuits
OpelBook.ru © 2017–2026 · Mobile version · · Sitemap: EN BG BY UA RS HR RO PL SK HU · Feedback · Site search
Astra F, petrol · Astra G, petrol · Astra G · Astra H · Astra J, petrol · Corsa B · Corsa C, petrol · Corsa C · Insignia A · Kadett D · Kadett E · Omega A · Omega B · Omega B2 · Vectra A, petrol · Vectra A · Vectra B, petrol · Vectra B · Vectra C · Zafira A, petrol · Frontera A, petrol · Frontera B · Ascona C · Vivaro A ·
We want your visit to be comfortable 🤝! We use cookies 🍪 to make that happen.