
OpelBook.ru
Cars AvtoVAZ Cars Mitsubishi Cars BMW Cars Mercedes Cars Nissan Cars Toyota Cars Chevrolet
English Русский
Български
Беларускі
Український
Српски
Hrvatski
Română
Polski
Slovenský
Magyar
 |  Sitemap  |  Contacts  |    


Main Astra Corsa Insignia Kadett Omega Vectra Zafira Others Articles
Corsa B (1993-2000) Corsa C (2000-2006, petrol) Corsa C (2000-2006)
  • Main
  • Corsa
  • Corsa B
  • Body
  • Doors and windows
  • Removal, installation and adjustment of the door

Removal, installation and adjustment of the door (Opel Corsa B)

            0

Contents: Removal ⬇ Installation ⬇ Adjustment ⬇

Removal


1. Remove the door trim.

2. Disconnect the electrical wiring connectors of the electric motors for the window lifter, outside mirror adjustment and central locking (with appropriate equipment).

3. Knock out the door stop pin with a hammer and punch.

4. Remove the rubber caps from the axles of both door hinges. Ask an assistant to hold the door and knock the hinge axles towards the cap. To facilitate the removal of the hinge axles, there is a special tool, for example, HAZET, No.1970.

Installation


1. Install the door and hammer in the hinge pins and insert the door stop pin from above.

2. Adjust the door position if necessary.

3. Place the caps on the hinge pins.

4. Replace the lock.

5. Connect the door wiring connectors.

Adjustment


The door must be adjusted after removal or if it does not close properly.


[Original source is on the website: Opelbook.ru]

1. Remove the door lock.

2. Adjustment is made by changing the position of the hinges.

3. To adjust the gap, install the hinges so that the gap between the door and the adjacent elements is the same width along the entire length.

4. Adjust the door to the contour of the body: If the door in the front is not flush with the adjacent body elements when closed, move the hinges outward or inward accordingly. On a five-door car, the rear door can be installed deeper than the front door by no more than 1 mm.

5. Install the door lock.

6. Loosen the retainer fastening enough that it can be moved with light blows from a plastic hammer.


Fastening the retainer
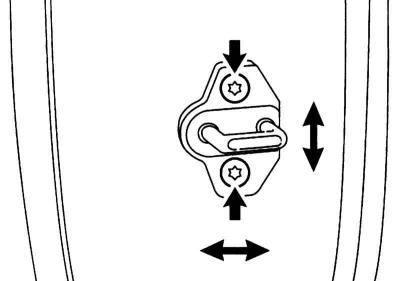
Fastening the retainer


7. Adjust the latch. To do this, close the door and adjust its position, then carefully open the door and tighten the latch mounting screws.

8. Repair any damage to the paintwork caused by the movement of the hinges.


This article is available at russian, bulgarian, belarusian, ukrainian, serbian, croatian, romanian, polish, slovak, hungarian
Checking the article: Trifonova Emilia

Share information:

Previous articles
Opel Corsa B: Doors and windows
Next articles

Protection against freezing of locks and seals
Removal and installation the door lock
Removal and installation the front door lock cylinder
Removal and installation the outer door handle
Removal and installation the window regulator
Removal and installation rear door glass (Corsa model)
Removal and installation the tailgate (Corsa and Tigra models)
Removal and installation the tailgate lock (Corsa and Tigra models)
Removal, installation, disassembly and assembly of the outer handle and cylinder of the rear door lock (Corsa model)
Sliding roof panel


See similar ones from other Opel car manuals:
▶ Front door adjustment Opel Insignia A (2008-2017)
▶ Door — removal, installation and adjustment Opel Omega B2 (1999-2003)
▶ Door lock — replacement and adjustment Opel Zafira A (1999-2005, petrol)
▶ Distributor belt — removal, installation and adjustment Opel Astra F (1991-1998, petrol)
▶ Adjustment and check of carburetor Solex 35 PDSI Opel Kadett E (1984-1995)
Link to this page in different formats

Visitor comments


No comments yet


How much will 42 + 47 =


Corsa C (2000-2006) 
  • General information
  • Introduction to guide
  • Troubleshooting
  • Vehicle device
  • User manual
  • Maintenance
  • Power unit
  • Engine repair
  • Cooling system
  • Power and exhaust system
  • Control system
  • Engine electrical equipment
  • Transmission
  • Clutch
  • Mechanical gearbox
  • Automatic gearbox
  • Drive shafts
  • Chassis
  • Brake system
  • Wheel suspension
  • Steering
  • Body
  • Exterior
  • Interior
  • Doors and windows
  • Heating and air conditioning
  • Electrical equipment
  • Equipment and devices
  • Lamps and lighting
  • Electrical circuits
Corsa C (2000-2006, petrol) 
  • User manual
  • Car access
  • Governing bodies
  • Seat control
  • Heating and air conditioning
  • Driving and maintenance
  • Engines 1.0 and 1.2 l
  • Engine repair
  • Cooling and lubrication system
  • Injection system
  • Engines 1.4, 1.6 and 1.8 l
  • Engine repair
  • Cooling and lubrication system
  • Injection system
  • Transmission
  • Clutch
  • Mechanical gearbox
  • Automatic gearbox
  • Drive shafts
  • Chassis
  • Wheels and tires
  • Wheel suspension
  • Steering
  • Brake system
  • Body
  • Exterior
  • Doors and windows
  • Electrical equipment
  • Equipment and devices
  • Lighting system
  • Electrical circuits
Corsa B (1993-2000) 
  • General information
  • Introduction to guide
  • User manual
  • Maintenance
  • Power unit
  • SOHC gasoline engines
  • DOHC gasoline engines
  • Diesel engines
  • Engine repair
  • Cooling system
  • Supply system
  • Injection system (gasoline)
  • Injection system (diesel)
  • Exhaust systems
  • Control system (gasoline)
  • Preheat system (diesel)
  • Charge and launch system
  • Transmission
  • Mechanical gearbox
  • Automatic gearbox
  • Clutch and drive shafts
  • Chassis
  • Brake system
  • Front suspension
  • Rear suspension
  • Steering
  • Body
  • Ventilation and heating
  • Exterior
  • Interior
  • Doors and windows
  • Electrical equipment
  • Equipment and devices
  • Lamps and lighting
  • Electrical circuits
OpelBook.ru © 2017–2026 · Mobile version · · Sitemap: EN BG BY UA RS HR RO PL SK HU · Feedback · Site search
Astra F, petrol · Astra G, petrol · Astra G · Astra H · Astra J, petrol · Corsa B · Corsa C, petrol · Corsa C · Insignia A · Kadett D · Kadett E · Omega A · Omega B · Omega B2 · Vectra A, petrol · Vectra A · Vectra B, petrol · Vectra B · Vectra C · Zafira A, petrol · Frontera A, petrol · Frontera B · Ascona C · Vivaro A ·
We want your visit to be comfortable 🤝! We use cookies 🍪 to make that happen.