
OpelBook.ru
Cars AvtoVAZ Cars Mitsubishi Cars BMW Cars Mercedes Cars Nissan Cars Toyota Cars Chevrolet
English Русский
Български
Беларускі
Український
Српски
Hrvatski
Română
Polski
Slovenský
Magyar
 |  Sitemap  |  Contacts  |    


Main Astra Corsa Insignia Kadett Omega Vectra Zafira Others Articles
Vectra A (1988-1995, petrol) Vectra A (1988-1995) Vectra B (1995-2002, petrol) Vectra B (1995-2002) Vectra C (2002-2008)
  • Main
  • Vectra
  • Vectra A
  • Body
  • Interior
  • Removal and installation door trim

Removal and installation door trim (Opel Vectra A)

            0

Vectra/Calibra cars


Removal


Unhook the triangular cover where the mirror is attached.

Use a wide spatula to lift and remove the door handle trim.
Use a wide spatula to lift and remove the door handle trim.


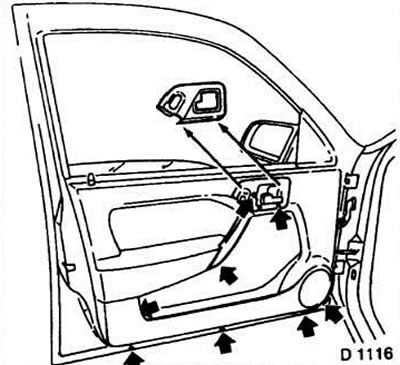
In Vectra cars: unscrew seven screws (see arrows in fig.) with cross slot.

For Calibra vehicles: remove six screws.
For Calibra vehicles: remove six screws.


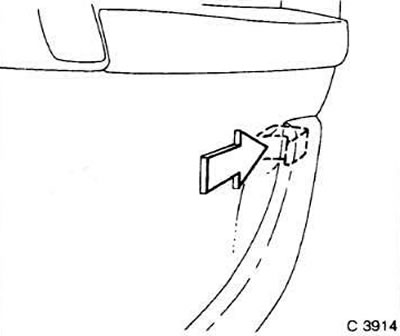
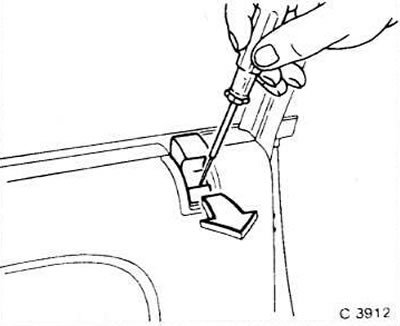
Unfasten the plastic button. To do this, insert the screwdriver along the arrow between the door trim and the door pocket. Slightly press the plastic hook back (to the back of the door), while simultaneously pulling the door trim away.
Unfasten the plastic button. To do this, insert the screwdriver along the arrow between the door…


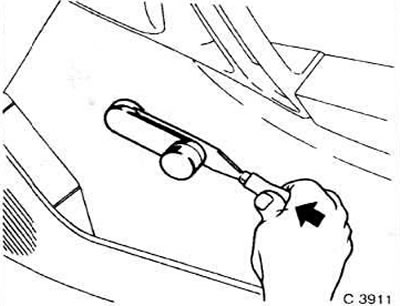
Pull the door button up. Use a narrow screwdriver to disconnect the button and remove the handle.


Pull the door button up. Use a narrow screwdriver to disconnect the button and remove the handle.


Remove the window lift handle (if any). To do this, use the Opel KM-317 tool to press the wire clamp, as shown in the figure. You can also use the Hazet 799 collet. If none of these tools are available, the clamp can be pressed by turning it in the direction of the arrow using a narrow screwdriver.

Remove the window lift handle from the shaft. If the clip was completely removed from the handle during removal, press it into its groove.

Remove the plastic washer.
Remove the plastic washer.


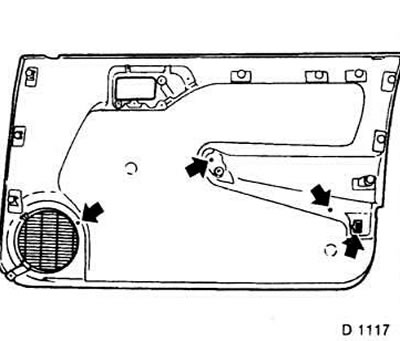
Unfasten and remove the door trim. To do this, pull the door trim away from the door frame in the area of the plastic buttons shown in the figure. The front door trim in Vectra cars is secured with nine buttons, and in Calibra cars (as well as rear trim in Vectra cars) - twelve.


Disconnect the power mirror connector (if equipped) from the front door frame.

Remove the trim. Disconnect the connector from the speaker (if any).

(Original posted on the website: OPELBOOK.ru)

Carefully remove the sealing film from the door.

If necessary, move the interior door handle forward and out of the door. Bend the handle down and disconnect it from the rod.

Installation


If the interior handle has been removed, connect it to the rod and insert it into the door.

Carefully stick the sealing film to the door. The film serves to isolate the interior from water and drafts. Therefore, it must be glued evenly, without folds. Seal torn areas with adhesive tape.

Put on the door trim, connect the connectors of the electric mirror and speaker (if available).

Align the trim on the door and secure with buttons.

For vehicles with manual windows: Slide the plastic washer onto the handle shaft with the side with the protrusion.

Place the handle on the window lifter shaft and press it with your thumb; the spring should enter the groove of the axle. When the window is closed, the handle should be directed downwards. Otherwise, slightly press the trim and correct the position of the plastic washer.

Screw in six or seven screws to secure the trim.

Place the door knob onto the rod and rotate it so that it can be pressed flush with the bottom edge of the trim. Secure the knob.

Secure the triangular mirror cover.

Snap the interior door handle cover into place.


This article is available at russian, bulgarian, belarusian, ukrainian, serbian, croatian, romanian, polish, slovak, hungarian
Checking the article: Zinoviev Kirill

Share information:

Previous articles
Opel Vectra A: Interior
Next articles

Removal and installation the pocket on the front door
Removal and installation armrests
Removal and installation of door glass
Removal and installation of window lifters
Removal and installation the door handle
Removal and installation the door lock cylinder


See similar ones from other Opel car manuals:
▶ Removal and installation the rear door trim Opel Astra H (2004-2009)
▶ Removal and installation door trim Opel Corsa B (1993-2000)
▶ Replacing the interior door trim Opel Insignia A (2008-2017)
▶ Removal and installation front door trim Opel Kadett D (1979-1984)
▶ Rear Door Trim Panel — Removal and Installation Opel Omega A (1986-1993)
Link to this page in different formats

Visitor comments


No comments yet


How much will 13 + 25 =


Vectra C (2002-2008) 
  • General information
  • User manual
  • Vehicle device
  • Maintenance
  • Troubleshooting
  • Power unit
  • Engine repair
  • Cooling system
  • Power and control system
  • Engine electrics
  • Transmission
  • Clutch
  • Car gearbox
  • Drive shafts
  • Chassis
  • Car suspension
  • Steering
  • Brake system
  • Body
  • Exterior
  • Interior
  • Doors, locks and windows
  • Heating and ventilation
  • Electrical equipment
  • Equipment and devices
  • Headlights and lighting
  • Electrical circuits
Vectra B (1995-2002) 
  • General information
  • User manual
  • Weekly checks
  • Maintenance (gasoline)
  • Maintenance (diesel)
  • Troubleshooting
  • Power unit
  • SOHC gasoline engine
  • DOHC petrol engine
  • Diesel engine 1.7 liter
  • Diesel engine 2.0 liters
  • Engine repair
  • Cooling system
  • Fuel system (gasoline)
  • Fuel system (diesel)
  • Charging system
  • Launch system
  • Ignition and preheat
  • Transmission
  • Clutch
  • Mechanical gearbox
  • Automatic gearbox
  • Drive shafts
  • Chassis
  • Brake system
  • Wheel suspension
  • Steering
  • Body
  • Exterior
  • Interior
  • Doors and windows
  • Heating and ventilation
  • Electrical equipment
  • Equipment and devices
  • Electrical circuits
Vectra B (1995-2002, petrol) 
  • General information
  • Maintenance
  • Help with malfunctions
  • Power unit
  • Engine repair
  • Exhaust system
  • Cooling system
  • Fuel system
  • Multec injection system
  • Four point injection
  • Transmission
  • Clutch
  • Gearbox and drive
  • Chassis
  • Wheel suspension
  • Steering
  • Brake system
  • Wheels and tires
  • Body
  • Exterior
  • Interior
  • Electrical equipment
  • Fuses and electronics
  • Power devices
  • Ignition system
  • Lighting and signaling
  • Equipment and devices
  • Heating and ventilation
  • Electrical circuits
Vectra A (1988-1995) 
  • Power unit
  • Engine repair
  • Ignition system
  • Lubrication system
  • Cooling system
  • Injection system
  • Fuel system (carburetor)
  • Fuel system (diesel)
  • Exhaust system
  • Transmission
  • Clutch
  • Car gearbox
  • Chassis
  • Front suspension
  • Rear suspension
  • Steering
  • Brake system
  • Wheels and tires
  • Body
  • Exterior
  • Interior
  • Electrical equipment
  • Electrical circuits
Vectra A (1988-1995, petrol) 
  • General information
  • User manual
  • Maintenance
  • Power unit
  • SOHC engine
  • DOHC engine
  • Cooling and ventilation
  • Fuel system (carburetor)
  • Fuel system (injector)
  • Exhaust converter
  • Transmission
  • Clutch
  • Mechanical gearbox
  • Automatic gearbox
  • Drive shafts
  • Chassis
  • Brake system
  • Car suspension
  • Steering
  • Body
  • Body elements
  • Electrical equipment
  • Power devices
  • Equipment and devices
  • Electrical circuits
OpelBook.ru © 2017–2026 · Mobile version · · Sitemap: EN BG BY UA RS HR RO PL SK HU · Feedback · Site search
Astra F, petrol · Astra G, petrol · Astra G · Astra H · Astra J, petrol · Corsa B · Corsa C, petrol · Corsa C · Insignia A · Kadett D · Kadett E · Omega A · Omega B · Omega B2 · Vectra A, petrol · Vectra A · Vectra B, petrol · Vectra B · Vectra C · Zafira A, petrol · Frontera A, petrol · Frontera B · Ascona C · Vivaro A ·
We want your visit to be comfortable 🤝! We use cookies 🍪 to make that happen.