


Note: Below is a description of this procedure using the Corsa C model as an example.
1. Remove the trim of the corresponding door (see Section 23).
2. Separate the insulating film from the door frame as much as necessary to gain access to the relevant parts.
3. Lower the glass using the rotary handle.
4. Using a plastic wedge, press the 3 clips and separate the outer triangular trim of the rear door. The wedge should be inserted from above.
5. Remove the rubber seal in the area of the rear glass guide (see accompanying illustration).
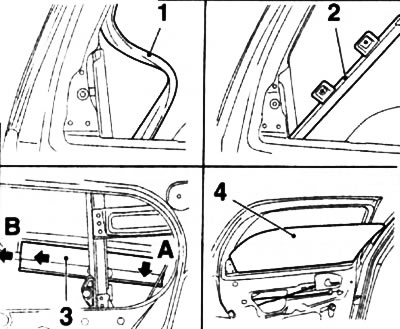
29.5. Removing the glass (4) of the rear door (corsa C models): 1. Seal; 2. Rear glass guide; 3. Window lift guide
6. Remove 2 screws and remove the rear glass guide from the door shaft (see accompanying illustration).
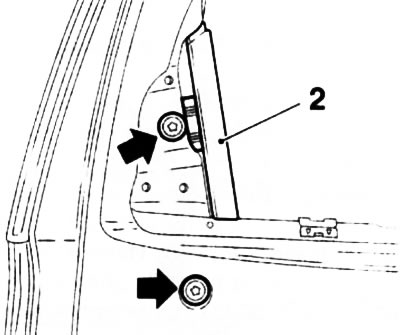
29.6. Mounting screws (indicated by arrows) rear guide (2) glass
7. Tilt the glass forward (arrow A) and pull it backwards (arrows B) out of the window regulator guide (see illustration 29.5).
8. Remove the glass from the door assembly through the upper shaft (see illustration 29.5).
9. Drill out the heads of the six window regulator mounting rivets (see accompanying illustration). Remove the window regulator from the door assembly. Remove metal filings from all door assembly components.
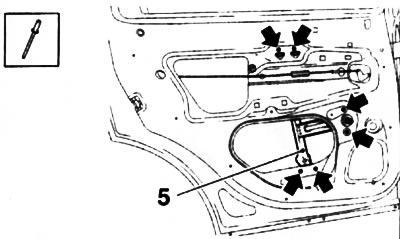
29.9. Rivets (indicated by arrows) rear door window lifter mounts (5) (corsa C models)
10. Installation is performed in the reverse order of removal. Lubricate the window lift levers with universal grease. To secure the window lift, use rivets ∅ 4.8x11 mm, or replace them with suitable short bolts with nuts, the bolt threads must be lubricated with a fixing compound. If necessary, replace the damaged insulating film.
(Text copied from this portal: «OPELBOOK.ru»)
11. Check the operation of the window lift.
Visitor comments