
OpelBook.ru
Cars AvtoVAZ Cars Mitsubishi Cars BMW Cars Mercedes Cars Nissan Cars Toyota Cars Chevrolet
English Русский
Български
Беларускі
Український
Српски
Hrvatski
Română
Polski
Slovenský
Magyar
 |  Sitemap  |  Contacts  |    


Main Astra Corsa Insignia Kadett Omega Vectra Zafira Others Articles
Corsa B (1993-2000) Corsa C (2000-2006, petrol) Corsa C (2000-2006)
  • Main
  • Corsa
  • Corsa B
  • Power unit
  • Engine repair
  • Honing of cylinder mirrors

Honing of cylinder mirrors (Opel Corsa B)

            0

1. Before assembling the engine, honing of the cylinder mirrors is mandatory in order to achieve the correct fit of the piston rings on them, ensuring proper tightness of the combustion chambers.

If you do not have the necessary tools at hand or do not want to do the honing yourself, the work can be entrusted to specialists at a car service workshop for a very reasonable fee.


2. Before you start honing, replace the main bearing covers/connecting bridge (without inserts) and tighten the mounting bolts to the required torque.

3. There are two types of hones for processing cylinder mirrors: a bottle brush type hone and a more traditional surface hone in the form of an attachment with spring-loaded sharpening stones. Both tools provide the necessary quality of processing of cylinder mirrors, although the use of the first is preferable for an inexperienced mechanic. You will also need a sufficient amount of rags, special honing or simply liquid machine oil, and an electric drill as a drive for the honing attachments. Proceed in the following order:
  • Clamp the hone into the chuck of the electric drill, bring the spring-loaded sharpening stones/rods of the brush attachment together and insert the latter into the cylinder.

Don't forget to wear safety glasses or a face shield!

  • Generously wet the mirror of the cylinder being processed with oil, turn on the drill and begin to make reciprocating movements with the attachment inside the cylinder. The speed of the vertical movement of the hone should ensure that a mesh pattern is applied to the surface of the cylinder mirror with an intersection angle of the sides of the mesh of about 60°. Do not skimp on oil and try not to remove more material from the surface of the cylinder walls than is really necessary to achieve the desired result.

Piston ring manufacturers may have their own requirements for the angle of intersection of the mesh pattern sides - carefully read the instructions on the repair kit packaging.


  • Do not remove the hone from the cylinder until the drill has stopped completely! Continue to move the hone back and forth until it stops rotating. Once the drill has stopped, squeeze the sharpening stones together and remove the hone from the cylinder. When using a bottle brush hone, wait until the drill has stopped completely, then remove the hone while continuing to manually rotate the chuck in the normal direction.
  • Wipe the cylinder bore with a rag and move on to honing the next one.
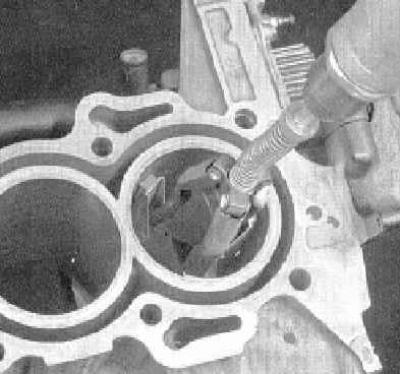
For an inexperienced amateur mechanic, it would be wiser to use a simpler to operate «bottle brush»…

For an inexperienced amateur mechanic, it would be wiser to use a simpler to operate "bottle brush" type hone
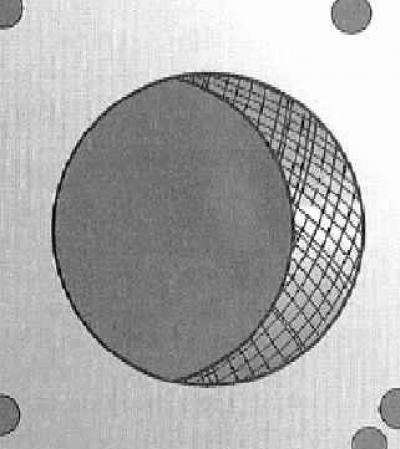

As a result of honing, a grid-like pattern with an intersection angle of cells of about 60° should…

As a result of honing, a grid-like pattern with an intersection angle of cells of about 60° should form on the cylinder walls


4. Once the treatment is complete, use a file to remove the chamfers from the upper edges of the cylinders - this treatment is performed in order to avoid difficulties when loading the pistons with the rings on them into the cylinders. Be extremely careful - do not scratch the cylinder bore with the file.

5. Finally, the entire unit should be thoroughly washed with a warm, soapy water solution.

The cylinders can be considered washed when, after passing an oil-soaked white rag over the mirror, no gray film remains on it. Do not forget to clean all oil holes and channels with a cylindrical brush, then wash the block with a stream of water under pressure.


6. After washing, dry the block thoroughly and lubricate the machined surfaces with oil to protect them from corrosion. Before assembling the engine, wrap the block in a clean plastic bag.


This article is available at russian, bulgarian, belarusian, ukrainian, serbian, croatian, romanian, polish, slovak, hungarian
Checking the article: Trifonova Emilia

Share information:

Previous articles
Opel Corsa B: Engine repair
Next articles

Cleaning and checking the condition of the cylinder block
Removal the crankshaft
Removal connecting rod and piston assemblies
Cylinder head assembly
Cleaning and checking the condition of the cylinder head
Disassembling the cylinder head
Checking the condition of the connecting rod and piston group components
Checking the condition of the crankshaft
Checking the condition of the main and connecting rod bearings of the crankshaft
Engine assembly procedure
Installing piston rings
Installing the crankshaft and checking the main bearing clearances


See similar ones from other Opel car manuals:
▶ Honing of cylinder mirrors Opel Astra G (1998-2004)
▶ Cylinder head cover Opel Insignia A (2008-2017)
▶ Cylinder head specifications Opel Kadett E (1984-1995)
▶ Cylinder head — removal and installation with engine in car Opel Omega A (1986-1993)
▶ Adjusting the rear view mirrors Opel Vectra A (1988-1995, petrol)
Link to this page in different formats

Visitor comments


No comments yet


How much will 32 + 15 =


Corsa C (2000-2006) 
  • General information
  • Introduction to guide
  • Troubleshooting
  • Vehicle device
  • User manual
  • Maintenance
  • Power unit
  • Engine repair
  • Cooling system
  • Power and exhaust system
  • Control system
  • Engine electrical equipment
  • Transmission
  • Clutch
  • Mechanical gearbox
  • Automatic gearbox
  • Drive shafts
  • Chassis
  • Brake system
  • Wheel suspension
  • Steering
  • Body
  • Exterior
  • Interior
  • Doors and windows
  • Heating and air conditioning
  • Electrical equipment
  • Equipment and devices
  • Lamps and lighting
  • Electrical circuits
Corsa C (2000-2006, petrol) 
  • User manual
  • Car access
  • Governing bodies
  • Seat control
  • Heating and air conditioning
  • Driving and maintenance
  • Engines 1.0 and 1.2 l
  • Engine repair
  • Cooling and lubrication system
  • Injection system
  • Engines 1.4, 1.6 and 1.8 l
  • Engine repair
  • Cooling and lubrication system
  • Injection system
  • Transmission
  • Clutch
  • Mechanical gearbox
  • Automatic gearbox
  • Drive shafts
  • Chassis
  • Wheels and tires
  • Wheel suspension
  • Steering
  • Brake system
  • Body
  • Exterior
  • Doors and windows
  • Electrical equipment
  • Equipment and devices
  • Lighting system
  • Electrical circuits
Corsa B (1993-2000) 
  • General information
  • Introduction to guide
  • User manual
  • Maintenance
  • Power unit
  • SOHC gasoline engines
  • DOHC gasoline engines
  • Diesel engines
  • Engine repair
  • Cooling system
  • Supply system
  • Injection system (gasoline)
  • Injection system (diesel)
  • Exhaust systems
  • Control system (gasoline)
  • Preheat system (diesel)
  • Charge and launch system
  • Transmission
  • Mechanical gearbox
  • Automatic gearbox
  • Clutch and drive shafts
  • Chassis
  • Brake system
  • Front suspension
  • Rear suspension
  • Steering
  • Body
  • Ventilation and heating
  • Exterior
  • Interior
  • Doors and windows
  • Electrical equipment
  • Equipment and devices
  • Lamps and lighting
  • Electrical circuits
OpelBook.ru © 2017–2026 · Mobile version · · Sitemap: EN BG BY UA RS HR RO PL SK HU · Feedback · Site search
Astra F, petrol · Astra G, petrol · Astra G · Astra H · Astra J, petrol · Corsa B · Corsa C, petrol · Corsa C · Insignia A · Kadett D · Kadett E · Omega A · Omega B · Omega B2 · Vectra A, petrol · Vectra A · Vectra B, petrol · Vectra B · Vectra C · Zafira A, petrol · Frontera A, petrol · Frontera B · Ascona C · Vivaro A ·
We want your visit to be comfortable 🤝! We use cookies 🍪 to make that happen.