
OpelBook.ru
Cars AvtoVAZ Cars Mitsubishi Cars BMW Cars Mercedes Cars Nissan Cars Toyota Cars Chevrolet
English Русский
Български
Беларускі
Український
Српски
Hrvatski
Română
Polski
Slovenský
Magyar
 |  Sitemap  |  Contacts  |    


Main Astra Corsa Insignia Kadett Omega Vectra Zafira Others Articles
Corsa B (1993-2000) Corsa C (2000-2006, petrol) Corsa C (2000-2006)
  • Main
  • Corsa
  • Corsa B
  • Power unit
  • Engine repair
  • Checking the condition of the crankshaft

Checking the condition of the crankshaft (Opel Corsa B)

            0

1. Use a sharpening stone, file or scraper to remove burrs from the edges of the oil holes.

Chamfering the edges of oil holes
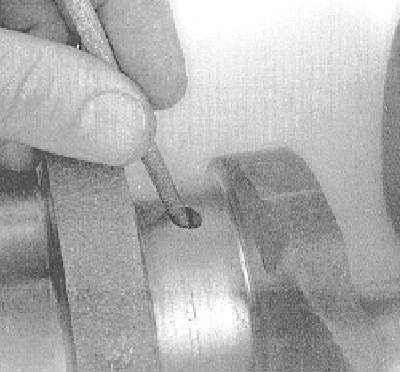
Chamfering the edges of oil holes


2. Wash the crankshaft with solvent, then dry it thoroughly, using compressed air if possible. Don't forget to clean the oil holes with a stiff brush. Then wash them with solvent as well.

Cleaning oil passages with a cylindrical brush
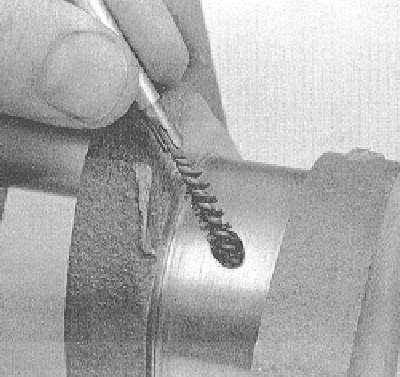
Cleaning oil passages with a cylindrical brush


When using compressed air, remember to wear safety glasses!


3. Check the crankshaft main and connecting rod journals for scoring, cavities, cracks and signs of uneven wear.

4. Inspect the entire surface of the shaft for cracks and other damage. To detect hidden cracks, magnetic particle inspection should be used - take the shaft to a car service workshop.


5. Use a micrometer to measure the diameters of the main and connecting rod journals of the shaft. Measure the diameter of each journal at several points along its length and perimeter, which will allow you to assess the value of its taper and ovality, which should not go beyond the permissible ranges (see Specifications in Chapter Engines). You should also evaluate the crankshaft runout value - you will need a pair of V-shaped blocks and a plunger-type dial gauge. If you do not have the necessary equipment, contact a car service specialist for help.
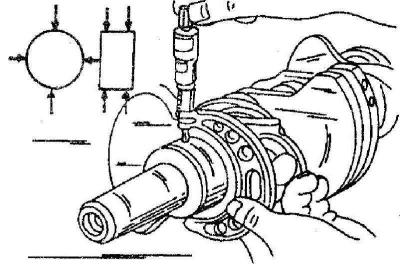
Measuring the diameters of the crankshaft bearing journals using a micrometer

Measuring the diameters of the crankshaft bearing journals using a micrometer


Measuring the radial runout of the crankshaft
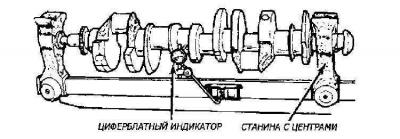
Measuring the radial runout of the crankshaft


6. If the wear/taper/ovality of the journals exceeds the permissible value, or there is mechanical damage to the surfaces, the crankshaft should be re-machined. After machining the shaft, it is necessary to select new main and/or connecting rod bearing shells of the appropriate repair size.


7. Check the condition of the seal journals on both crankshaft journals. The presence of worn grooves, burrs or scuffs will lead to the failure of new seals in the very near future. In some cases, the journals can be restored by turning and pressing special thin-walled bushings onto them. If this type of restoration is not possible, replace the shaft.

8. Check the condition of the main and connecting rod bearing shells (see section Checking the condition of the main and connecting rod bearings of the crankshaft).


This article is available at russian, bulgarian, belarusian, ukrainian, serbian, croatian, romanian, polish, slovak, hungarian
Checking the article: Trifonova Emilia

Share information:

Previous articles
Opel Corsa B: Engine repair
Next articles

Checking the condition of the connecting rod and piston group components
Honing of cylinder mirrors
Cleaning and checking the condition of the cylinder block
Removal the crankshaft
Removal connecting rod and piston assemblies
Cylinder head assembly
Checking the condition of the main and connecting rod bearings of the crankshaft
Engine assembly procedure
Installing piston rings
Installing the crankshaft and checking the main bearing clearances
Installation of connecting rod and piston assemblies and checking the size of working clearances in the connecting rod bearings of the crankshaft
Test run and running-in of the engine after major repairs


See similar ones from other Opel car manuals:
▶ Checking the condition of the crankshaft Opel Astra G (1998-2004)
▶ Cleaning and checking the technical condition of the… Opel Insignia A (2008-2017)
▶ Checking the diametrical clearance between the bearings and… Opel Kadett E (1984-1995)
▶ Checking the condition of the auxiliary drive belt — every… Opel Omega A (1986-1993)
▶ Hoses — checking the condition and tightness of their… Opel Vectra A (1988-1995, petrol)
Link to this page in different formats

Visitor comments


No comments yet


How much will 10 + 46 =


Corsa C (2000-2006) 
  • General information
  • Introduction to guide
  • Troubleshooting
  • Vehicle device
  • User manual
  • Maintenance
  • Power unit
  • Engine repair
  • Cooling system
  • Power and exhaust system
  • Control system
  • Engine electrical equipment
  • Transmission
  • Clutch
  • Mechanical gearbox
  • Automatic gearbox
  • Drive shafts
  • Chassis
  • Brake system
  • Wheel suspension
  • Steering
  • Body
  • Exterior
  • Interior
  • Doors and windows
  • Heating and air conditioning
  • Electrical equipment
  • Equipment and devices
  • Lamps and lighting
  • Electrical circuits
Corsa C (2000-2006, petrol) 
  • User manual
  • Car access
  • Governing bodies
  • Seat control
  • Heating and air conditioning
  • Driving and maintenance
  • Engines 1.0 and 1.2 l
  • Engine repair
  • Cooling and lubrication system
  • Injection system
  • Engines 1.4, 1.6 and 1.8 l
  • Engine repair
  • Cooling and lubrication system
  • Injection system
  • Transmission
  • Clutch
  • Mechanical gearbox
  • Automatic gearbox
  • Drive shafts
  • Chassis
  • Wheels and tires
  • Wheel suspension
  • Steering
  • Brake system
  • Body
  • Exterior
  • Doors and windows
  • Electrical equipment
  • Equipment and devices
  • Lighting system
  • Electrical circuits
Corsa B (1993-2000) 
  • General information
  • Introduction to guide
  • User manual
  • Maintenance
  • Power unit
  • SOHC gasoline engines
  • DOHC gasoline engines
  • Diesel engines
  • Engine repair
  • Cooling system
  • Supply system
  • Injection system (gasoline)
  • Injection system (diesel)
  • Exhaust systems
  • Control system (gasoline)
  • Preheat system (diesel)
  • Charge and launch system
  • Transmission
  • Mechanical gearbox
  • Automatic gearbox
  • Clutch and drive shafts
  • Chassis
  • Brake system
  • Front suspension
  • Rear suspension
  • Steering
  • Body
  • Ventilation and heating
  • Exterior
  • Interior
  • Doors and windows
  • Electrical equipment
  • Equipment and devices
  • Lamps and lighting
  • Electrical circuits
OpelBook.ru © 2017–2026 · Mobile version · · Sitemap: EN BG BY UA RS HR RO PL SK HU · Feedback · Site search
Astra F, petrol · Astra G, petrol · Astra G · Astra H · Astra J, petrol · Corsa B · Corsa C, petrol · Corsa C · Insignia A · Kadett D · Kadett E · Omega A · Omega B · Omega B2 · Vectra A, petrol · Vectra A · Vectra B, petrol · Vectra B · Vectra C · Zafira A, petrol · Frontera A, petrol · Frontera B · Ascona C · Vivaro A ·
We want your visit to be comfortable 🤝! We use cookies 🍪 to make that happen.