
OpelBook.ru
Cars AvtoVAZ Cars Mitsubishi Cars BMW Cars Mercedes Cars Nissan Cars Toyota Cars Chevrolet
English Русский
Български
Беларускі
Український
Српски
Hrvatski
Română
Polski
Slovenský
Magyar
 |  Sitemap  |  Contacts  |    


Main Astra Corsa Insignia Kadett Omega Vectra Zafira Others Articles
Corsa B (1993-2000) Corsa C (2000-2006, petrol) Corsa C (2000-2006)
  • Main
  • Corsa
  • Corsa B
  • Power unit
  • Engine repair
  • Installing piston rings

Installing piston rings (Opel Corsa B)

            0

Before installing new piston rings, check the clearances in their locks. It is assumed that the lateral clearances of the rings in the piston grooves have already been checked and comply with the accepted standards.

1. Lay out the connecting rod and piston assemblies with ring sets on the work surface of the workbench. From this point on, each ring set will be rigidly "tied" to its piston. Now you can start measuring the gaps in the ring locks.

2. Insert the upper (No. 1) compression ring into the first cylinder of the engine and align it perpendicularly by pushing it down with the piston crown. The ring should be in the area of the lower limit of the working stroke of the rings in the cylinder.

3. Determine the ring gap using a blade type feeler gauge. The blade should slide tightly in the ring gap. Compare the measurement with the Specifications. If the gap is outside the acceptable range in either direction, double check that the rings are not mixed up before taking any corrective action (see below).

Measuring the gap in the piston ring lock
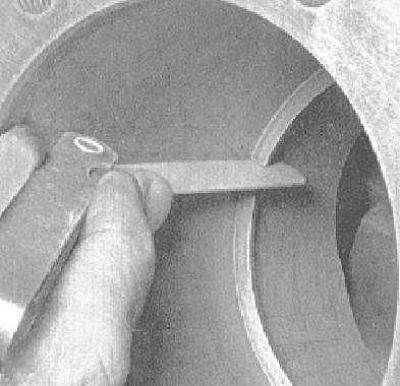
Measuring the gap in the piston ring lock


4. If the gap is too small, it can be widened by boring with a fine-tooth file. Clamp a rectangular file in a vice, then put the ring on the file with the lock so that the end of the latter is inside the circle. Slowly pull the ring towards you, removing excess metal from its ends in the lock. When you reach the end of the file, remove the ring, check the gap again, and repeat the procedure if necessary.


Never push the ring away from you onto the file, as this will cause the edges of the lock to converge and there is a high risk of damaging the metal!


5. The gap size should not exceed the value 1.02 mm. Once again, make sure that the ring sets you purchase meet the characteristics of your vehicle's engine needs.

6. Repeat the procedure for the remaining rings (second compression and oil scraper) piston of the first cylinder, then for the rings of all other pistons. Remember that now each set of rings is definitely "tied" to its piston, on which it should be installed.

7. Having checked and adjusted the gaps in the ring locks properly, you can begin to install them on your pistons.

8. The oil scraper (lower) ring is put on the piston first. The oil scraper ring consists of three separate sections. First, insert the spring expander into the lower groove of the piston. If the expander is equipped with an anti-rotation tongue, make sure that the latter gets into the counter-drilling in the piston groove. Now install the lower working section of the ring into the groove. To avoid accidental damage to the working sections of the oil scraper ring, do not use any tool to install them - just insert one end of the section into the groove under/above the expander, press it firmly with your finger and, moving along the perimeter of the ring, insert the remaining part. Lastly, install the upper working section of the ring.

9. After seating all three components of the oil scraper ring in the lower groove of the piston, check for freedom of rotation (sliding in a groove) upper and lower working sections.


10. The second (lower) compression ring is installed next. The ring should be installed with the marking facing up (to the piston bottom).

Follow the ring manufacturers instructions carefully, which are usually printed on the kit packaging. Do not confuse the second compression ring with the first (upper) one - they have different cross-sections


The upper and lower compression rings differ from each other in the shape of the cross-section
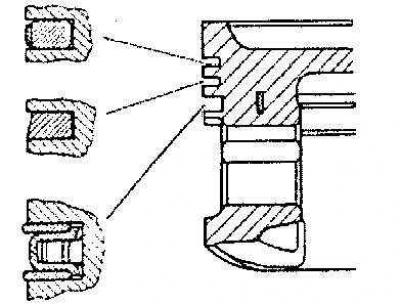
The upper and lower compression rings differ from each other in the shape of the cross-section


11. Using a special expander and making sure that the ring is turned with the marking facing up, place it in the middle groove on the piston. Try not to spread the ring lock more than is really necessary for its smooth installation on the piston.

12. Proceed in a similar manner to install the first (upper) compression ring (marking up). Try not to confuse the top ring with the second one.

On some engines the top compression ring is not marked and can be installed with either side facing up.


13. Proceeding in a similar manner, fit rings to all remaining pistons one by one.


This article is available at russian, bulgarian, belarusian, ukrainian, serbian, croatian, romanian, polish, slovak, hungarian
Checking the article: Trifonova Emilia

Share information:

Previous articles
Opel Corsa B: Engine repair
Next articles

Engine assembly procedure
Checking the condition of the main and connecting rod bearings of the crankshaft
Checking the condition of the crankshaft
Checking the condition of the connecting rod and piston group components
Honing of cylinder mirrors
Cleaning and checking the condition of the cylinder block
Installing the crankshaft and checking the main bearing clearances
Installation of connecting rod and piston assemblies and checking the size of working clearances in the connecting rod bearings of the crankshaft
Test run and running-in of the engine after major repairs


See similar ones from other Opel car manuals:
▶ Installing piston rings Opel Astra G (1998-2004)
▶ Checking and installing piston rings Opel Kadett E (1984-1995)
▶ Installing piston rings Opel Vectra B (1995-2002)
▶ Piston rings — installation Opel Omega B2 (1999-2003)
▶ Pistons, connecting rods and piston rings Opel Frontera B (1998-2004)
Link to this page in different formats

Visitor comments


No comments yet


How much will 47 + 34 =


Corsa C (2000-2006) 
  • General information
  • Introduction to guide
  • Troubleshooting
  • Vehicle device
  • User manual
  • Maintenance
  • Power unit
  • Engine repair
  • Cooling system
  • Power and exhaust system
  • Control system
  • Engine electrical equipment
  • Transmission
  • Clutch
  • Mechanical gearbox
  • Automatic gearbox
  • Drive shafts
  • Chassis
  • Brake system
  • Wheel suspension
  • Steering
  • Body
  • Exterior
  • Interior
  • Doors and windows
  • Heating and air conditioning
  • Electrical equipment
  • Equipment and devices
  • Lamps and lighting
  • Electrical circuits
Corsa C (2000-2006, petrol) 
  • User manual
  • Car access
  • Governing bodies
  • Seat control
  • Heating and air conditioning
  • Driving and maintenance
  • Engines 1.0 and 1.2 l
  • Engine repair
  • Cooling and lubrication system
  • Injection system
  • Engines 1.4, 1.6 and 1.8 l
  • Engine repair
  • Cooling and lubrication system
  • Injection system
  • Transmission
  • Clutch
  • Mechanical gearbox
  • Automatic gearbox
  • Drive shafts
  • Chassis
  • Wheels and tires
  • Wheel suspension
  • Steering
  • Brake system
  • Body
  • Exterior
  • Doors and windows
  • Electrical equipment
  • Equipment and devices
  • Lighting system
  • Electrical circuits
Corsa B (1993-2000) 
  • General information
  • Introduction to guide
  • User manual
  • Maintenance
  • Power unit
  • SOHC gasoline engines
  • DOHC gasoline engines
  • Diesel engines
  • Engine repair
  • Cooling system
  • Supply system
  • Injection system (gasoline)
  • Injection system (diesel)
  • Exhaust systems
  • Control system (gasoline)
  • Preheat system (diesel)
  • Charge and launch system
  • Transmission
  • Mechanical gearbox
  • Automatic gearbox
  • Clutch and drive shafts
  • Chassis
  • Brake system
  • Front suspension
  • Rear suspension
  • Steering
  • Body
  • Ventilation and heating
  • Exterior
  • Interior
  • Doors and windows
  • Electrical equipment
  • Equipment and devices
  • Lamps and lighting
  • Electrical circuits
OpelBook.ru © 2017–2026 · Mobile version · · Sitemap: EN BG BY UA RS HR RO PL SK HU · Feedback · Site search
Astra F, petrol · Astra G, petrol · Astra G · Astra H · Astra J, petrol · Corsa B · Corsa C, petrol · Corsa C · Insignia A · Kadett D · Kadett E · Omega A · Omega B · Omega B2 · Vectra A, petrol · Vectra A · Vectra B, petrol · Vectra B · Vectra C · Zafira A, petrol · Frontera A, petrol · Frontera B · Ascona C · Vivaro A ·
We want your visit to be comfortable 🤝! We use cookies 🍪 to make that happen.