


Contents: Removal ⬇ Installation and tensioning ⬇
Proceed with the procedures only after the engine has completely cooled down.
Removal
1. Disconnect the negative cable from the battery.
2. On 1.6 l engine disconnect the mass air flow (MAF) sensor connector.
3. Remove the air filter with the suction hose and air intake sleeve (see Chapter Fuel, exhaust and emission control systems).
4. Unscrew the mounting bolts and remove the upper timing belt cover.
5. Remove the accessory drive belt.
On vehicles with a CV joint, only remove the belt from the pulley, but do not take it out.
6. Remove the spark plugs (see Chapter Vehicle settings and routine maintenance).
7. Remove the two camshaft position (CMP) sensor mounting bolts (1) and move it to the side along with the attached electrical wiring.
TDC timing marks location diagram
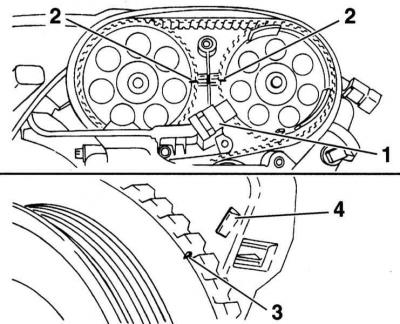
8. Remove the right front wheel. If necessary, remove the wheel arch liner. If the engine has an oil bath, remove the flywheel cover (see Chapter Manual 5-speed gearbox).
9. Set the piston of the 1st cylinder to the TDC position (see section Repair procedures for DOHC gasoline engines without removing them from the vehicle).
10. Remove the crankshaft pulley. Make sure that the previously set position of the shaft does not change. To prevent the shaft from turning, block it.
11. Remove the lower timing belt cover.
12. If you intend to reuse the timing belt, mark the direction of its movement with an arrow on it (clockwise).
13. Loosen the toothed belt tension by loosening the tension roller mounting bolt. If necessary, turn the tension roller clockwise using the Allen key by the eccentric.
Timing belt tension loosening
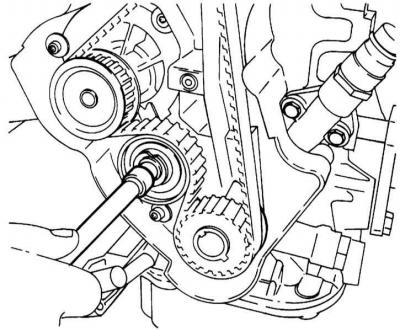
14. Remove the timing belt and check its condition.
Do not change the position of the engine with the timing belt removed.
Installation and tensioning
Before installation, check that the TDC marks match (see section Repair procedures for DOHC gasoline engines without removing them from the vehicle) on the camshaft pulleys, as well as on the crankshaft toothed wheel. Installing the timing belt with the toothed wheels in the wrong position can cause damage to the engine valves and pistons.
1. Check the installation position of the water pump. The mark (2) on the pump must match the mark (1) on the cylinder block.
Water pump timing marks
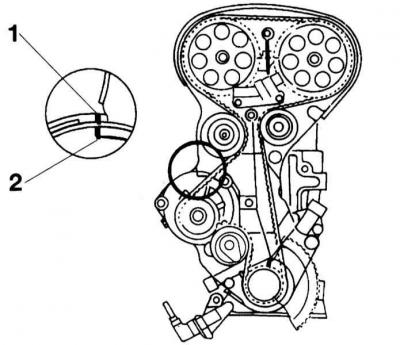
2. Put the toothed belt on the toothed wheels without turning them. Be sure to ensure that the belt is positioned correctly.
Timing Belt Routing Diagram
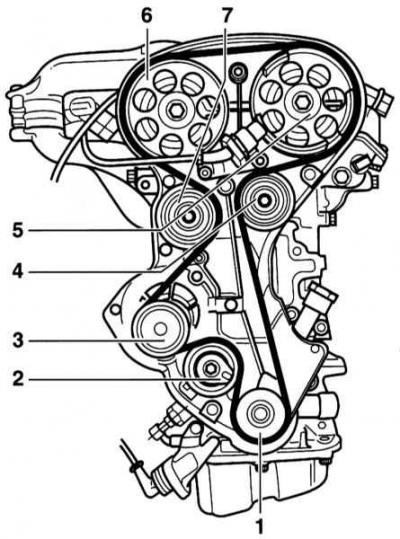
1 - Crankshaft gear
2 — Tension roller
3 - Water pump
4 - Intermediate roller, release side
5 — Intake camshaft gear
6 — Exhaust camshaft gear
7 - Intermediate roller, intake side
When installing the timing belt on the intake camshaft gear, make sure that no teeth are missed and that the mark when applying the belt coincides with the upper edge of the cylinder head.
3. Tighten the toothed belt. To do this, turn the tension roller counterclockwise with an Allen key through the adjusting eccentric so as to achieve maximum tension. The tension roller indicator is on the right, near the mark. Secure the toothed belt tension roller in this position.
Initial tension of the toothed belt
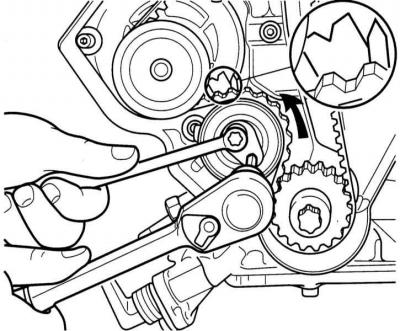
When adjusting the tension of the timing belt, its part between the intermediate roller on the outlet side and the crankshaft toothed wheel must be tensioned, otherwise precise adjustment is impossible.
4. Screw in the old crankshaft pulley mounting bolt. Smoothly, without jerking, turn the crankshaft by hand 2 turns clockwise. Then check whether the marks on the camshaft gears and on the crankshaft gear match. If they do not match, remove the belt and repeat the adjustment.
5. Adjust the tension of the toothed belt. To do this, slightly loosen the adjusting bolt of the toothed belt tension roller and turn the adjusting eccentric clockwise so that the position of the pointer corresponds accompanying illustrations.
Adjusting the new timing belt
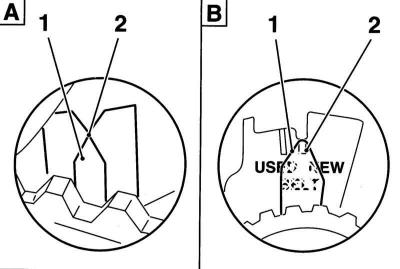
A — The pointer (1) of the toothed belt tension roller must coincide with the mark (2)
IN — The pointer (1) of the timing belt tension roller must coincide with the mark (2) "NEW"
Adjusting a previously used timing belt
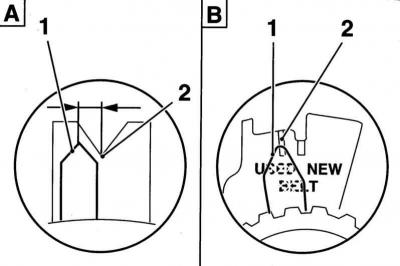
A — The pointer (1) of the toothed belt tension roller must coincide with the left edge of the mark (2)
IN - The pointer (1) of the timing belt tension roller must coincide with the mark (2) "USED"
The adjustment marks may differ depending on the year of manufacture of the vehicle. The values specified also apply to adjusting the timing belt tension as part of maintenance.
6. Tighten the tension roller adjusting bolt with force 20 Nm.
7. Install the lower timing belt cover.
8. Install the crankshaft gear. Always use a new bolt. Tighten the bolt first 95 Nm, and then tighten it with a hard wrench at an angle 30 degrees. and also on the corner 15 degrees.
9. Secure the camshaft position sensor to the rear timing belt cover with two bolts, tightening them firmly 8 Nm. Pre-lubricate the bolt threads with sealant.
10. Further installation is carried out in the reverse order of removal of the components.
Visitor comments