
OpelBook.ru
Cars AvtoVAZ Cars Mitsubishi Cars BMW Cars Mercedes Cars Nissan Cars Toyota Cars Chevrolet
English Русский
Български
Беларускі
Український
Српски
Hrvatski
Română
Polski
Slovenský
Magyar
 |  Sitemap  |  Contacts  |    


Main Astra Corsa Insignia Kadett Omega Vectra Zafira Others Articles
Corsa B (1993-2000) Corsa C (2000-2006, petrol) Corsa C (2000-2006)
  • Main
  • Corsa
  • Corsa B
  • Power unit
  • DOHC gasoline engines
  • Removal and installation camshafts

Removal and installation camshafts (Opel Corsa B)

            0

Contents: Removal ⬇ Examination ⬇ Installation ⬇

Removal


Engines 1.4 and 1.6 l


1. Remove the timing belt (see section Removal and installation the timing belt (1.4 and 1.6 l engines)).

2. Remove the camshaft timing gears (see section Removal and installation of gear wheels of crankshaft and camshafts and intermediate rollers (1.4 and 1.6 l engines)).

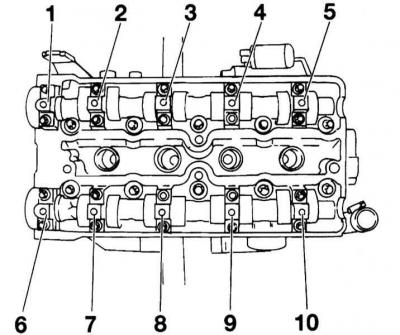
3. First remove the following bearing caps: 1, 3 and 5 of the intake camshaft, as well as 6, 8 and 10 of the exhaust camshaft. Loosen all the mounting bolts of the specified caps crosswise, first by half a turn, then by one turn and then completely unscrew. Remove the bearing caps.

Numbering of camshaft bearing caps
Numbering of camshaft bearing caps


4. Then, in the same way, unscrew the bolts securing covers 2 and 4, as well as 7 and 9.

5. Remove the camshaft by pulling it evenly out of the bearings.

6. Carefully remove both seals from their mounting locations.

Engines 1.0 and 1.2 l


Timing drive components are presented on the accompanying illustration.

Timing Drive Components
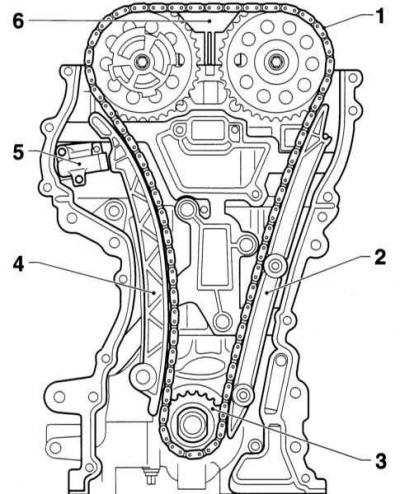
1 - Chain

1 - Chain

2 - Chain guide

3 - Asterisk

4 - Tension bar

5 — Tensioner

6 — Spacer


The chain tension is provided by a spring-loaded hydraulic tensioner, which does not require maintenance. The drive chain in question cannot be disconnected and locks cannot be used to connect it.


1. Remove the timing belt housing cover (see section Removal and installation the timing cover) and the timing belt cover (see section Removal and installation the cylinder head).

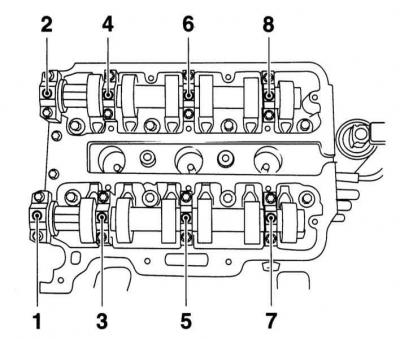
2. First, loosen the bolts securing the bearing caps 2 and 8 of the intake camshaft by a quarter turn, then one turn, and then the bearing caps 1 and 7 of the exhaust camshaft, after which completely unscrew the bolts.

Numbering of camshaft bearing caps
Numbering of camshaft bearing caps


When removing the bearing caps, pay attention to the markings. Do not mix them up when installing.


3. Then, in a similar manner, unscrew the bearing cap mounting bolts 4 and 6 and 3 and 5, respectively. Evenly remove the camshafts from the bearings.

Examination


1. Carefully examine the condition of the bearing journals and camshaft cams. If scoring or scratches are detected, replace the shaft. Also check the condition of the working surfaces of the plain bearings in the valve train housing supports; if irreparable defects are detected, the cylinder head will have to be replaced.


2. Alternately placing the camshafts in the prisms, use a plunger-type dial gauge to determine the value of their radial runout (by bearing journals). If the measurement results are outside the permissible range (see Specifications in Chapter Engines) the camshaft must be replaced.

Installation


Engines 1.4 and 1.6 l


1. Lubricate the rubbing surfaces of the hydraulic valve lifters with a thin layer of MoS2 grease.

2. Lubricate the sealing surfaces of the outer camshaft bearing caps (from the toothed belt side) on the cylinder head with a sealant, for example, OPEL 15 04 201.

3. Carefully install the camshaft.

4. Tighten alternately, crosswise, in several steps, the bolts securing the bearing caps 2 and 4 of the intake camshafts, as well as the bearing caps 7 and 9 of the exhaust camshafts.

The markings on the camshaft bearing caps must match the markings on the cylinder head.


5. Install bearing caps 1, 3 and 5, as well as 6, 8 and 10 in the same manner.

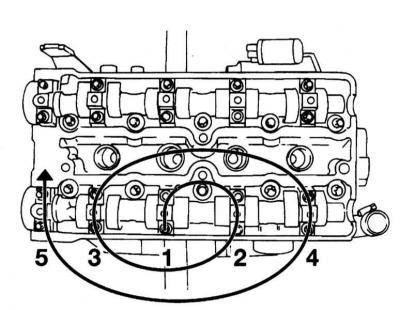
6. Tighten the camshaft bearing cap bolts in a spiral pattern as shown on the accompanying illustration, with effort 8 Nm.

Tightening Procedure for Camshaft Bearing Caps
Tightening Procedure for Camshaft Bearing Caps


7. Install the shaft seals using the appropriate tool. Pre-lubricate the working edge of the seals with clean engine oil.


8. Install the camshaft timing gears (see section Removal and installation of gear wheels of crankshaft and camshafts and intermediate rollers (1.4 and 1.6 l engines)).

9. Install the timing belt (see section Removal and installation the timing belt (1.4 and 1.6 l engines)).

Engines 1.0 and 1.2 l


1. First, alternately, in several approaches, screw in the bearing cap mounting bolts 4 and 6, then 3 and 4. Do not tighten the bolts.

2. Then, in the same way, screw in the bearing cap mounting bolts 2 and 8, then 1 and 7.

3. Tighten the camshaft bearing cap bolts in a spiral pattern from the inside out with force 8 Nm.

Tightening Procedure for Camshaft Bearing Caps
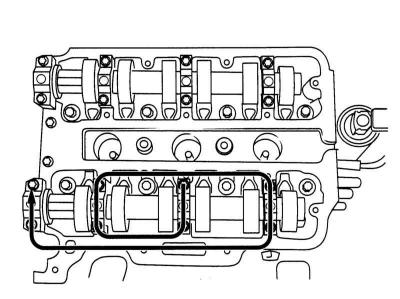
Tightening Procedure for Camshaft Bearing Caps


This article is available at russian, bulgarian, belarusian, ukrainian, serbian, croatian, romanian, polish, slovak, hungarian
Checking the article: Trifonova Emilia

Share information:

Previous articles
Opel Corsa B: DOHC gasoline engines
Next articles

Removal and installation of gear wheels of crankshaft and camshafts and intermediate rollers (engines 1.4 and 1.6 l)
Removal and installation the timing belt (1.4 and 1.6 l engines)
Removal and installation the timing cover
Bringing the piston of the first cylinder to the position of the top dead center of the compression stroke (TDC)
Removal and installation the cylinder head
Removal and installation the oil pan
Removal, maintenance and installation of the oil pump
Replacing camshaft seals
Removal, checking condition and installing flywheel/drive disk
Replacing crankshaft seals


See similar ones from other Opel car manuals:
▶ Removal and installation of camshafts and valve lifters,… Opel Astra H (2004-2009)
▶ Replacing camshafts Opel Insignia A (2008-2017)
▶ Camshafts and hydraulic tappets — removal, inspection and… Opel Omega B2 (1999-2003)
▶ Camshafts, repair dimensions for models C16NZ2, 1.8 and 2.0… Opel Vectra A (1988-1995, petrol)
▶ Camshafts Opel Frontera B (1998-2004)
Link to this page in different formats

Visitor comments


No comments yet


How much will 21 + 11 =


Corsa C (2000-2006) 
  • General information
  • Introduction to guide
  • Troubleshooting
  • Vehicle device
  • User manual
  • Maintenance
  • Power unit
  • Engine repair
  • Cooling system
  • Power and exhaust system
  • Control system
  • Engine electrical equipment
  • Transmission
  • Clutch
  • Mechanical gearbox
  • Automatic gearbox
  • Drive shafts
  • Chassis
  • Brake system
  • Wheel suspension
  • Steering
  • Body
  • Exterior
  • Interior
  • Doors and windows
  • Heating and air conditioning
  • Electrical equipment
  • Equipment and devices
  • Lamps and lighting
  • Electrical circuits
Corsa C (2000-2006, petrol) 
  • User manual
  • Car access
  • Governing bodies
  • Seat control
  • Heating and air conditioning
  • Driving and maintenance
  • Engines 1.0 and 1.2 l
  • Engine repair
  • Cooling and lubrication system
  • Injection system
  • Engines 1.4, 1.6 and 1.8 l
  • Engine repair
  • Cooling and lubrication system
  • Injection system
  • Transmission
  • Clutch
  • Mechanical gearbox
  • Automatic gearbox
  • Drive shafts
  • Chassis
  • Wheels and tires
  • Wheel suspension
  • Steering
  • Brake system
  • Body
  • Exterior
  • Doors and windows
  • Electrical equipment
  • Equipment and devices
  • Lighting system
  • Electrical circuits
Corsa B (1993-2000) 
  • General information
  • Introduction to guide
  • User manual
  • Maintenance
  • Power unit
  • SOHC gasoline engines
  • DOHC gasoline engines
  • Diesel engines
  • Engine repair
  • Cooling system
  • Supply system
  • Injection system (gasoline)
  • Injection system (diesel)
  • Exhaust systems
  • Control system (gasoline)
  • Preheat system (diesel)
  • Charge and launch system
  • Transmission
  • Mechanical gearbox
  • Automatic gearbox
  • Clutch and drive shafts
  • Chassis
  • Brake system
  • Front suspension
  • Rear suspension
  • Steering
  • Body
  • Ventilation and heating
  • Exterior
  • Interior
  • Doors and windows
  • Electrical equipment
  • Equipment and devices
  • Lamps and lighting
  • Electrical circuits
OpelBook.ru © 2017–2026 · Mobile version · · Sitemap: EN BG BY UA RS HR RO PL SK HU · Feedback · Site search
Astra F, petrol · Astra G, petrol · Astra G · Astra H · Astra J, petrol · Corsa B · Corsa C, petrol · Corsa C · Insignia A · Kadett D · Kadett E · Omega A · Omega B · Omega B2 · Vectra A, petrol · Vectra A · Vectra B, petrol · Vectra B · Vectra C · Zafira A, petrol · Frontera A, petrol · Frontera B · Ascona C · Vivaro A ·
We want your visit to be comfortable 🤝! We use cookies 🍪 to make that happen.