
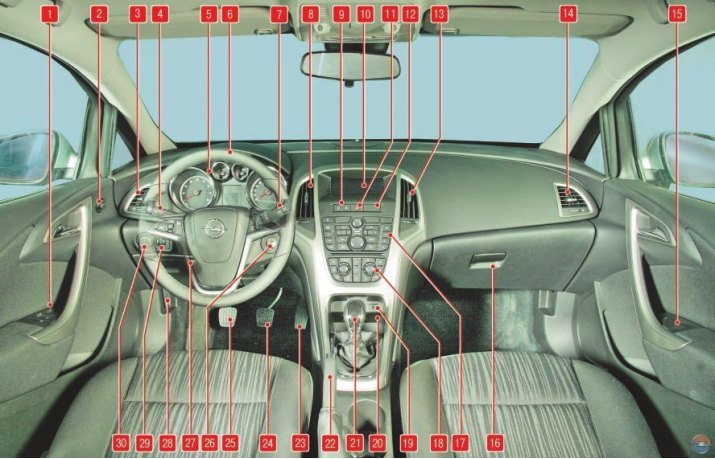
Pic. 1. Instrument panel and controls
The instrument panel contains the following controls and gauges (see fig. 1).
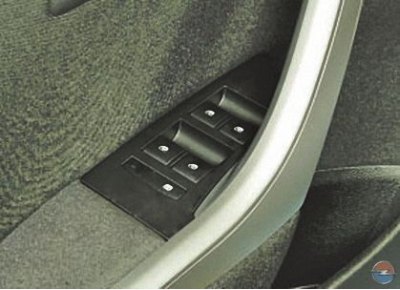
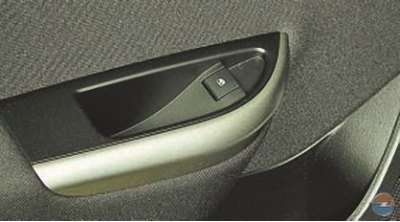
1 – the block of switches of management of electrowindow regulators of doors (see Power windows).
2 - joystick control exterior mirrors (see Rear view mirrors).
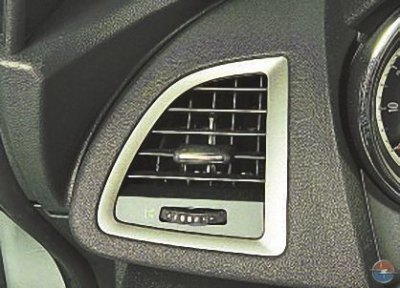
3, 14 - side nozzles of the ventilation and interior heating system. Nozzles regulate the direction and intensity of air flows, see Fig. Heating (conditioning) and ventilation.
4 - lever switch for outdoor lighting and direction indicators. When the switch lever is moved to position I, the right turn indicators turn on (fixed position), in position II - left turn indicators are switched on (fixed position).
When the lever is moved to position I or II, the control lamp in the instrument cluster lights up with a flashing light, respectively 25 or 38 (see fig. 2). When the steering wheel is returned to the straight-ahead position, the lever automatically returns to its original position. When changing lanes, to turn on the direction indicator, it is enough to press the lever in the direction of position I or II only until a moment of tangible resistance, without fixing the lever, and release it - the direction indicators will flash three times in this case.
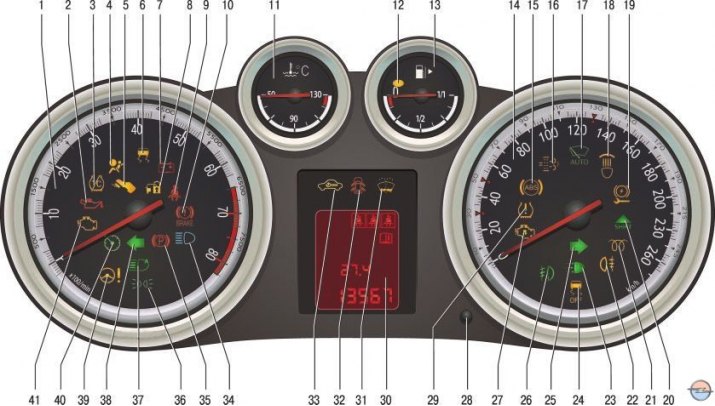
Pic. 2. Instrument cluster
To turn on the high beam headlights (outdoor lighting switch handle in control unit 30, see fig. 1 must be in position «
Note. When the main beam is switched on, the control lamp 34 lights up in the instrument cluster (see fig. 2).
To signal high beam headlights, move the switch lever to the steering wheel to the unlocked position (outdoor lighting switch handle in control unit 30, see fig. 1 must be in position «
Note. When the main beam is switched on, the control lamp 34 also lights up in the instrument cluster (see fig. 2).
On request, a function can be introduced «illumination of the road to the house». If, with the ignition off and the driver's door open, move the switch lever one position to the steering wheel and release it, the headlights off delay function is activated: the dipped headlights and the reversing lights will turn on, which will turn off 30 minutes after the last door is closed. To turn off the headlights, move the switch lever one position toward the steering wheel again and release.
Note. If the switch (lock) ignition is in position «0» or «I», when the exterior lighting is on, an audible signal will sound when the driver's door is opened (buzzer), to remind you to turn off the lights.
On request, the parking light function can be introduced. When parking the car, you can turn on the front and rear marker lights on one side of the car, for which, with the ignition off and the handle of the outdoor lighting switch in the control unit 30 (see fig. 1), set to position «0», turn the exterior light and turn signal switch lever in the desired direction. At the same time, the buzzer will turn on and control lamps 25 and 38 will light up simultaneously (see fig. 2) in the instrument cluster.
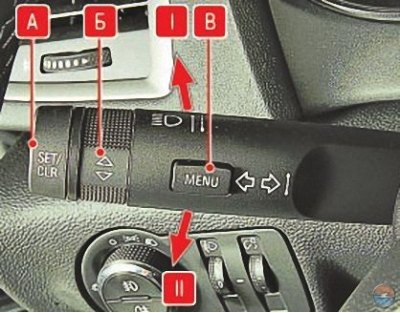
On the lever of the switch of external lighting and direction indicators controls are installed A, B and IN on-board computer (see On-board computer).
5 - a combination of devices (see instrument cluster).
6 - steering wheel.
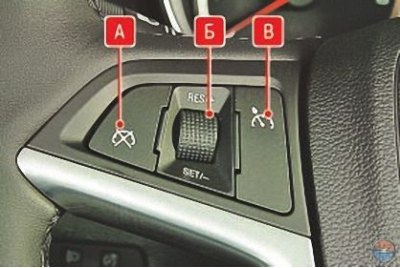
The cruise control switch box is located in the left spoke of the steering wheel. To turn on the cruise control mode, press the bottom of the button IN – indicator lamp 40 lights up in the instrument cluster (see rice. 2) white. Pick up the desired speed and turn the regulator knob B in any direction. The current vehicle speed will be stored in the vehicle memory and will be maintained, and the control lamp 40 will light up in the instrument cluster (see rice. 2) Green colour.
To increase speed while in cruise control, turn and hold the speed control knob B in the direction of the inscription «RES/+», in which case the speed will increase continuously or in small increments. You can also increase the speed with the accelerator pedal and fix the selected value by turning the control knob once in the direction «RES/+». To decrease speed, turn and hold the speed control knob B in the direction of the inscription «RES/–», then the speed will increase continuously or in small increments.
To disable cruise control, press the top edge of the switch button IN. At the same time, the control lamp in the instrument cluster will go out.
Note. Cruise control is automatically deactivated under the following conditions:
- when the vehicle speed drops to less than 30 km/h;
- when pressing the brake pedal;
- when pressing the clutch pedal;
- when the automatic transmission control selector lever is moved to the position «N»;
- when the traction control or dynamic stabilization systems are activated.
To resume movement at the set speed, turn the switch knob B in the direction «RES/+», the memorized speed will be reached. To delete the stored speed value from the memory, press the switch key A.
Note. The stored speed setpoint is automatically deleted when the ignition is switched off.
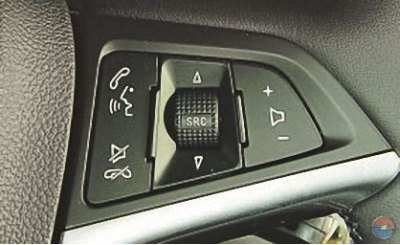
The radio control unit is installed in the right spoke of the steering wheel.

When you press the center pad of the steering wheel hub, the horn sounds. The driver's airbag is mounted in the steering wheel hub.
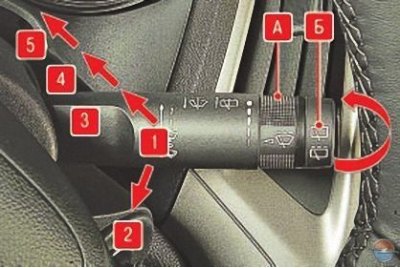
7 - the lever of the switch of a screen wiper and washer of a wind window and a window of a door of a back turns on electrical circuits when the ignition is on and can occupy the following positions:
- 1. wiper off;
- 2. the wiper blades will complete one cycle;
- 3. Intermittent wiper operation is on. To adjust the delay time between cycles (if this option is set) turn the handle in the desired direction A;
Note. Depending on the equipment, the intermittent wiper can be replaced with an automatic wiper. In this case, handle A changes the sensitivity of the rain sensor.
- 4. included first (low) wiper speed;
- 5. second included (high) wiper speed.
When moving the lever towards the steering wheel (non-fixed position) the windshield wiper and washer are switched on. When the lever is held in this position, the wiper and washer will operate for the entire time the lever is held.
Attention! Do not operate the windshield washer for more than 10 seconds or when there is no fluid in the washer reservoir, as this will damage the washer pump.
Do not operate the wiper when the glass is dry, as this will scratch the glass and prematurely wear the wiper blades.
When moving the lever away from the steering wheel (non-fixed position) the tailgate glass cleaner and washer are switched on. When the lever is held in this position, the tailgate wiper and washer will operate as long as the lever is held.
Note. The tailgate window wiper will turn on automatically (depends on configuration) when reverse gear is engaged with the wiper lever in position 3 or 4.
Turning around the axis of the handle B clockwise turn on the tailgate window wiper in continuous mode, counterclockwise - in intermittent mode.
8, 13 - central nozzles of the ventilation and interior heating system. The nozzle control algorithm is the same as for side nozzles 3 and 14, see Fig. Heating (conditioning) and ventilation.
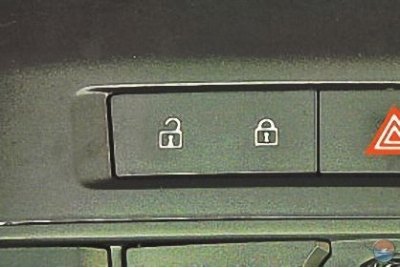
9 - central lock control switch. When you press the right edge of the key, the locks of all doors are blocked, and when you press the left edge, they are unlocked.
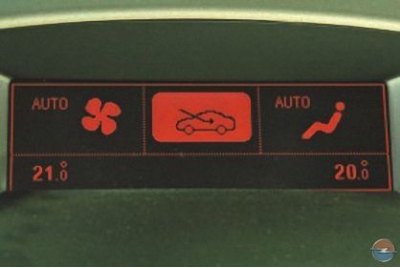
10 - display of the control unit for the audio system and the heating system (conditioning) and interior ventilation, cm. Heating (conditioning) and ventilation.
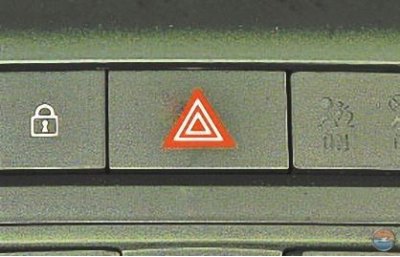
11 - alarm switch. When the switch button is pressed, all direction indicators and the corresponding control lamps installed in the instrument cluster, as well as the backlight of the button, light up with a flashing light. Pressing the key again turns off the alarm.
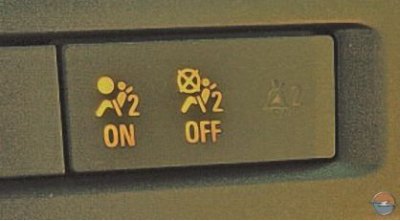
12 - a block of control lamps for deactivating the front passenger airbag and a signal lamp for the front passenger's unfastened seat belt (if a display system is installed). When the front passenger airbag switch is set to «ON» or «OFF» (see Use of child seats) the corresponding control lamp lights up. If, after switching on the ignition, it turns out that the passenger in the front seat is not wearing a belt, the warning lamp will also light up.
15 – the switch of management of an electrowindow regulator of a door of the forward passenger (see Power windows).
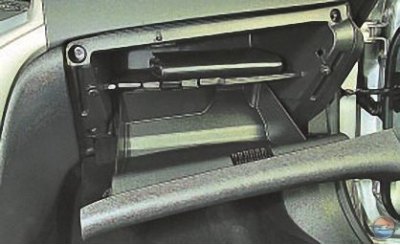
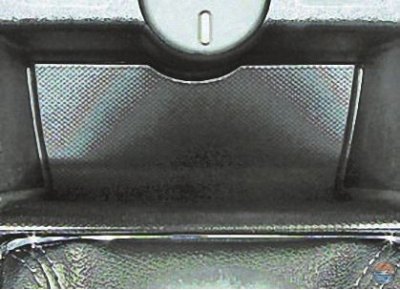
16 - glove box. Serves for storing small items and opens when the lock handle is turned up.
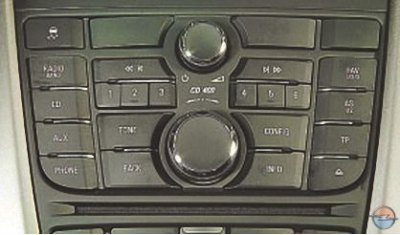
17 - audio system.

18 - heating system control unit (conditioning) and interior ventilation, cm. Heating (conditioning) and ventilation.
19 - USB port block and sockets for connecting additional electrical consumers (see Storage compartments and electrical outlet).
Note. On request, instead of a socket for connecting additional electrical consumers, a cigarette lighter can be installed.
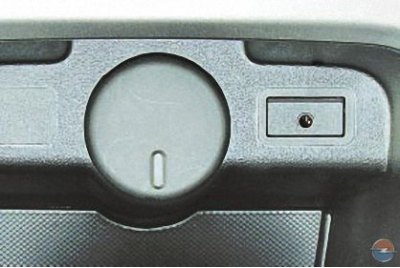
20 - a niche for small items.
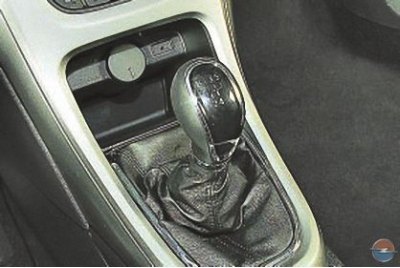
21 - gearbox control lever (see Gearbox control).
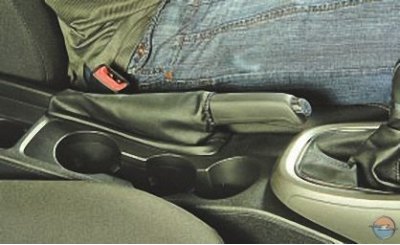
22 - parking brake lever.
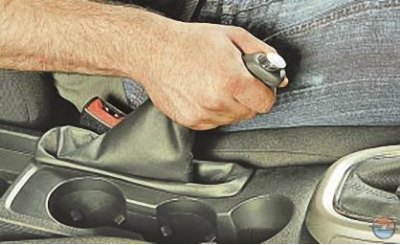
In order to brake the vehicle with the parking brake, lift the lever all the way up - the signal lamp 10 in the instrument cluster will light up red (see fig. 2).
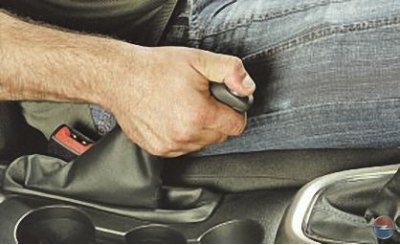
To brake the car, pull the lever up a little, press the button at the end of the lever handle...
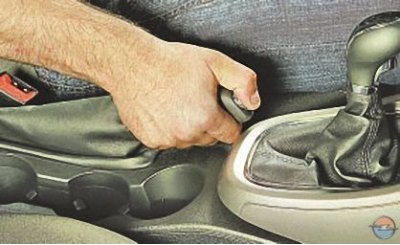
... and lower the lever all the way down - the control lamp should go out.
23 - accelerator pedal.
24 - brake pedal.
25 - clutch pedal. Not available on vehicles with automatic transmission.

26 - switch (lock) ignition. Combined with anti-theft device and immobilizer receiving antenna, located on the right side of the steering column. The key in the lock can occupy one of four positions:
Note. On the switch body (castle) ignition, there is no indication of the position of the key. The marking of key positions given below is conditional.
- 0 (blocking) – the ignition is off, with the key removed, the anti-theft device is turned on. To ensure that the steering shaft is locked, turn the steering wheel to the right or left until it clicks. To turn off the anti-theft device, insert the key into the ignition switch and, turning the steering wheel slightly to the right and left, turn to the position «I»;
Attention! Do not turn off the ignition or remove the key from the lock while driving: the steering will be locked and the car will become uncontrollable.
- I (optional equipment) – the ignition is off, the key cannot be removed, the steering is unlocked. The power supply circuits for the sound signal, outdoor lighting, high-beam headlights, radio equipment, cigarette lighter, etc. are turned on;
- II (included) – the ignition is on, the key cannot be removed, the steering is unlocked. Ignition, instruments and all electrical circuits are on;
- III (starter) – the ignition and starter are on, the key cannot be removed, the steering is unlocked. This position of the key is not fixed; when released, the key returns to the position under the action of the spring force «II».
Note. The car is equipped with an automatic start system, so it is not necessary to hold the key in position III during starting. It is enough to briefly move the key to this position and release it. The system will operate automatically until the engine starts. Since a diagnostic procedure is performed at start-up, the engine starts after a short delay.
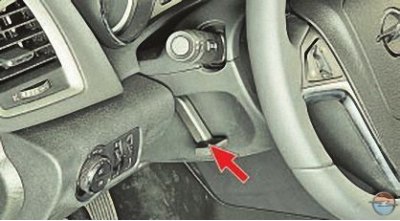
27 - steering column position lock lever (see Steering wheel adjustment).
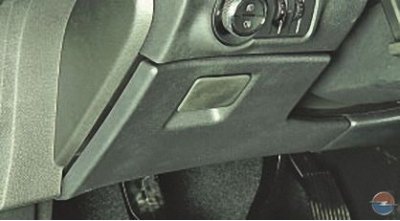
28 - hood lock drive handle (see Hood).
29 - box for small items (see Storage compartments and electrical outlet).
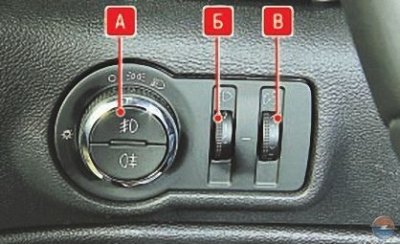
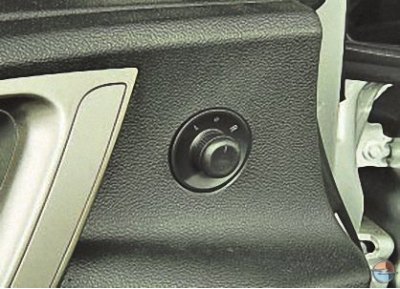
30 - control unit for outdoor lighting, headlight range control and illumination of the instrument cluster, steering wheel controls, information display and infotainment system controls.
Turning the switch handle A outdoor lighting include parking lights, low beam or high beam.
The handle can be moved to the following positions:
0 - everything is off;
Note. Depending on the configuration, the vehicle can be equipped with an automatic control system for outdoor lighting. In this case, an additional position is provided for the outdoor lighting switch handle «AUTO», in which the headlights are controlled automatically depending on the degree of external illumination.
In the center of the switch handle A there are control buttons for fog lights and rear fog lights. By pressing the bottom button turn on the light in the rear fog lights. Pressing the button again turns off the fog lights. Fog lights are turned on and off in the same way by pressing the top button.
Turning the regulator knob B depending on the load of the car, the angle of inclination of the headlight beam is changed in such a way as to exclude blinding of drivers of oncoming vehicles. The combination of the number on the regulator knob and the mark on the block body provides the appropriate headlight position adjustment for the following vehicle loading options:
- 0 - one driver or driver and passenger in the front seat;
- 1 - all seats are occupied;
- 2 - all seats are occupied and cargo is in the trunk;
- 3 - one driver and cargo in the trunk.
To increase the brightness of the backlight, turn the control knob B up and hold it in this position until the desired brightness is reached (backlight brightness changes automatically). Similarly, reduce the brightness of the backlight by turning the control knob down.
Visitor comments