


To avoid the car pulling to one side during braking, the brake pads must be replaced simultaneously on both front/rear brake mechanisms. Remember that the dust generated during operation of the brake mechanisms may contain asbestos, which is extremely harmful to human health. Never blow off dust with compressed air or inhale it - wear a protective mask or respirator when servicing the mechanisms. Never use gasoline or petroleum-based solvents to wipe the brake system components - use only branded cleaning agents or methyl alcohol!
1. Support the front wheels with wheel chocks, jack up the rear of the car and place it on supports. Remove both rear wheels.
2. Release the parking brake completely and loosen the drive cable by loosening the adjusting nut.
3. Use a screwdriver to press the actuator lever on the rear wheel brake caliper and disconnect the cable end from it, release the lock and release the cable from the support bracket.
4. Remove the lower caliper mounting bolt, holding the guide pin from turning with a brace. Remove the brace.
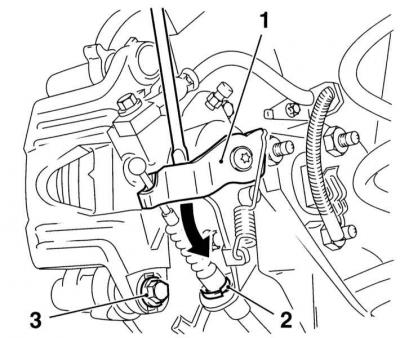
1 — Executive lever
2 — Cable fastening clamp in the support bracket
3 — Lower caliper mounting bolt
5. Rotate the caliper upwards on the upper guide axle and remove the pads.
A - Removing the outer shoe
B - Removing the inner shoe
A.
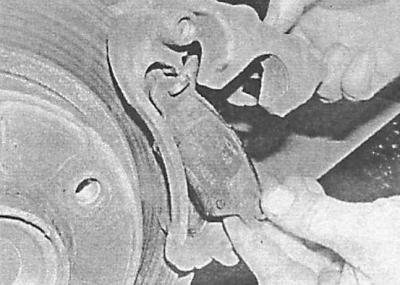
B.
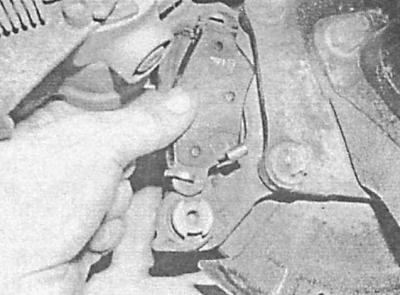
6. Sweep away any dust that has accumulated on the surfaces of the brake components (see warning at the beginning). Wipe the caliper and piston end surface with a clean rag. Remove rust from the edge of the brake disc.
7. Measure the thickness of each pad, not including the metal backing. If any pad is damaged or worn beyond the allowable limit (see Specifications), replace the entire set of pads, both front wheels. Oily pads must be replaced without fail - first eliminate the cause of the leak.
8. If the brake pads are found to be in good condition, thoroughly clean them from dirt with a soft wire brush, paying particular attention to the back and sides. Clean the grooves in the friction linings, completely removing foreign inclusions from them. Clean the pad seats in the caliper and anchor bracket.
9. The guide pins should move freely in the caliper bushings. Lubricate the backs of the pads with copper grease. Check the condition of the dust cover installed on the piston, inspect the piston for signs of developing brake fluid leaks, traces of corrosion and mechanical damage. If necessary, carry out the necessary restorative repairs (see Removal, repair and installation of front wheel disc brake calipers). Replace defective components.
10. When installing new pads, the piston must be sunk into the caliper cylinder to release it for installing thicker new pads - the cutout on the piston must be aligned with the protrusion on the brake caliper. The piston is pressed back using a special device (1), although a clamp of a suitable size or a wooden lever will work no less effectively. If the brake master cylinder reservoir is not filled to the top, pressing the piston should not lead to the brake fluid leaking out of it, however, it would be reasonable to check its level beforehand - if necessary, pump out the excess.
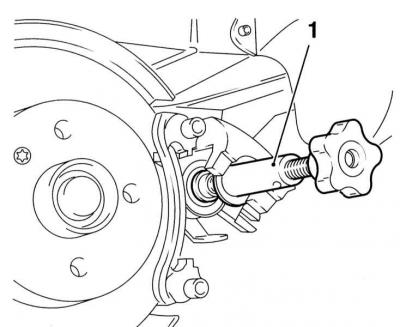
Pressing the piston is associated with the risk of damaging the sealing cuff. The authors of this Manual recommend pinching the brake hose with a clamp and bleeding the fluid through the bleed nipple, having first released it by half a turn.
11. By turning the piston, align the cutout in its end surface with the protrusion on the caliper.
12. Turn the caliper upwards, install new pads in the anchor bracket with the friction linings facing the disc. The acoustic wear indicator spring (1) is installed on the inner pad.
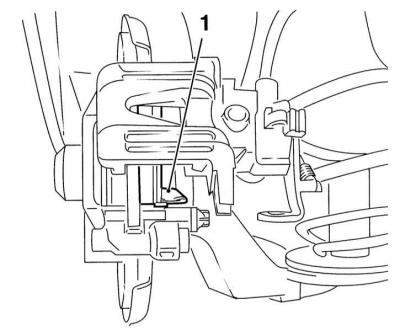
13. Lower the caliper onto the pads. Clean the threads of the lower bolt with a wire brush or "run" them with a die. Lightly lubricate the threaded portion of the bolt with locking sealant, then screw the bolt in and tighten it to the required torque, holding the guide pin from turning with an open-end wrench.
14. Place the handbrake drive cable into the caliper bracket and secure it with a brace.
15. Press the actuator lever and connect the cable end to it.
16. Press the foot brake pedal several times until you feel a "firm" sensation in its movement.
17. Proceed in a similar manner to replace the brake pads of the opposite wheel.
18. Adjust the parking brake drive cable (see Adjusting the parking brake drive).
19. Install the wheels, lower the vehicle to the ground and tighten the wheel bolts to the required torque.
20. Check the brake fluid level and make the appropriate adjustments if necessary (see Chapter Routine maintenance).
Visitor comments