OpelBook.ru
Cars AvtoVAZ Cars Mitsubishi Cars BMW Cars Mercedes Cars Nissan Cars Toyota Cars Chevrolet
English Русский
Български
Беларускі
Український
Српски
Hrvatski
Română
Polski
Slovenský
Magyar
 |  Sitemap  |  Contacts  |    


Main Astra Corsa Insignia Kadett Omega Vectra Zafira Others Articles
Astra F (1991-1998, petrol) Astra G (1998-2004, petrol) Astra G (1998-2004) Astra H (2004-2009) Astra J (2009-2015, petrol)
  • Main
  • Astra
  • Astra G
  • Chassis
  • Brake system
  • Replacing the front disc brake pads

Replacing the front disc brake pads (Opel Astra G)

            0

To avoid the car pulling to one side during braking, the brake pads must be replaced simultaneously on both front/rear brake mechanisms. Remember that the dust generated during operation of the brake mechanisms may contain asbestos, which is extremely harmful to human health. Never blow off dust with compressed air or inhale it - wear a protective mask or respirator when servicing the mechanisms. Never use gasoline or petroleum-based solvents to wipe the brake system components - use only branded cleaning agents or methyl alcohol!


1. Set the parking brake, jack up the front of the car and place it on supports. Remove the front wheels.

2. Using a small slotted screwdriver, remove the brake pad wear sensor (1) from the hole in the caliper and move it to the side.
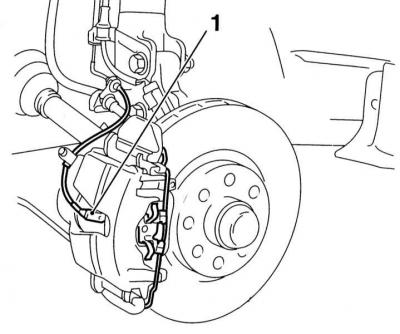
2. Using a small slotted screwdriver, remove the brake pad wear sensor (1) from the hole in the…


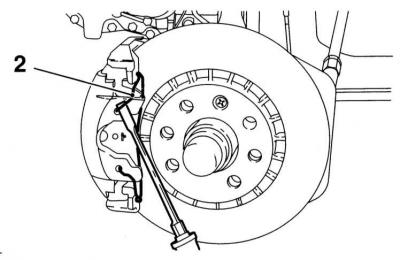
3. Remove the large spring clip from the caliper - be careful to avoid the spring jumping off, cover it with a rag before prying it up with a screwdriver.

A - Removing the retaining spring from the front brake caliper on Astra models

B — Removing the retaining spring from the front brake caliper on Zafira models

A.
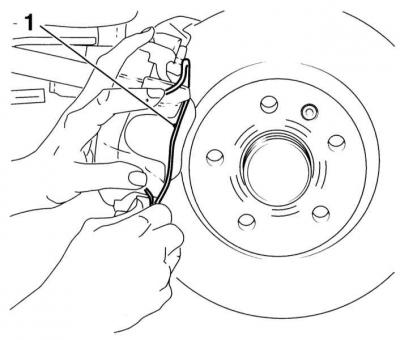
B — Removing the retaining spring from the front brake caliper on Zafira models


B.
B — Removing the retaining spring from the front brake caliper on Zafira models


4. Remove the dust caps from the caliper guide pin holes.
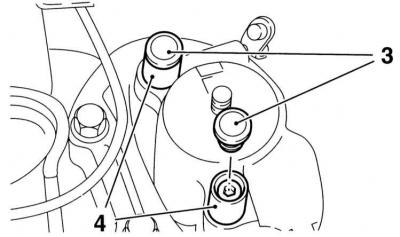


4. Remove the dust caps from the caliper guide pin holes.


5. Unscrew the guide bolts and remove the caliper with pads from the anchor bracket or hub carriage (depending on the method of execution). Tie the caliper to the stand with a piece of wire - do not leave it hanging by the hose.

6. Remove the outer pad from the caliper, then remove the inner pad, which is held in place by a metal spring attached to its base.
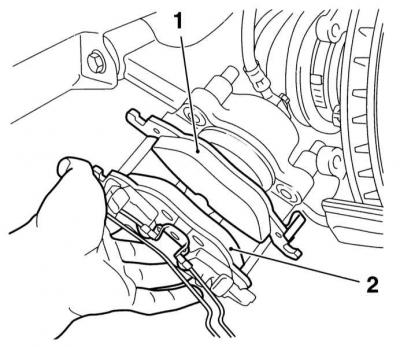
1 - Inner shoe

1 - Inner shoe

2 - Outer shoe


7. Sweep away any dust that has accumulated on the surfaces of the brake components (see warning at the beginning). Wipe the caliper and piston end surface with a clean rag. Remove rust from the edge of the brake disc.

8. Measure the thickness of each pad, not including the metal backing. If any pad is damaged or worn beyond the allowable limit (see Specifications), replace the entire set of pads, both front wheels. Oily pads must be replaced without fail - first eliminate the cause of the leak. When the pad wear indicator comes into contact with the disc (the control lamp on the instrument panel comes on), it should also be replaced.


9. If the brake pads are found to be in good condition, thoroughly clean them from dirt with a soft wire brush, paying particular attention to the back and sides. Clean the grooves in the friction linings, completely removing foreign inclusions from them. Clean the pad seats in the caliper and anchor bracket.

10. The guide pins should slide easily in the caliper bushings. Lubricate the backs of the pads with copper grease. Check the condition of the dust cover installed on the piston, inspect the piston for signs of developing brake fluid leaks, traces of corrosion and mechanical damage. If necessary, carry out the necessary restorative repairs (see Removal, repair and installation of front wheel disc brake calipers). Replace defective components.

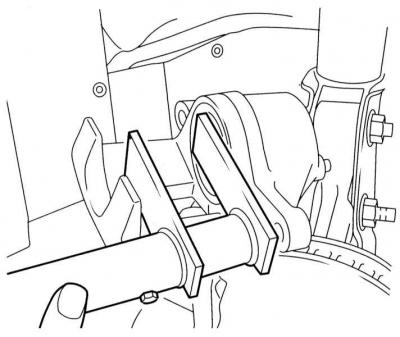
11. When installing new pads, the piston must be pressed into the caliper cylinder to free it up for installing thicker new pads. The piston is pressed back using a special Vauxhall device, although a suitable sized clamp or wooden lever will work just as effectively. If the brake master cylinder reservoir is not filled to the top, pressing the piston back should not cause brake fluid to leak out, however, it would be wise to check its level first - pump out the excess if necessary.

A — Special tool for pressing the brake caliper piston

B - Pressing the piston with a clamp

A.
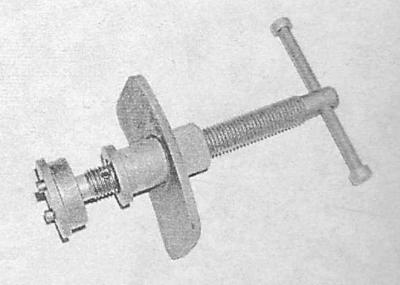
B - Pressing the piston with a clamp


B.
B - Pressing the piston with a clamp


Pressing the piston is associated with the risk of damaging the sealing cuff! The authors of this Manual recommend pinching the brake hose with a clamp and bleeding the fluid through the bleed nipple, having first released it by half a turn.


12. Insert the inner brake shoe into the caliper, placing its spring into the recess in the end surface of the piston.
12. Insert the inner brake shoe into the caliper, placing its spring into the recess in the end…


The inner and outer pads differ in design - pay attention to the arrow marking on the base of the pad - the arrow should point in the direction of rotation of the disc when the car is moving forward.


13. Install the outer pad on the caliper, with the friction lining facing the disc. The pad is equipped with an acoustic signal spring (1) that warns the driver about pad wear.
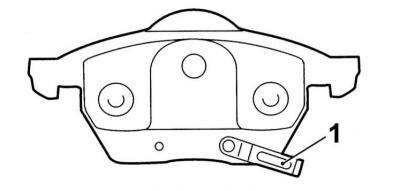
13. Install the outer pad on the caliper, with the friction lining facing the disc. The pad is…


14. Install the floating bracket with the inner shoe over the outer shoe and place it on the bracket.

15. Screw in the guide bushing bolts and tighten them to the required torque.

16. Install the anthers.

17. Install the caliper spring by inserting its ends into the holes in the bracket.


There are two types of springs used - one is connected to the caliper, the other to the mounts on the outer shoe. If you are installing the latter type of spring, first connect it to the shoe, then put it behind the lugs on the caliper.


18. Install the brake pad wear sensor.

19. Press the foot brake pedal several times until you feel a firm movement.

20. Proceed in a similar manner to replace the brake pads of the opposite wheel.

21. Install the wheels, lower the vehicle to the ground and tighten the wheel bolts to the required torque.

22. Check the brake fluid level and make the appropriate adjustments if necessary (see Chapter Routine maintenance).


This article is available at russian, bulgarian, belarusian, ukrainian, serbian, croatian, romanian, polish, slovak, hungarian
Checking the article: Pavlovsky Nikolay

Share information:

Previous articles
Opel Astra G: Brake system
Next articles

Checking the condition and replacing brake lines and hoses
Bleeding the brake system
Anti-lock Brake System (ABS) and Traction Control System (TCS) — General Information and Error Codes
Brake system specifications
General information about the brake system
Replacing the rear wheel disc brake pads
Replacing the shoes of the rear wheel drum brake mechanisms
Checking the condition, removing and installing the brake disc
Removal, inspection and installation of the brake drum
Removal, repair and installation of front wheel disc brake calipers
Removal, repair and installation of rear wheel disc brake calipers


See similar ones from other Opel car manuals:
▶ Replacing the front disc brake pads Opel Corsa B (1993-2000)
▶ Replacing the front disc brake pads Opel Vectra C (2002-2008)
▶ Replacing the front brake pads Opel Insignia A (2008-2017)
▶ Replacing the brake pads of the rear disc brake mechanisms Opel Kadett E (1984-1995)
▶ Replacing the front brake pads Opel Frontera A (1991-1998, petrol)
Link to this page in different formats

Visitor comments


No comments yet


How much will 49 + 14 =


Astra J (2009-2015, petrol) 
  • General information
  • Vehicle device
  • User manual
  • Faults en route
  • Maintenance
  • Power unit
  • Engine repair
  • Cooling and lubrication system
  • Engine power system
  • Exhaust system
  • Transmission
  • Clutch
  • Car gearbox
  • Drive shafts
  • Chassis
  • Front suspension
  • Rear suspension
  • Steering
  • Brake system
  • Wheels and tires
  • Body
  • Exterior
  • Interior
  • Doors and windows
  • Body Care
  • Heating and air conditioning
  • Security systems
  • Electrical equipment
  • Equipment and devices
  • Lighting and signaling
  • Power devices
  • Electrical circuits
Astra H (2004-2009) 
  • General information
  • Introduction to the guide
  • Troubleshooting
  • User manual
  • Maintenance
  • Power unit
  • Engine repair
  • Cooling and heating
  • Power and exhaust system
  • Ignition system
  • Launch and charge system
  • Transmission
  • Mechanical gearbox
  • Automatic gearbox
  • Drive shafts
  • Chassis
  • Brake system
  • Car suspension
  • Steering
  • Body
  • Interior
  • Exterior
  • Electrical equipment
  • Equipment and devices
  • Electrical circuits
Astra G (1998-2004) 
  • General information
  • Introduction to manual
  • User manual
  • Maintenance
  • Power unit
  • SOHC gasoline engines
  • DOHC gasoline engines
  • Diesel engines 1.7 and 2.0
  • Engine repair
  • Cooling system
  • Supply system
  • Injection system (gasoline)
  • Injection system (diesel)
  • Exhaust system
  • Charge and launch system
  • Ignition system (gasoline)
  • Preheat system (diesel)
  • Transmission
  • Manual gearbox
  • Automatic gearbox
  • Clutch
  • Drive shafts
  • Chassis
  • Brake system
  • Wheel suspension
  • Steering
  • Body
  • Exterior
  • Interior
  • Doors and windows
  • Ventilation and heating
  • Electrical equipment
  • Equipment and devices
  • Electrical circuits
Astra G (1998-2004, petrol) 
  • General information
  • User manual
  • Car care
  • Maintenance
  • Power unit
  • Single shaft engines
  • Twin shaft engines
  • Engine repair
  • Cooling and heating
  • Fuel and exhaust systems
  • Starting and charging system
  • Ignition system
  • Transmission
  • Clutch
  • Mechanical gearbox
  • Automatic gearbox
  • Drive shafts
  • Chassis
  • Brake system
  • Car suspension
  • Steering
  • Body
  • Interior
  • Exterior
  • Electrical equipment
  • Equipment and devices
  • Wiring diagrams Opel Astra
  • Wiring diagrams Opel Zafira
Astra F (1991-1998, petrol) 
  • General information
  • Maintenance
  • Power unit
  • Engine in car
  • Engine removed
  • Cooling system
  • Heating and ventilation
  • Fuel supply (carburetor)
  • Fuel supply (injector)
  • Emission control
  • Ignition system
  • Transmission
  • Clutch
  • Mechanical gearbox
  • Automatic gearbox
  • Drive shafts
  • Chassis
  • Brake system
  • Car suspension
  • Steering
  • Body
  • Exterior
  • Interior
  • Electrical equipment
  • Equipment and devices
  • Electrical circuits
OpelBook.ru © 2017–2026 · Mobile version · · Sitemap: EN BG BY UA RS HR RO PL SK HU · Feedback · Site search
Astra F, petrol · Astra G, petrol · Astra G · Astra H · Astra J, petrol · Corsa B · Corsa C, petrol · Corsa C · Insignia A · Kadett D · Kadett E · Omega A · Omega B · Omega B2 · Vectra A, petrol · Vectra A · Vectra B, petrol · Vectra B · Vectra C · Zafira A, petrol · Frontera A, petrol · Frontera B · Ascona C · Vivaro A ·
We want your visit to be comfortable 🤝! We use cookies 🍪 to make that happen.