
OpelBook.ru
Cars AvtoVAZ Cars Mitsubishi Cars BMW Cars Mercedes Cars Nissan Cars Toyota Cars Chevrolet
English Русский
Български
Беларускі
Український
Српски
Hrvatski
Română
Polski
Slovenský
Magyar
 |  Sitemap  |  Contacts  |    


Main Astra Corsa Insignia Kadett Omega Vectra Zafira Others Articles
Vectra A (1988-1995, petrol) Vectra A (1988-1995) Vectra B (1995-2002, petrol) Vectra B (1995-2002) Vectra C (2002-2008)
  • Main
  • Vectra
  • Vectra C
  • Transmission
  • Car gearbox
  • Adjusting the gear shift drive (manual transmission)

Adjusting the gear shift drive (manual transmission) (Opel Vectra C)

            0

Contents: All models ⬇ Manual transmission F17/F17+ and F40 ⬇ Manual transmission F23 ⬇ Manual transmission F35 ⬇

All models


1. On all manual transmissions described in this Manual, the gear shift drive is carried out by means of cables.

2. The general principle of adjustment is to set the gearshift lever in the car interior and the gearshift mechanism on the gearbox to neutral with the drive removed, after which the drive is installed - the positions of the lever and the mechanism are synchronized. The operations for all transmission models are almost identical and differ only in the way the lever and mechanism are fixed - they are given separately for each manual transmission.

3. Adjustment of the gearshift drive is not a routine procedure for current vehicle maintenance and is only necessary after removing the gearshift mechanism. If gearshift clarity is impaired, the drive can be checked for proper operation and, if necessary, appropriate adjustments can be made.

4. On the central console in the car interior, using a plastic wedge, release the decorative frame of the niche from the clips first, and then the leather boot of the gearshift lever and turn the boot of the lever upwards. Remove the front ashtray tray.

5. Using a small screwdriver, gently pry up and release both drive cable latches (see accompanying illustration).

[Source is on this resource: www.opelbook.ru]
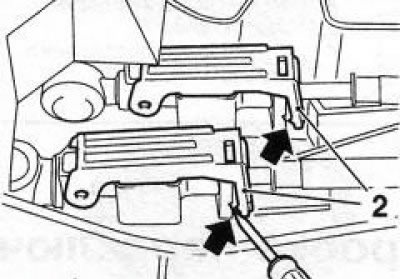
8.5 Releasing the gear shift cable clamps (on the example of F23)

8.5 Releasing the gear shift cable clamps (on the example of F23)


Caution: Be careful when pressing the clamps, excessive force may cause them to break!


Manual transmission F17/F17+ and F40


6. Pull the reverse gear lock latch up and squeeze the 2 locking tabs with pliers (see accompanying illustration) so that the spring-loaded locking block of the gearshift lever drops down. Using the stopper, secure the locking block (and accordingly the lever) in neutral position.
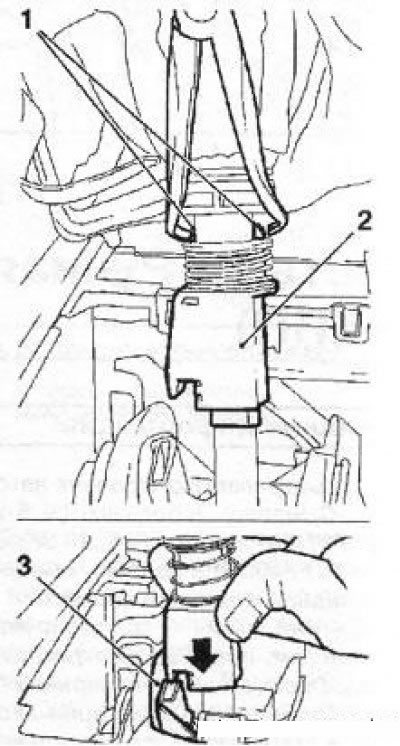
8.6 Setting the gear shift lever to neutral position: 1. Retainer tongues; 2. Locking block; 3.…

8.6 Setting the gear shift lever to neutral position: 1. Retainer tongues; 2. Locking block; 3. Stopper


7. Set the gearbox to neutral and lock the gearshift mechanism in this position. On the F17/F17+ gearbox, the spring-loaded gearshift mechanism axis must be pressed down to lock it (see illustration 8.7a) and fix it using the "M-527-A" device.
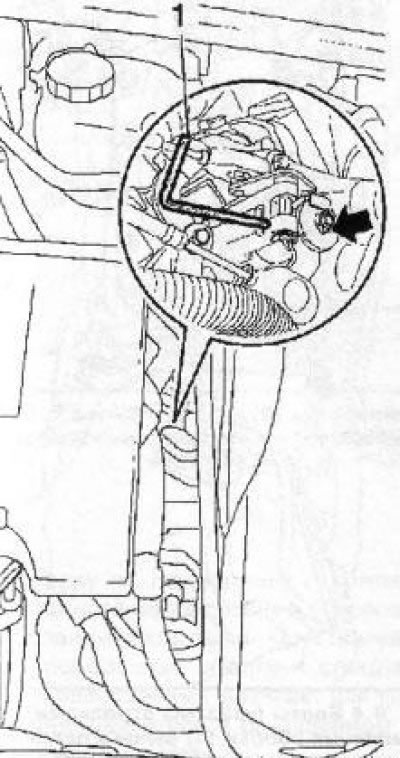
8.7a Press the gearshift mechanism shaft in the direction indicated by the arrow and fix it using…

8.7a Press the gearshift mechanism shaft in the direction indicated by the arrow and fix it using the KM-527-A (1) device (F17 manual transmission)


Note: The illustration shows the gear shift mechanism of earlier models (until approximately January 2003.). Fixation of the modified mechanism is carried out completely - illogically. In addition, the mechanisms are interchangeable.


For the F40 manual transmission, the same operations must be performed, with the only difference being that the device is installed in a slightly different way.

Note: On models equipped with the Y30DT engine, it is necessary to first remove the battery with the tray (see chapter 5).


Connect the drive cables to the lever and press down from above to snap the locks of both cables into place one after the other.
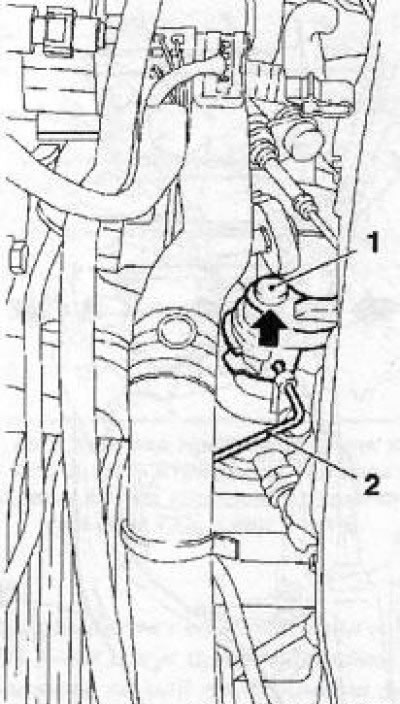
8.7b Press the axle (1) of the gear shift mechanism in the direction indicated by the arrow and…

8.7b Press the axle (1) of the gear shift mechanism in the direction indicated by the arrow and secure it using the KM-527-A tool (2) (F40 manual transmission)


9. Remove the fasteners and reinstall all removed components, then check the proper functioning of the shift mechanism.

Manual transmission F23


10. Set the gear shift mechanism on the manual transmission to the "neutral" position, make sure that no gear is engaged by shaking the mechanism lever (see accompanying illustration). Then move the gearshift lever inside the car to the neutral position and lock it with the lock.
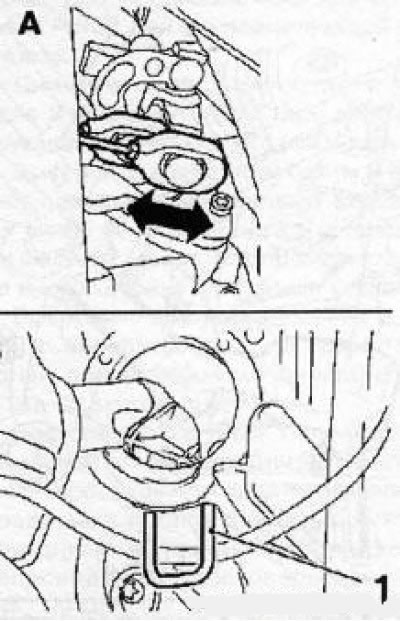


8.10 Setting the gearshift mechanism (A) and lever (B) (F23 manual transmission) to neutral…

8.10 Setting the gearshift mechanism (A) and lever (B) (F23 manual transmission) to neutral position: 1. Lever lock


11. Connect the drive cables, remove the clamps and reinstall all removed components, then check the proper functioning of the shift mechanism.

Manual transmission F35


12. Pull the reverse gear lock latch up and squeeze the 2 locking tabs with pliers (see accompanying illustration) so that the spring-loaded locking block of the gearshift lever drops down. Using the stopper, secure the locking block (and accordingly the lever) in the 4th gear engagement position.
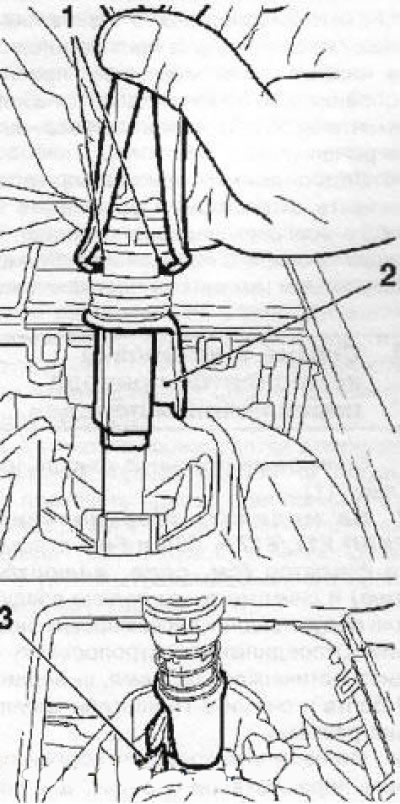
8.12 Setting the gearshift lever to neutral position (F35 manual transmission): 1. Locking tabs; 2.…

8.12 Setting the gearshift lever to neutral position (F35 manual transmission): 1. Locking tabs; 2. Locking block; 3. Stopper


13. Pressing the lever (see accompanying illustration) gear shift mechanism back, engage 4th gear in the manual transmission. Fix the mechanism in this position by installing the KM-6325 device on the lower lever of the mechanism and pressing it so that it "sits" deep enough on the lever.
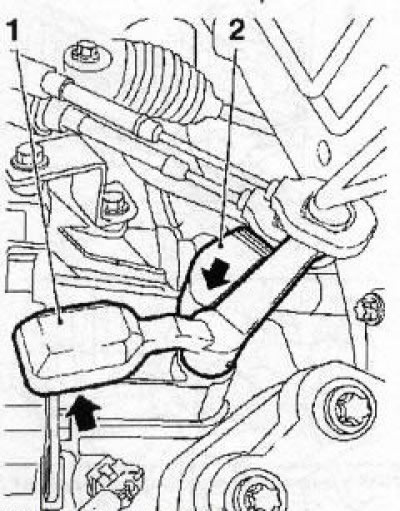
8.13 Engage 4th gear by pressing the gearshift lever (1) in the direction indicated by the arrow…

8.13 Engage 4th gear by pressing the gearshift lever (1) in the direction indicated by the arrow and install the KM-6325 device (2) (F35 manual transmission)


14. Connect the drive cables, remove the clamps and reinstall all removed components, then check the proper functioning of the shift mechanism.


This article is available at russian, bulgarian, belarusian, ukrainian, serbian, croatian, romanian, polish, slovak, hungarian
Checking the article: Meshcheryakov Damir

Share information:

Previous articles
Opel Vectra C: Car gearbox
Next articles

General description of a manual gearbox
Removal and installation of gear shift drive components (manual transmission)
Removal and installation of manual transmission
Automatic Transmission Specifications
General information about automatic transmission
Adjusting the selector lever position sensor and gear shift drive (automatic transmission)
Removal and installation of gear shift drive components (automatic transmission)


See similar ones from other Opel car manuals:
▶ Adjusting the gear shift drive Opel Astra H (2004-2009)
▶ Adjusting the gear shift drive Opel Corsa B (1993-2000)
▶ Adjusting the gear shift drive Opel Kadett E (1984-1995)
▶ Gear shift rod for manual transmission — adjustment Opel Omega A (1986-1993)
▶ Adjusting the gear shift cables Opel Insignia A (2008-2017)
Link to this page in different formats

Visitor comments


No comments yet


How much will 12 + 21 =


Vectra C (2002-2008) 
  • General information
  • User manual
  • Vehicle device
  • Maintenance
  • Troubleshooting
  • Power unit
  • Engine repair
  • Cooling system
  • Power and control system
  • Engine electrics
  • Transmission
  • Clutch
  • Car gearbox
  • Drive shafts
  • Chassis
  • Car suspension
  • Steering
  • Brake system
  • Body
  • Exterior
  • Interior
  • Doors, locks and windows
  • Heating and ventilation
  • Electrical equipment
  • Equipment and devices
  • Headlights and lighting
  • Electrical circuits
Vectra B (1995-2002) 
  • General information
  • User manual
  • Weekly checks
  • Maintenance (gasoline)
  • Maintenance (diesel)
  • Troubleshooting
  • Power unit
  • SOHC gasoline engine
  • DOHC petrol engine
  • Diesel engine 1.7 liter
  • Diesel engine 2.0 liters
  • Engine repair
  • Cooling system
  • Fuel system (gasoline)
  • Fuel system (diesel)
  • Charging system
  • Launch system
  • Ignition and preheat
  • Transmission
  • Clutch
  • Mechanical gearbox
  • Automatic gearbox
  • Drive shafts
  • Chassis
  • Brake system
  • Wheel suspension
  • Steering
  • Body
  • Exterior
  • Interior
  • Doors and windows
  • Heating and ventilation
  • Electrical equipment
  • Equipment and devices
  • Electrical circuits
Vectra B (1995-2002, petrol) 
  • General information
  • Maintenance
  • Help with malfunctions
  • Power unit
  • Engine repair
  • Exhaust system
  • Cooling system
  • Fuel system
  • Multec injection system
  • Four point injection
  • Transmission
  • Clutch
  • Gearbox and drive
  • Chassis
  • Wheel suspension
  • Steering
  • Brake system
  • Wheels and tires
  • Body
  • Exterior
  • Interior
  • Electrical equipment
  • Fuses and electronics
  • Power devices
  • Ignition system
  • Lighting and signaling
  • Equipment and devices
  • Heating and ventilation
  • Electrical circuits
Vectra A (1988-1995) 
  • Power unit
  • Engine repair
  • Ignition system
  • Lubrication system
  • Cooling system
  • Injection system
  • Fuel system (carburetor)
  • Fuel system (diesel)
  • Exhaust system
  • Transmission
  • Clutch
  • Car gearbox
  • Chassis
  • Front suspension
  • Rear suspension
  • Steering
  • Brake system
  • Wheels and tires
  • Body
  • Exterior
  • Interior
  • Electrical equipment
  • Electrical circuits
Vectra A (1988-1995, petrol) 
  • General information
  • User manual
  • Maintenance
  • Power unit
  • SOHC engine
  • DOHC engine
  • Cooling and ventilation
  • Fuel system (carburetor)
  • Fuel system (injector)
  • Exhaust converter
  • Transmission
  • Clutch
  • Mechanical gearbox
  • Automatic gearbox
  • Drive shafts
  • Chassis
  • Brake system
  • Car suspension
  • Steering
  • Body
  • Body elements
  • Electrical equipment
  • Power devices
  • Equipment and devices
  • Electrical circuits
OpelBook.ru © 2017–2026 · Mobile version · · Sitemap: EN BG BY UA RS HR RO PL SK HU · Feedback · Site search
Astra F, petrol · Astra G, petrol · Astra G · Astra H · Astra J, petrol · Corsa B · Corsa C, petrol · Corsa C · Insignia A · Kadett D · Kadett E · Omega A · Omega B · Omega B2 · Vectra A, petrol · Vectra A · Vectra B, petrol · Vectra B · Vectra C · Zafira A, petrol · Frontera A, petrol · Frontera B · Ascona C · Vivaro A ·
We want your visit to be comfortable 🤝! We use cookies 🍪 to make that happen.