
Disconnecting the battery
1. When carrying out repairs, it is always recommended to disconnect the battery. In principle, if the battery needs to be disconnected without removing it from the vehicle, it is enough to disconnect only the wire from the negative terminal, but in order to avoid any unforeseen accidents, it is recommended to disconnect both wires and close the battery with a protective cover.
Attention: The negative wire is always disconnected first and connected last!
2. There are several systems installed on the vehicle that require a constant power supply. Disconnecting the battery inevitably leads to the erasure of the information stored in the memory of the engine management system about the optimal settings, turning off the clock, destroying the security code entered into the radio receiver, etc. Please read the following guidelines carefully before disconnecting the battery:
- a) On models equipped with a single lock, do not forget to remove the key from the ignition lock and put the key in your pocket - when the battery is connected, all doors will automatically lock;
- b) Disconnecting the battery will erase all accumulated tuning parameters from the ECM memory (except for basic settings). These parameters include: idle speed, maximum speed and fault codes of the self-diagnosis system. If necessary, read the diagnostic data before disconnecting the battery. After connecting, all the lost settings will be restored automatically, however, this will require some time for the control system, during which the engine may operate unstably in various modes;
- c) If the battery was disconnected while the anti-theft alarm was on, the system will remain in the same mode after the battery is connected. An audible alarm can be triggered when the battery terminals are connected;
- d) On models equipped with a trip computer, disconnecting the battery will also delete all user data entered during the operation of the computer;
- e) The infotainment system installed in the car is equipped with a security code, before disconnecting the battery, make sure that you have the correct combination to activate the equipment. The security code can be found in the owner's manual for the infotainment system and must be kept outside the vehicle. In case of loss of the combination, seek help from the specialists of the Opel branded service station.
Note: On production models from 2005, the security code is recognized by the electronic system without the intervention of the owner and its input when connecting the battery is not required;
- f) On models equipped with the ESP system, it is necessary to coordinate the steering angle sensor, for which, with the ignition on, turn the steering wheel once from right to left from lock to lock.
3. To avoid the unpleasant consequences of disconnecting the battery, you can use an external power source - detailed rules for using such devices are given in their operating instructions. As a rule, such power sources are connected to the cigarette lighter socket, after which the standard battery can be safely disconnected. The current generated by the source should be enough to power the memory of the control module, prevent blocking the radio and keep the clock working.
Attention: Some of these devices can supply enough current to the system for normal operation of other power consumers. Before servicing electrical components, make sure that the corresponding consumer is completely de-energized!
4. After connecting the battery, it is necessary to coordinate the electric drives of the upper hatch windows (with appropriate equipment).
Buying a new battery
5. When purchasing, you must select a new battery with the same nominal voltage. 12 V, and capacity (measured in ampere-hours (Ah)), that the replacement battery had.
6. Depending on the installed engine-generator, engine start system and the number of electricity consumers, a battery with a capacity of 55 Ah / 66 Ah / 70 Ah / 72 A can be installed on the car. The battery capacity corresponding to a particular car is indicated in the technical documentation attached to it when sale. If during operation it is necessary to change the number of electricity consumers, for example, when installing new equipment, consult an Opel service station, they will advise in detail on the possibility of changes, help select and install and make appropriate adjustments to the propulsion electrical equipment. Otherwise, if a battery with a smaller capacity than the required capacity is used, this will lead to a constant overcharging of the battery, boiling of the electrolyte and gradual destruction of the battery plates, as a result, the battery life will sharply decrease. In addition, the output capacity may be insufficient to start the engine, especially during cold starts in the winter season. The purchase of a battery larger than the nominal capacity will not give a gain in terms of its service life, because. constant undercharging will lead to sulfation of the plates. Using a battery with an excessively high starting current can burn the starter winding.
7. Modern technologies make it possible to produce batteries that reliably ensure the functioning of all systems with minimal maintenance. If you follow the rules of operation, the battery lasts for 4-5 years. However, it must be borne in mind that the control of the engine on modern cars, including the models considered in this manual, is carried out through electronic systems. The number of electronic equipment has also increased to ensure the convenience and comfort of the driver and passengers. All electronic equipment is very demanding on the constancy and magnitude of the voltage in the mains. Therefore, if there is a need for frequent charging of the battery, its starting properties have deteriorated, etc. Don't put off getting a new battery - it will save you a lot more expensive electronic system repairs.
Removing and installing the battery
Note: Please read the above instructions carefully before disconnecting the battery.
8. Turn off all electrical consumers and wait approximately 1 minute to remove the internal electrical voltage on the electronic circuits.
9. The battery is installed in the left front corner of the engine compartment and placed in a protective casing.

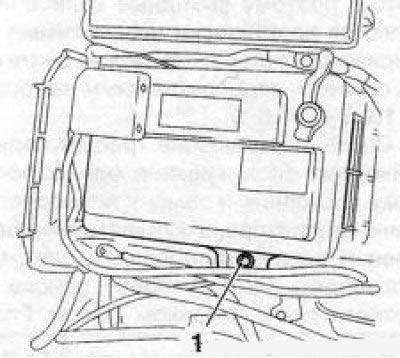
8.10 Removing the cover (1) battery protective cover
10. Open the protective cover (see resist. illustration), remove the battery cover (with appropriate performance), loosen the terminal lug nut and disconnect the wire from the negative terminal.
11. If applicable, lift the protective cover of the positive terminal and disconnect the second wire from the battery.
12. Turn out a fixing bolt (see resist. illustration), remove the mounting bracket and remove the battery from the engine compartment.
8.12 Bolt (1) battery mounting bracket
13. If necessary, unscrew the mounting bolts and remove the battery installation tray (see below).
14. Installation is carried out in the reverse order to the dismantling of the components. Before connecting the battery, it is necessary to clean its surfaces and terminals from traces of oxide and dirt (see chapter 1). Lubricate the terminal blocks with petroleum jelly after connecting the wires.
Attention: The negative wire must be connected last! Do not reverse the battery poles when connecting the wires - this can cause serious damage to the generator and other electrical equipment! Make sure the battery is secure.
15. After connecting the battery, it is necessary to coordinate the electric windows and the top hatch (with appropriate equipment), as well as the steering angle sensor (see above).
Removing and installing the battery tray
16. Remove the battery (see above).
17. On diesel models, remove the vacuum chamber (see resist. illustration) and control device (preheat system.
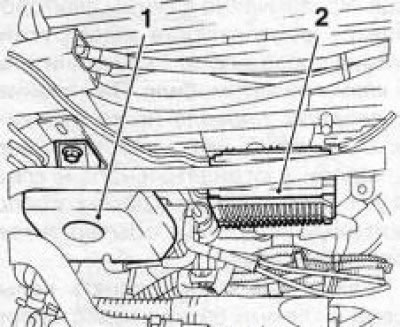
8.17 Vacuum chamber (1) and device (2) preheat system control (diesel models)
18. Disconnect from intermediate clips and tray holders (see resist. illustration) coolant hose and all wiring harnesses. Remove the transmission control unit along with the holder and the front battery cover.
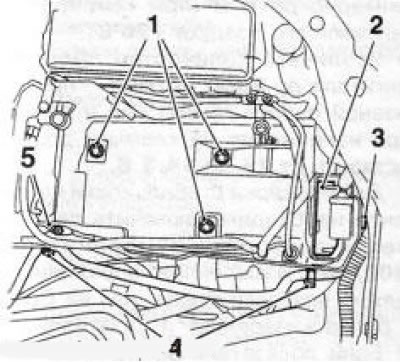
8.18 Nuts (1) battery mounting tray: 2. Transmission control device; 3. Front cover; 4. Holders of a hose of system of cooling; 5. Positive cable of the fuse box
19. Remove 3 bolts (see illustration 8.18) fasteners and remove the battery installation tray from the engine compartment.
20. Installation is carried out in the reverse order.
Checking the condition and replacing the battery wires
1. Regularly inspect the battery wires along their entire length for signs of mechanical damage, cracks and insulation burnouts, as well as corrosion. Do not forget that a violation of the quality of the electrical connection of the contact terminals can lead to difficulties in starting the engine, as well as a decrease in the efficiency of its return.
2. Check the wire terminals for cracks, signs of copper strands falling out, and signs of corrosion. The presence of white powdery deposits accumulated under the insulation layer near the terminal lugs indicates the development of corrosion and the need to replace the wire. Check battery terminals and wire end clamps for signs of deformation, loose bolts, and corrosion.
3. When replacing wires, follow the instructions given in Section 8. Remember to disconnect the negative wire even if only the positive one is to be replaced. Try to remember the routes for laying both wires in order to follow them when installing new ones.
4. Take the wire to be replaced with you to the store as a sample. An extremely important factor is that the design of the wire clamps matches the shape of the connection terminals on the vehicle.
Note: As a rule, the wires are easily distinguished from each other by the color of the insulation, always black on the negative and red on the positive. In addition, the positive wire usually has a larger cross section.
5. Before connecting a new wire to the battery terminal, make sure that it reaches freely without excessive tension. Thoroughly clean the battery terminals, then lightly grease them with acid-free Vaseline.
Visitor comments