
OpelBook.ru
Cars AvtoVAZ Cars Mitsubishi Cars BMW Cars Mercedes Cars Nissan Cars Toyota Cars Chevrolet
English Русский
Български
Беларускі
Український
Српски
Hrvatski
Română
Polski
Slovenský
Magyar
 |  Sitemap  |  Contacts  |    


Main Astra Corsa Insignia Kadett Omega Vectra Zafira Others Articles
Vectra A (1988-1995, petrol) Vectra A (1988-1995) Vectra B (1995-2002, petrol) Vectra B (1995-2002) Vectra C (2002-2008)
  • Main
  • Vectra
  • Vectra C
  • Electrical equipment
  • Equipment and devices
  • Replacing fuses

Replacing fuses (Opel Vectra C)

            0

1. Various combinations of fuses, circuit breakers and fusible links can be used to protect the contact circuits of vehicle electrical equipment.

2. In the models of cars under consideration, the fuses are distributed among three mounting blocks. One mounting block is mounted in the instrument panel on the left. This block also contains the controls for the electronic systems of the passenger compartment and the instrument panel. The second passenger compartment mounting block is mounted in the left side of the luggage compartment. In addition to the fuses and relays, it contains the controls that monitor the operation of the electronic systems of the rear of the car. The third mounting block is located on the left in the engine compartment next to the battery. The engine control module (ECM) is also installed in this block. All blocks are equipped with removable covers.

3. To access the mounting block on the instrument panel, grasp the ledge on the service cover of the block (see accompanying illustration) and pull it towards you with force, if necessary use a plastic wedge. Remove the cover from the mounting grooves and remove it.
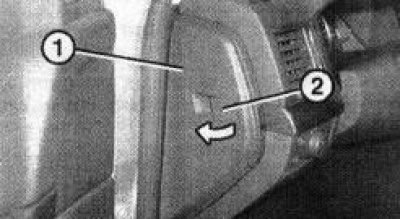
3.3 Service cover (1) of the fuse box on the instrument panel: 2. Protrusion on the lid

3.3 Service cover (1) of the fuse box on the instrument panel: 2. Protrusion on the lid


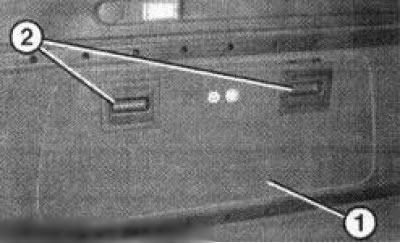
4. To remove the cover of the mounting block in the luggage compartment on Sedan/Hatchback models, it is necessary to press 1, and on Station Wagon/Signum models 2 clamps (see accompanying illustrations), open and remove the covers from the luggage compartment trim. On Estate/Signum models, another service cover must be removed to access the fuses.
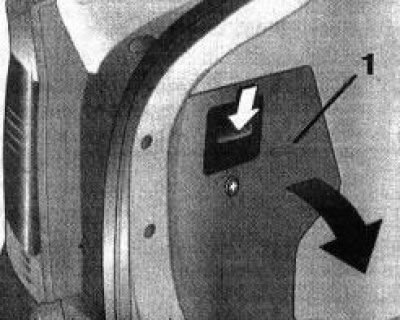
3.4a Cover (1) of the fuse box in the luggage compartment (sedan/Hatchback models)
3.4a Cover (1) of the fuse box in the luggage compartment (sedan/Hatchback models)


3.4b Cover (1) of the fuse box in the luggage compartment (models Universal/Signum) 2 Locking…

3.4b Cover (1) of the fuse box in the luggage compartment (models Universal/Signum) 2 Locking handles


5. In the engine compartment, to remove the cover of the underhood fuse box, you must first remove the cover of the protective casing of the battery (see Chapter 5). Then press the lock (arrow A) (see accompanying illustration)mounting block cover, pull the cover up (arrow B) and remove it.
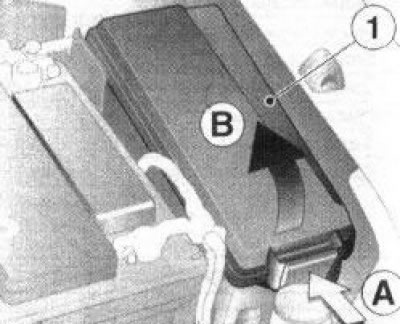


3.5 Removing the cover (1) of the underhood fuse box

3.5 Removing the cover (1) of the underhood fuse box


6. Each individual fuse is used to protect a specific electrical circuit or several circuits. An identification card with a diagram of the location of the fuses in the mounting block is usually glued to the cover of the latter, on its inner side (see also Specifications).

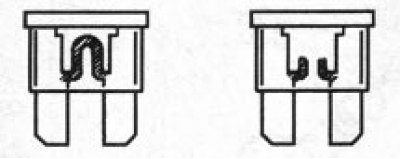
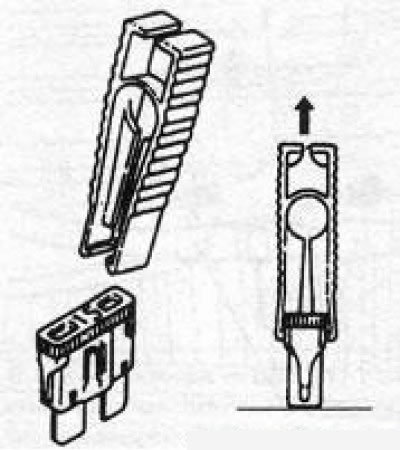
7. The fuses in the mounting blocks are compact in design, equipped with bayonet contacts, and, if necessary, can be easily removed from their sockets in the block. A special clamp should be used to remove the fuses (see illustration 3.7a), which is attached to the back of the instrument panel fuse box cover. If any of the power consumers fails, the condition of the corresponding fuse should always be checked first. The fuse body is usually made of transparent plastic, through which the condition of the working jumper can be easily determined (see illustration 3.7b).
3.7a A special clip for extracting fuses is usually attached to the inside of the fuse box cover

3.7a A special clip for extracting fuses is usually attached to the inside of the fuse box cover


(Article published on the website: «www.OPELBOOK.ru»)
3.7b The fact that the contact jumper of a failed fuse has burned out is easily detected by visual…

3.7b The fact that the contact jumper of a failed fuse has burned out is easily detected by visual inspection of the element with a translucent body


8. When replacing a blown fuse, make sure that the replacement element you prepare matches the type of the one that failed. Each electrical circuit has different operating parameters and requires a different degree of protection, so replacing a fuse designed for a certain current with one that does not match its parameters is fraught with the most serious consequences (until a fire breaks out). Operating parameters of the fuse (rated current) are usually marked on its plastic body, in addition, color identification is additionally used (see Specifications).

9. If the new fuse also fails immediately after installation, there is no point in replacing it further - first you should identify and eliminate the cause of the overload in the circuit. In most cases, this is a short circuit in the connecting wiring caused by damage to its insulation. Spare fuses are placed in special sockets on the back of the service cover of the instrument panel mounting block (see accompanying illustration), as well as in free pads directly in the mounting blocks.
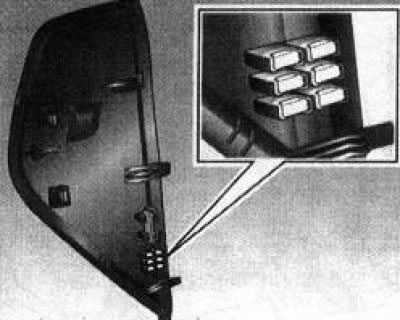


3.9 Spare fuses

3.9 Spare fuses


10. After completing work on electrical equipment, replace the cover of the corresponding mounting block and check the tightness of the fit and fixation of the cover.


This article is available at russian, bulgarian, belarusian, ukrainian, serbian, croatian, romanian, polish, slovak, hungarian
Checking the article: Meshcheryakov Damir

Share information:

Previous articles
Opel Vectra C: Equipment and devices
Next articles

Fuses and relays — location and purpose
Troubleshooting electrical equipment
General description of on-board electrical equipment
Relays — general information and checking serviceability
Removal and installation the horn
Removal and installation windshield washer nozzles
Removal and installation the wiper arms (leashes)
Removal and installation the windshield washer reservoir and pump
Removal and installation the windshield wiper motor


See similar ones from other Opel car manuals:
▶ Replacing fuses Opel Kadett D (1979-1984)
▶ Mounting Blocks — Replacing Fuses and Relays Opel Zafira A (1999-2005, petrol)
▶ Fuses — Checking and Replacing Opel Ascona C (1981-1988)
▶ Coolant Hoses — Disconnecting and Replacing Opel Astra F (1991-1998, petrol)
▶ Checking the condition and replacing the auxiliary drive… Opel Corsa B (1993-2000)
Link to this page in different formats

Visitor comments


No comments yet


How much will 46 + 30 =


Vectra C (2002-2008) 
  • General information
  • User manual
  • Vehicle device
  • Maintenance
  • Troubleshooting
  • Power unit
  • Engine repair
  • Cooling system
  • Power and control system
  • Engine electrics
  • Transmission
  • Clutch
  • Car gearbox
  • Drive shafts
  • Chassis
  • Car suspension
  • Steering
  • Brake system
  • Body
  • Exterior
  • Interior
  • Doors, locks and windows
  • Heating and ventilation
  • Electrical equipment
  • Equipment and devices
  • Headlights and lighting
  • Electrical circuits
Vectra B (1995-2002) 
  • General information
  • User manual
  • Weekly checks
  • Maintenance (gasoline)
  • Maintenance (diesel)
  • Troubleshooting
  • Power unit
  • SOHC gasoline engine
  • DOHC petrol engine
  • Diesel engine 1.7 liter
  • Diesel engine 2.0 liters
  • Engine repair
  • Cooling system
  • Fuel system (gasoline)
  • Fuel system (diesel)
  • Charging system
  • Launch system
  • Ignition and preheat
  • Transmission
  • Clutch
  • Mechanical gearbox
  • Automatic gearbox
  • Drive shafts
  • Chassis
  • Brake system
  • Wheel suspension
  • Steering
  • Body
  • Exterior
  • Interior
  • Doors and windows
  • Heating and ventilation
  • Electrical equipment
  • Equipment and devices
  • Electrical circuits
Vectra B (1995-2002, petrol) 
  • General information
  • Maintenance
  • Help with malfunctions
  • Power unit
  • Engine repair
  • Exhaust system
  • Cooling system
  • Fuel system
  • Multec injection system
  • Four point injection
  • Transmission
  • Clutch
  • Gearbox and drive
  • Chassis
  • Wheel suspension
  • Steering
  • Brake system
  • Wheels and tires
  • Body
  • Exterior
  • Interior
  • Electrical equipment
  • Fuses and electronics
  • Power devices
  • Ignition system
  • Lighting and signaling
  • Equipment and devices
  • Heating and ventilation
  • Electrical circuits
Vectra A (1988-1995) 
  • Power unit
  • Engine repair
  • Ignition system
  • Lubrication system
  • Cooling system
  • Injection system
  • Fuel system (carburetor)
  • Fuel system (diesel)
  • Exhaust system
  • Transmission
  • Clutch
  • Car gearbox
  • Chassis
  • Front suspension
  • Rear suspension
  • Steering
  • Brake system
  • Wheels and tires
  • Body
  • Exterior
  • Interior
  • Electrical equipment
  • Electrical circuits
Vectra A (1988-1995, petrol) 
  • General information
  • User manual
  • Maintenance
  • Power unit
  • SOHC engine
  • DOHC engine
  • Cooling and ventilation
  • Fuel system (carburetor)
  • Fuel system (injector)
  • Exhaust converter
  • Transmission
  • Clutch
  • Mechanical gearbox
  • Automatic gearbox
  • Drive shafts
  • Chassis
  • Brake system
  • Car suspension
  • Steering
  • Body
  • Body elements
  • Electrical equipment
  • Power devices
  • Equipment and devices
  • Electrical circuits
OpelBook.ru © 2017–2026 · Mobile version · · Sitemap: EN BG BY UA RS HR RO PL SK HU · Feedback · Site search
Astra F, petrol · Astra G, petrol · Astra G · Astra H · Astra J, petrol · Corsa B · Corsa C, petrol · Corsa C · Insignia A · Kadett D · Kadett E · Omega A · Omega B · Omega B2 · Vectra A, petrol · Vectra A · Vectra B, petrol · Vectra B · Vectra C · Zafira A, petrol · Frontera A, petrol · Frontera B · Ascona C · Vivaro A ·
We want your visit to be comfortable 🤝! We use cookies 🍪 to make that happen.