
OpelBook.ru
Cars AvtoVAZ Cars Mitsubishi Cars BMW Cars Mercedes Cars Nissan Cars Toyota Cars Chevrolet
English Русский
Български
Беларускі
Український
Српски
Hrvatski
Română
Polski
Slovenský
Magyar
 |  Sitemap  |  Contacts  |    


Main Astra Corsa Insignia Kadett Omega Vectra Zafira Others Articles
Zafira A (1999-2005, petrol)
  • Main
  • Zafira
  • Zafira A
  • Electrical equipment
  • Equipment and devices
  • Mounting Blocks — Replacing Fuses and Relays

Mounting Blocks — Replacing Fuses and Relays (Opel Zafira A)

            0

Warning! Before replacing a fuse, it is necessary to determine and eliminate the cause of its burnout. To avoid failure of electrical equipment components, fuses with an increased rating or homemade ones cannot be installed.


Sequence of execution


1. Prepare the car for work (see "Preparing the car for maintenance and repair").

Note. The further course of the operation, presented in points 2-5, is valid only for the Astra model. On the Zafira model, it is sufficient to simply remove the block cover.
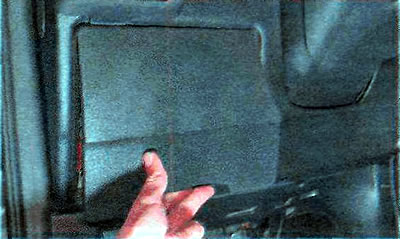
Note. The further course of the operation, presented in points 2-5, is valid only for the Astra…


2. To replace the fuse in the unit located in the passenger compartment, open the small item drawer in the instrument panel and remove it by squeezing it at the edges to release the opening limiters from engagement with the instrument panel.
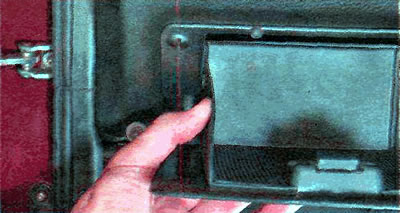
2. To replace the fuse in the unit located in the passenger compartment, open the small item drawer…


3. Using a coin or any other flat object, turn the mounting block cover latches by 90° (in the open position, the slot in the locking heads should be horizontal).
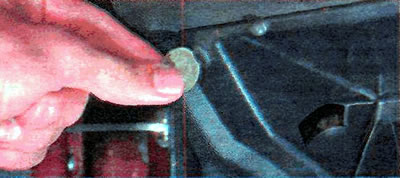


3. Using a coin or any other flat object, turn the mounting block cover latches by 90° (in the open…


Note: The mounting block cover is secured with four fasteners.
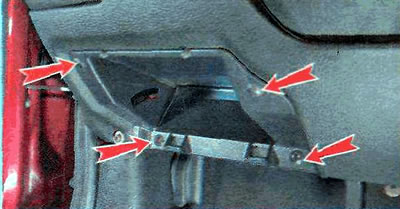
Note: The mounting block cover is secured with four fasteners.


4. Remove the cover of the mounting block.
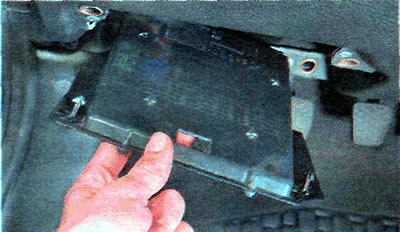
4. Remove the cover of the mounting block.


5. Press the latch and turn the mounting block towards you.
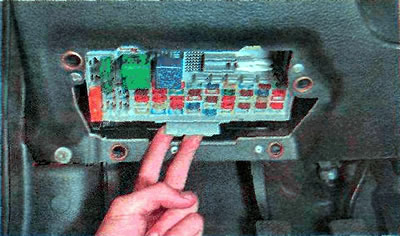
5. Press the latch and turn the mounting block towards you.


Note: The fuse and relay box contains fuse removal tweezers.
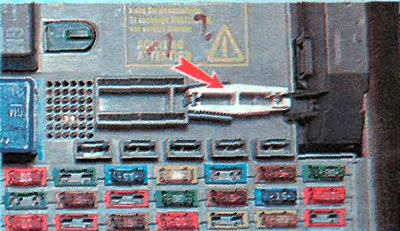
Note: The fuse and relay box contains fuse removal tweezers.


6. According to the diagram on the back of the lid, and according to table 14.8 we find the fuse of the faulty circuit and remove it.
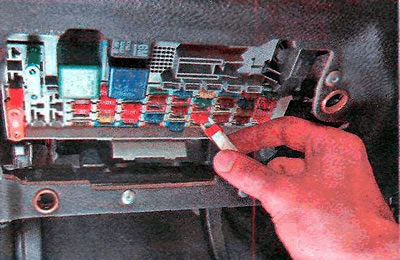


6. According to the diagram on the back of the lid, and according to table 14.8 we find the fuse of…


A faulty fuse can be identified by a burnt-out filament.
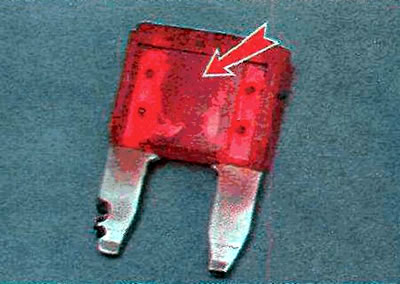
A faulty fuse can be identified by a burnt-out filament.


Recommendation: Sometimes the fuse thread remains intact, while its connection inside the fuse is broken. It is impossible to visually determine such a malfunction. In this case, you can evaluate the condition of the fuse using an ohmmeter.


7. Install a new fuse of the appropriate rating.

8. Turn the mounting block away from you until it locks into place, install the mounting block cover and the small item box in place.

9. To replace the fuses in the block located in the engine compartment, open the hood, press the latch and remove the block cover.
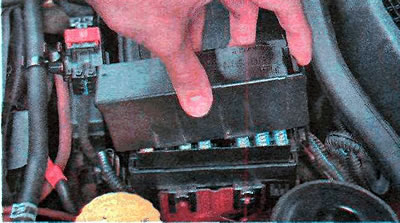
9. To replace the fuses in the block located in the engine compartment, open the hood, press the…


10. According to the diagram on the inside of the mounting block cover and according to table 14.10 we find the fuse of the faulty circuit and remove it by prying it with a screwdriver.
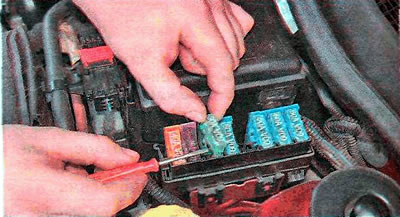


10. According to the diagram on the inside of the mounting block cover and according to table 14.10…


11. Install a new fuse of the appropriate rating and close the fuse box cover.

12. To replace the relay in the main relay block located in the engine compartment, open the hood, press the latches and open the cover of the mounting block.
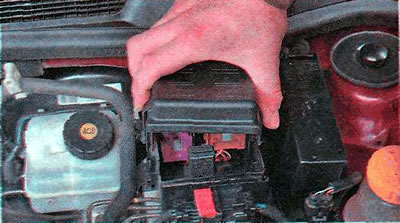
12. To replace the relay in the main relay block located in the engine compartment, open the hood,…


13. According to the diagram on the outside of the mounting block cover and according to table 14.11 we find the relay of the faulty circuit.

14. Remove the faulty relay by shaking it from side to side.
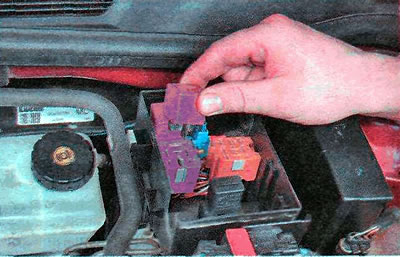
14. Remove the faulty relay by shaking it from side to side.


Recommendation: You can verify that the relay is faulty by checking it (see "Checking the relay") or by installing another one in its place - one that is known to be working properly.)


15. Install a new relay of the same type as the faulty one. In doing so, align its terminals with the slots of the mounting block and press it in until it stops.

16. Close the cover of the mounting block.


This article is available at russian, bulgarian, belarusian, ukrainian, serbian, croatian, romanian, polish, slovak, hungarian
Checking the article: Chernov Alexander

Share information:

Previous articles
Opel Zafira A: Equipment and devices
Next articles

Fuse and relay mounting blocks
Checking electrical consumers
Checking the relay
Checking and repairing electrical circuits
Electrical equipment — technical condition check
Description of the electrical equipment system
Description of the design of the ignition switch (lock)
Ignition Switch (Lock) Cylinder — Replacement
Ignition Switch Contact Group — Checking and Replacing
Ignition Key Interlock Solenoid — Checking and Replacing
Steering column switches — checking and replacement
External and internal lighting control unit — removal, replacement of backlight lamp and installation


See similar ones from other Opel car manuals:
▶ Fuses and relays — checking and removing Opel Astra F (1991-1998, petrol)
▶ Fuses and relays — location and designation Opel Corsa C (2000-2006)
▶ Replacing the silent blocks of the suspension arms Opel Kadett E (1984-1995)
▶ Fuses and relays — general description Opel Omega A (1986-1993)
▶ Fuses and Relays — General Description Opel Vectra A (1988-1995, petrol)
Link to this page in different formats

Visitor comments


No comments yet


How much will 18 + 50 =


Zafira A (1999-2005, petrol) 
  • General information
  • Governing bodies
  • User manual
  • Maintenance
  • Power unit
  • Engine repair
  • Control system
  • Cooling system
  • Exhaust system
  • Transmission
  • Clutch
  • Mechanical gearbox
  • Automatic gearbox
  • Front wheel drives
  • Chassis
  • Hubs, wheels and tires
  • Front suspension
  • Rear suspension
  • Steering
  • Brake system
  • Body
  • Maintenance and care
  • Exterior
  • Side doors
  • Climate control
  • Electrical equipment
  • Equipment and devices
  • Power devices
  • Lighting and signaling
  • Windshield wipers and washers
  • Electrical circuits
OpelBook.ru © 2017–2026 · Mobile version · · Sitemap: EN BG BY UA RS HR RO PL SK HU · Feedback · Site search
Astra F, petrol · Astra G, petrol · Astra G · Astra H · Astra J, petrol · Corsa B · Corsa C, petrol · Corsa C · Insignia A · Kadett D · Kadett E · Omega A · Omega B · Omega B2 · Vectra A, petrol · Vectra A · Vectra B, petrol · Vectra B · Vectra C · Zafira A, petrol · Frontera A, petrol · Frontera B · Ascona C · Vivaro A ·
We want your visit to be comfortable 🤝! We use cookies 🍪 to make that happen.