
Windshield
1. Remove the fairing grille (see chapter 11).
2. Disunite sockets of electroconducting of heating of atomizers of windshield washer nozzles.
Note: There are 2 connectors on the right nozzle.
3. Squeeze out the latches and squeeze out the nozzles one by one (see resist. illustration) from landing slots. Disconnect the hoses from the injectors.
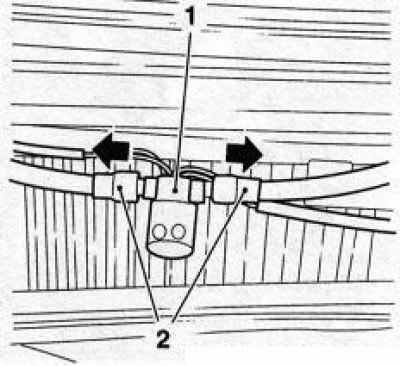
6.3 Supply hoses (2) nozzles (1) windshield washer, the arrow indicates the clamps
4. Installation is carried out in the reverse order.
5. If necessary, adjust the direction of the washer fluid jet on the windshield, for which insert a needle into the appropriate nozzle of the nozzle (service stations use Hazet 4850-1) and aim the nozzle at the desired point.
Rear glass
Signum Models
6. On these models, the rear window washer jet is integrated into the upper brake light (see Section 17).
Hatchback Models (GTC)
7. Unscrew and remove the antenna pin from the base.
8. With a plastic wedge (e.g. Hazet 1965-20), remove the rear window washer nozzle from the antenna base (see resist. illustration).
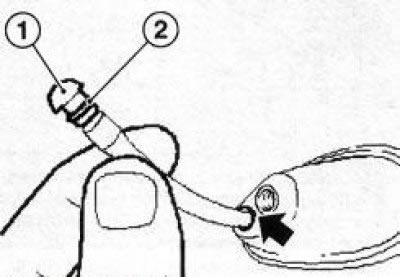
6.8 Nozzle (1) rear window washer (Hatchback models) - the arrow indicates the seat: 2. O-ring
9. Disconnect the supply hose and remove the nozzle.
10. Installation is carried out in the reverse order. Make sure the O-ring fits correctly (see illustration 6.8). Check the functioning of the nozzle and, if necessary, adjust the direction of its nozzle (see paragraph 5).
Models Wagon
11. Using a plastic wedge (e.g. Hazet 1965-20) or other suitable tool, pry the nozzle and remove it from the mounting socket on the roof of the car (see resist. illustration). Disconnect the supply hose and remove the seal from the nozzle.
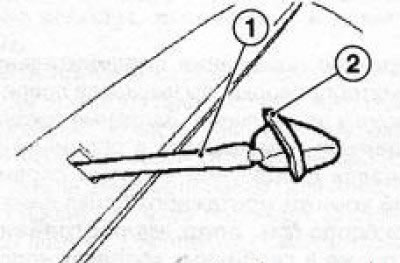
6.11 Removing the rear window washer nozzle (station wagon models): 1. Supply hose; 2. Sealing gasket
12. Installation is carried out in the reverse order.
Visitor comments