
OpelBook.ru
Cars AvtoVAZ Cars Mitsubishi Cars BMW Cars Mercedes Cars Nissan Cars Toyota Cars Chevrolet
English Русский
Български
Беларускі
Український
Српски
Hrvatski
Română
Polski
Slovenský
Magyar
 |  Sitemap  |  Contacts  |    


Main Astra Corsa Insignia Kadett Omega Vectra Zafira Others Articles
Omega A (1986-1993) Omega B (1993-1999) Omega B2 (1999-2003)
  • Main
  • Omega
  • Omega A
  • Power unit
  • Fuel system (diesel)
  • Injectors — removal and installation

Injectors — removal and installation (Opel Omega A)

            0

Contents: Removal ⬇ Installation ⬇
1. Faulty injectors are the cause of a strong knocking sound in the engine and subsequent damage to the bearings. In this case, turn the engine to idle speed and loosen the union nuts of the injection channels one by one. If the knocking sound disappears when you loosen any nut, then the faulty injector has been found.

2. A defective injector can also be detected at higher speeds, also without loosening the union nuts. If the number of revolutions remains unchanged after loosening the nut, then this injector is defective. Injectors are tested under pressure in the workshop.

3. Signs of a faulty injector:
  • a) Faulty ignition (misfire).
  • b) Knocking in one or more cylinders.
  • c) The engine overheats.
  • d) Loss of engine power.
  • e) Black exhaust smoke.
  • j) High fuel consumption.

Removal


4. Clean the injection channels with a cold cleaner.

5. Remove all injection channels by loosening the union nuts with a spanner, for example, HAZET 612-17x19.

Note: Do not change the bend shape of the pipes.


6. Remove the return pipes.

7. Remove the injectors with a 27 mm wrench, for example, HAZET4550.

8. Remove the axle washer, heat shield and copper gasket.

Installation


9. Insert a new sealing ring into the injection hole of the cylinder head.

10. Install the heat-protective sleeve so that its smaller diameter faces the cylinder head, i.e. downwards.

11. Place an additional copper gasket on the heat-protective sleeve.

12. Insert a new axle washer into the heat-protective sleeve. The recess should be facing upwards, the arrow points towards the cylinder head (see illustration).
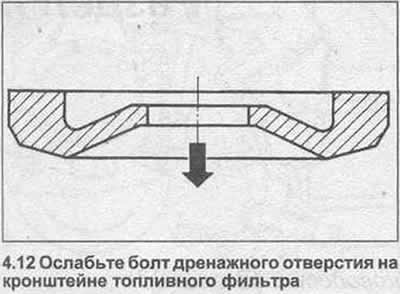


12. Insert a new axle washer into the heat-protective sleeve. The recess should be facing upwards,…


13. Tighten the injectors with a force of 70 Nm.

14. Strengthen the pipelines with a force of 25 Nm.


This article is available at russian, bulgarian, belarusian, ukrainian, serbian, croatian, romanian, polish, slovak, hungarian
Checking the article: Zinoviev Kirill

Share information:

Previous articles
Opel Omega A: Fuel system (diesel)
Next articles

Fuel system — bleeding
Glow Plugs — Checking
General description
Fuel System Specifications (Diesel)
Moment of injection start of the high-pressure fuel pump — check
Gas turbine supercharger — general description
Exhaust system — removal and installation


See similar ones from other Opel car manuals:
▶ Removal and installation of fuel injectors Opel Astra H (2004-2009)
▶ Removal and installation injectors Opel Corsa B (1993-2000)
▶ Diagnostics and cleaning of fuel injectors Opel Insignia A (2008-2017)
▶ Checking, removing and installing injection valves… Opel Kadett D (1979-1984)
▶ Fuel injectors (except Multec system) — removal and… Opel Vectra A (1988-1995, petrol)
Link to this page in different formats

Visitor comments


No comments yet


How much will 40 + 25 =


Omega B2 (1999-2003) 
  • General information
  • User manual
  • Maintenance
  • Troubleshooting
  • Power unit
  • Petrol 4-cylinder
  • Petrol 6-cylinder
  • Engine overhaul
  • Diesel engines 2.0 l
  • Diesel engines 2.5 l
  • Cooling and heating
  • Injection system (gasoline)
  • Fuel system (diesel)
  • Fuel system
  • Exhaust system
  • Ignition system
  • Transmission
  • Clutch
  • Mechanical gearbox
  • Automatic gearbox
  • Main gear and shafts
  • Chassis
  • Brake system
  • Car suspension
  • Steering
  • Body
  • Body elements
  • Electrical equipment
  • Equipment and devices
  • Electrical circuits
Omega B (1993-1999) 
  • General information
  • User manual
  • Tips for the car owner
  • Maintenance (gasoline)
  • Maintenance (diesel)
  • Power unit
  • Petrol engine SOHC 2.0 l
  • Petrol engine DOHC 2.0 l
  • Petrol engines 2.5 and 3.0 l
  • Repair of gasoline engines
  • Diesel engine 2.0 l
  • Diesel engine repair 2.0 l
  • Diesel engine 2.5 l
  • Cooling and heating
  • Power system (petrol)
  • Emission reduction
  • Fuel system (diesel 2.0 l)
  • Fuel system (diesel 2.5 l)
  • Launch system
  • Ignition system
  • Transmission
  • Clutch
  • Mechanical gearbox
  • Automatic gearbox
  • Drive shafts
  • Chassis
  • Brake system
  • Wheel suspension
  • Steering
  • Body
  • Exterior
  • Interior
  • Doors and windows
  • Electrical equipment
  • Equipment and devices
  • Wiring diagrams (early)
  • Wiring diagrams (late)
Omega A (1986-1993) 
  • General information
  • User manual
  • Maintenance
  • Changes and additions
  • Troubleshooting
  • Power unit
  • Gasoline engines
  • Diesel engines
  • Cooling system
  • Fuel system (gasoline)
  • Fuel system (diesel)
  • Ignition system
  • Transmission
  • Clutch
  • Mechanical gearbox
  • Automatic gearbox
  • Cardan shaft
  • Drive shafts
  • Chassis
  • Brake system
  • Car suspension
  • Steering
  • Body
  • Exterior
  • Interior
  • Electrical equipment
  • Power devices
  • Lighting and appliances
  • Electrical circuits
OpelBook.ru © 2017–2026 · Mobile version · · Sitemap: EN BG BY UA RS HR RO PL SK HU · Feedback · Site search
Astra F, petrol · Astra G, petrol · Astra G · Astra H · Astra J, petrol · Corsa B · Corsa C, petrol · Corsa C · Insignia A · Kadett D · Kadett E · Omega A · Omega B · Omega B2 · Vectra A, petrol · Vectra A · Vectra B, petrol · Vectra B · Vectra C · Zafira A, petrol · Frontera A, petrol · Frontera B · Ascona C · Vivaro A ·
We want your visit to be comfortable 🤝! We use cookies 🍪 to make that happen.