
OpelBook.ru
Cars AvtoVAZ Cars Mitsubishi Cars BMW Cars Mercedes Cars Nissan Cars Toyota Cars Chevrolet
English Русский
Български
Беларускі
Український
Српски
Hrvatski
Română
Polski
Slovenský
Magyar
 |  Sitemap  |  Contacts  |    


Main Astra Corsa Insignia Kadett Omega Vectra Zafira Others Articles
Vectra A (1988-1995, petrol) Vectra A (1988-1995) Vectra B (1995-2002, petrol) Vectra B (1995-2002) Vectra C (2002-2008)
  • Main
  • Vectra
  • Vectra C
  • Electrical equipment
  • Headlights and lighting
  • Removal and installation an additional brake light bulb

Removal and installation an additional brake light bulb (Opel Vectra C)

            0

Contents: Sedan Models ⬇ Models Hatchback GTS ⬇ Models Universal ⬇ Signum Models ⬇
Note: The high-level brake light is made using LEDs. Individual LEDs cannot be replaced; the entire assembly must be replaced if necessary.


Sedan Models


Note: To remove the upper level brake light, you will need a special tool Ore1-KM-6343.


1. Turn off the ignition and disconnect the battery (see Chapter 5).

2. Remove the trunk lid trim (see Chapter 11).

3. Using the special tool, squeeze the center clip of the high-level brake light (see accompanying illustration). At the same time, using a screwdriver, press the side retainer of the brake light and slightly push the assembly out of the seat.
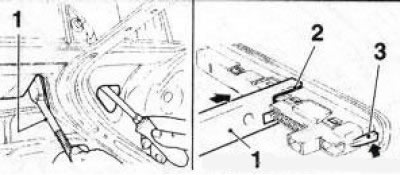
17.3 Central (2) and side (3) high-level brake light retainers (sedan models): 1. Device…

17.3 Central (2) and side (3) high-level brake light retainers (sedan models): 1. Device Ore1-KM-6343


Note: The illustration shows the brake light in the removed position.


4. In the same manner, press the side retainer on the other side of the brake light and remove it from the trunk lid.

5. Disconnect the wiring connector and remove the brake light.

6. Installation is carried out in reverse order.


Models Hatchback GTS


7. Turn off the ignition and disconnect the battery (see Chapter 5).

8. Remove the tailgate trim (see Chapter 11).

9. Drill 3 holes on the inside of the tailgate at the height of the high-level brake light in the marked places: two holes on the sides with a diameter of 6 mm, and one in the center - Ø8 mm.

10. Using a hex key, remove the 3 mounting screws through the drilled holes. Remove the brake light and disconnect its wiring connector.

11. Coat the edges of the holes with a corrosion protection agent.

12. Installation is carried out in reverse order.

Models Universal


13. Turn off the ignition and disconnect the battery (see Chapter 5).

14. Remove the tailgate trim (see Chapter 11).

15. Disconnect the wiring connector from the back of the high-level brake light (see accompanying illustration), press the clips and remove the brake light assembly.
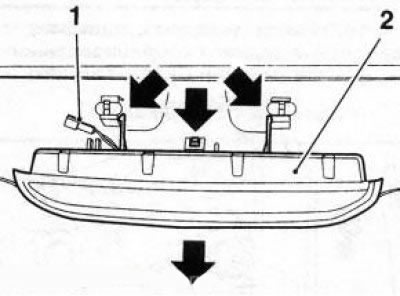
17.15 Connector (1) of the high-level brake light wiring (2) (models Universal) - arrows indicate…

17.15 Connector (1) of the high-level brake light wiring (2) (models Universal) - arrows indicate the directions for pressing the clamps and removing the brake light assembly


16. Installation is performed in the reverse order of removal. Pay attention to the position of the guides and brake light retainers.


Signum Models


17. Turn off the ignition and disconnect the battery (see Chapter 5).

18. Remove the rear door trim (see Chapter 11).

19. Disconnect the rear window washer hose and disconnect the brake light wiring connector.

20. Remove the 4 mounting screws and remove the high level brake light from the tailgate.

21. Installation is carried out in reverse order.


This article is available at russian, bulgarian, belarusian, ukrainian, serbian, croatian, romanian, polish, slovak, hungarian
Checking the article: Meshcheryakov Damir

Share information:

Previous articles
Opel Vectra C: Headlights and lighting
Next articles

Removal and installation the rear combination light and replacing its bulbs
Removal and installation turn signal repeaters
Replacing the fog light bulb
Removal and installation fog lights
Removal and installation the headlight
Replacing headlight bulbs
Removal and installation the license plate light
Removal and installation the lampshade of individual front seat lights
Replacement of interior, trunk and threshold lighting lamps


See similar ones from other Opel car manuals:
▶ Replacing an additional brake light Opel Astra J (2009-2015, petrol)
▶ Removal and installation the high-level brake light bulb Opel Corsa C (2000-2006)
▶ Astra Additional Brake Light Replacement Opel Zafira A (1999-2005, petrol)
▶ Scheme 13. License plate light, additional brake light,… Opel Frontera B (1998-2004)
▶ Replacing the parking light bulb Opel Kadett D (1979-1984)
Link to this page in different formats

Visitor comments


No comments yet


How much will 11 + 40 =


Vectra C (2002-2008) 
  • General information
  • User manual
  • Vehicle device
  • Maintenance
  • Troubleshooting
  • Power unit
  • Engine repair
  • Cooling system
  • Power and control system
  • Engine electrics
  • Transmission
  • Clutch
  • Car gearbox
  • Drive shafts
  • Chassis
  • Car suspension
  • Steering
  • Brake system
  • Body
  • Exterior
  • Interior
  • Doors, locks and windows
  • Heating and ventilation
  • Electrical equipment
  • Equipment and devices
  • Headlights and lighting
  • Electrical circuits
Vectra B (1995-2002) 
  • General information
  • User manual
  • Weekly checks
  • Maintenance (gasoline)
  • Maintenance (diesel)
  • Troubleshooting
  • Power unit
  • SOHC gasoline engine
  • DOHC petrol engine
  • Diesel engine 1.7 liter
  • Diesel engine 2.0 liters
  • Engine repair
  • Cooling system
  • Fuel system (gasoline)
  • Fuel system (diesel)
  • Charging system
  • Launch system
  • Ignition and preheat
  • Transmission
  • Clutch
  • Mechanical gearbox
  • Automatic gearbox
  • Drive shafts
  • Chassis
  • Brake system
  • Wheel suspension
  • Steering
  • Body
  • Exterior
  • Interior
  • Doors and windows
  • Heating and ventilation
  • Electrical equipment
  • Equipment and devices
  • Electrical circuits
Vectra B (1995-2002, petrol) 
  • General information
  • Maintenance
  • Help with malfunctions
  • Power unit
  • Engine repair
  • Exhaust system
  • Cooling system
  • Fuel system
  • Multec injection system
  • Four point injection
  • Transmission
  • Clutch
  • Gearbox and drive
  • Chassis
  • Wheel suspension
  • Steering
  • Brake system
  • Wheels and tires
  • Body
  • Exterior
  • Interior
  • Electrical equipment
  • Fuses and electronics
  • Power devices
  • Ignition system
  • Lighting and signaling
  • Equipment and devices
  • Heating and ventilation
  • Electrical circuits
Vectra A (1988-1995) 
  • Power unit
  • Engine repair
  • Ignition system
  • Lubrication system
  • Cooling system
  • Injection system
  • Fuel system (carburetor)
  • Fuel system (diesel)
  • Exhaust system
  • Transmission
  • Clutch
  • Car gearbox
  • Chassis
  • Front suspension
  • Rear suspension
  • Steering
  • Brake system
  • Wheels and tires
  • Body
  • Exterior
  • Interior
  • Electrical equipment
  • Electrical circuits
Vectra A (1988-1995, petrol) 
  • General information
  • User manual
  • Maintenance
  • Power unit
  • SOHC engine
  • DOHC engine
  • Cooling and ventilation
  • Fuel system (carburetor)
  • Fuel system (injector)
  • Exhaust converter
  • Transmission
  • Clutch
  • Mechanical gearbox
  • Automatic gearbox
  • Drive shafts
  • Chassis
  • Brake system
  • Car suspension
  • Steering
  • Body
  • Body elements
  • Electrical equipment
  • Power devices
  • Equipment and devices
  • Electrical circuits
OpelBook.ru © 2017–2026 · Mobile version · · Sitemap: EN BG BY UA RS HR RO PL SK HU · Feedback · Site search
Astra F, petrol · Astra G, petrol · Astra G · Astra H · Astra J, petrol · Corsa B · Corsa C, petrol · Corsa C · Insignia A · Kadett D · Kadett E · Omega A · Omega B · Omega B2 · Vectra A, petrol · Vectra A · Vectra B, petrol · Vectra B · Vectra C · Zafira A, petrol · Frontera A, petrol · Frontera B · Ascona C · Vivaro A ·
We want your visit to be comfortable 🤝! We use cookies 🍪 to make that happen.