
Hatchback Models (GTC)
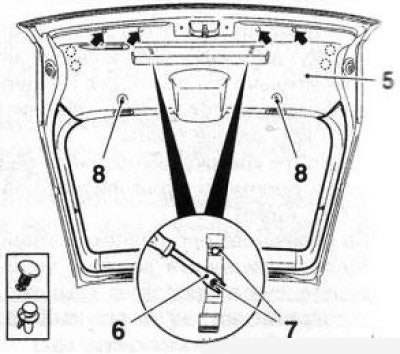
1. Open the tailgate, remove the luggage compartment shelf.
2. Remove the decorative covers on the left and right on the upholstery of the tailgate and unscrew the fixing screws (see resist. illustration).

15.2 Removing the trims (3 and 4) tailgate window frame (Hatchback models): 1. Screws for fastening the lining; 2. Elements for fastening the cables of the luggage compartment shelf; 5. Lower upholstery
Note: If only the lower part of the upholstery is removed, it is enough to unscrew the screws securing the trims of the window frame of the tailgate, paragraphs 3 and 4 can be skipped.
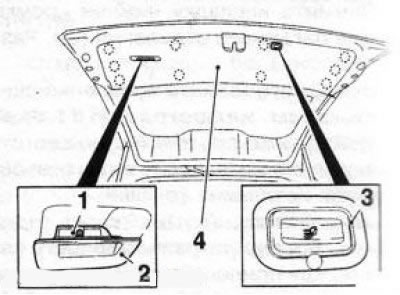
3. Turn out fastening elements of cables of the shelf of a luggage space from an upholstery of a window frame (see illustration 15.2).
4. Alternately insert a plastic wedge under the window frame lining, wring out the latches and separate the lining from the window frame (see illustration 12.2) in the directions indicated by the arrows.
Note: Each window frame trim is secured with three latches.
5. Using a special tool (e.g. Hazet 799-3) remove 4 plugs from the bottom of the tailgate upholstery (see resist. illustration), then use the same tool to remove the expansion rivets and remove the 2 holders.
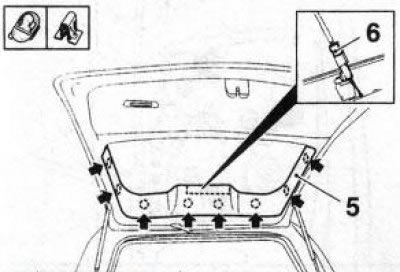
15.5 Removing the lower part of the upholstery (5) tailgate (Hatchback models)
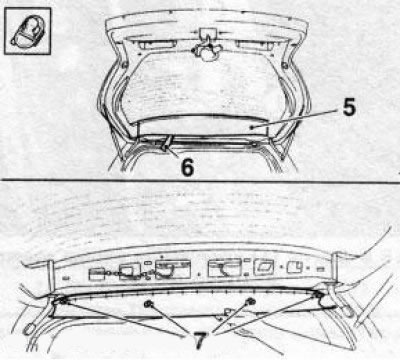
6. Remove 2 screws (see illustration 15.5), insert a plastic wedge under the upholstery, wring out 4 latches in the lower corners of the upholstery and remove it from the tailgate.
7. Installation is made in an order the return to an order of removal. Replace any damaged fasteners, rivets and plugs with new ones.
Models Wagon
8. Open the tailgate, remove the fixing screw and remove the tailgate handle trim panel (see resist. illustration).
15.8 Fixings for the lower part of the upholstery (4) tailgate (station wagon models): 1. Fixing screw; 2. Facing panel of the tailgate handle; 3. Sensor-switch
9. On models equipped with an automatic tailgate opening mechanism, use a plastic wedge to remove the sensor switch from the installation housing (see illustration 15.8). Squeeze out 2 fasteners of the switch housing and remove the housing from the upholstery, disconnect the electrical wiring connector from the back of the housing.
10. Using a plastic wedge, wring out 10 clips of the lower part of the upholstery and remove it from the tailgate.
11. Insert a plastic wedge under the trim of the window frame of the tailgate, gradually moving it along the edge of the trim, wring out 8 latches and separate the trim (see resist. illustration).
15.11 Fasteners (indicated by arrows) overlays (5) tailgate window frame (station wagon models): 6. Upper brake light wiring connector
12. Disconnect the top level brake light harness connector and remove the window frame trim.
13. Installation is made in an order, the return to an order of removal. Upon completion of work, check the operation of the upper level brake light and the automatic tailgate opening mechanism.
Signum Models
14. Open the tailgate, remove the light cover from the upholstery (see resist. illustration) and disconnect its electrical connector.

15.14 Fixings for the lower part of the upholstery (1) tailgate (Signum models): 2. Expanding rivets; 3. Ceiling light; 4. Fixing screws
15. Remove the 3 fixing screws, then use the special tool (e.g. Hazet 799-3) remove 2 spacer rivets (see illustration 15.14) from the tailgate trim. Using a plastic wedge, wring out 10 clips and remove the lower part of the upholstery of the tailgate.
16. Using a plastic wedge, wring out 4 latches and remove the top lining of the tailgate window frame (see resist. illustration).
15.16 Removing the top trim (5) tailgate window frame (Signum models): 6. Plastic wedge; 7. Clips
17. Using the same tool, press out 2 latches and remove the side trims of the window frame (see resist. illustration).
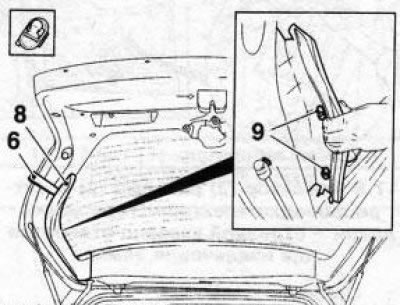
15.17 Fasteners (9) side trim attachments (8) tailgate window frame (Signum models): 6. Plastic wedge
18. Installation is made in an order, the return to an order of removal.
Visitor comments