


Removal
1. Open the trunk lid and remove the lid trim (see Section 12).
2. Disconnect the high-level brake light wiring connectors (central) and single lock systems. Remember to turn off the ignition and disconnect the battery (see Chapter 5).
3. Press out the rubber guide bushing of the wiring harness and trunk lid and pull out the wire.
4. Disconnect the gas-filled telescopic struts from the luggage compartment lid by slightly lifting the locking bracket with a screwdriver and removing the strut from the upper spherical support - you will need the help of an assistant to support the lid.
5. For subsequent installation, use a marker to outline the position of the hinges on the lid.
6. Remove 4 mounting bolts (2 on each side) (see accompanying illustration), then, with the help of an assistant, remove the luggage compartment lid and set it aside.
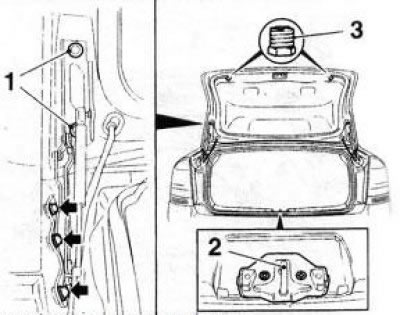
11.6 Attachment points and adjustment of the luggage compartment lid The arrows indicate the screws for attaching the hinges to the body: 1. Cover mounting bolts; 2. Lock bracket; 3. Adjustment buffers
Installation
7. With the help of an assistant, install the cover, aligning the hinge strips with the marks made during dismantling, then tighten the fastening bolts by hand.
8. Close the cover, align it in the body opening and adjust the gaps (see below).
9. After completing the adjustment, tighten the bolts and secure the upper ends of the gas-filled struts to the cover.
10. Reinstall all removed components.
Adjusting the trunk lid gaps
11. Remove the lower edge trim of the luggage compartment opening (see Section 48).
12. Remove the 2 screws securing the lock bracket (see illustration 11.6) on the lower edge of the luggage compartment opening and remove the bracket, then loosen the cover mounting screws.
13. Close the trunk lid and check the uniformity of the gap between the adjacent body elements (see Specifications). The cover is adjusted correctly if, when closed, there is a uniform gap around the entire perimeter and the edges of the cover are flush with the surrounding body surfaces.
14. If necessary, adjust the gaps by moving the cover in the appropriate direction.
15. Tighten the cover mounting bolts to the required torque (see Specifications).
16. If necessary, loosen the screws securing the hinges to the car body (see illustration 11.6) and by moving the hinges relative to the body, adjust the height of the front (adjacent to the rear window) edges of the luggage compartment lid.
17. To adjust the depth of the lid in the luggage compartment opening, turn the adjusting dampers out/in (see illustration 11.6), install them so that the lid, when closed, fits freely against the stops.
Note: To make adjustment easier, apply a paste-like mass to the dampers - use the imprint on the mass to determine whether the door is properly seated.
18. After completing the adjustment, lubricate the hinge mounting screws with fixing compound (for example, Loctite 243) and tighten them to the required torque (see Specifications).
19. Replace the luggage compartment lid lock bracket and tighten the screws by hand. Carefully close the luggage compartment lid: the lock bracket will take the desired position. Open the lid and tighten the bracket mounting screws to the required torque.
20. Close and open the trunk lid several times and make sure that it is adjusted correctly and that the lock is functioning properly; repeat the adjustment if necessary.
21. Install the luggage compartment opening lower edge trim.
Visitor comments