


Contents: Removal and installation ⬇ Adjustment ⬇
Removal and installation
1. Disconnect the cable from the negative terminal of the battery (see Chapter 5).
2. Remove the rear door trim (see Section 15).
3. Disconnect the wiring connectors of the windshield wiper, rear window defroster, high-level brake light and tailgate lock, and disconnect the rear window washer hose if necessary.
4. Press out the rubber guide bushing and pull the wiring harness out of the tailgate.
Note: To facilitate subsequent installation, attach a cord to the end of the wire, which will remain in the tailgate after the wires are pulled out.
5. Use a small screwdriver to slightly lift the locking clips (see accompanying illustration) and disconnect the gas-filled struts one by one from the upper spherical supports of the tailgate; you will need the help of an assistant to support the cover.
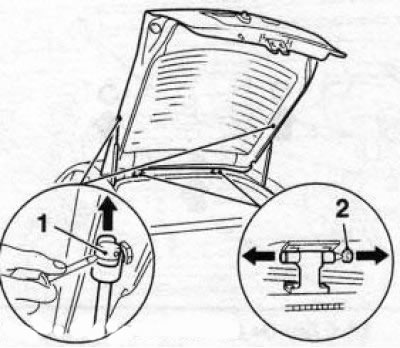
13.5 Fastening the tailgate: 1. Gas-filled strut locking bracket; 2. Door hinge axis retainer
6. Remove the clamps (see illustration 13.5), Using a hammer and a drift, knock out the hinge pins and, with the help of an assistant, remove the tailgate.
7. Installation is performed in the reverse order of removal. After installing the door hinge pins, close the tailgate and make adjustments (see below)
Adjustment
8. Remove the rear door sill trim (see Section 48).
9. Remove the 2 screws securing the lock bracket on the lower edge of the rear door frame and remove the bracket.
10. If necessary, remove the trim at the top of the vehicle's rear pillars (C or D - depending on the model).
11. Carefully release the rear edge of the headliner from the holders and loosen the door hinge mounting screws.
12. Close the tailgate and check the uniformity of the gap between the adjacent body elements (see Specifications). The tailgate is adjusted correctly if, when closed, there is an even gap around the entire perimeter and the door is flush with the surrounding body surfaces.
13. If necessary, the gaps are adjusted by moving the tailgate in the appropriate direction.
14. To adjust the depth of the rear door, dampers must be installed in the door opening (see accompanying illustration) on both sides so that the tailgate fits freely against them when closed.
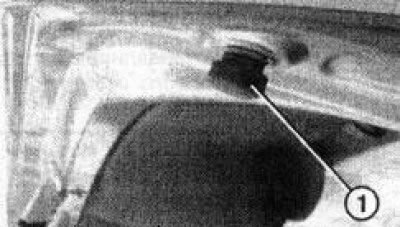
13.14 Adjustable rubber damper (1) of the tailgate
Original posted on the website [www.opelbook.ru]
Note: To make adjustment easier, apply a paste-like mass to the dampers - use the imprint on the mass to determine whether the door is properly seated.
15. Tighten the door hinge mounting bolts to the required torque (see Specifications).
16. Replace the tailgate lock bracket and tighten the bolts by hand. Carefully close the tailgate: the lock bracket will take the desired position. Open the door and tighten the bracket mounting bolts to the required force.
17. Close and open the tailgate several times and make sure that it is adjusted correctly and that the lock is functioning properly; repeat the adjustment if necessary.
18. Install the tailgate threshold trim.
Visitor comments