
OpelBook.ru
Cars AvtoVAZ Cars Mitsubishi Cars BMW Cars Mercedes Cars Nissan Cars Toyota Cars Chevrolet
English Русский
Български
Беларускі
Український
Српски
Hrvatski
Română
Polski
Slovenský
Magyar
 |  Sitemap  |  Contacts  |    


Main Astra Corsa Insignia Kadett Omega Vectra Zafira Others Articles
Astra F (1991-1998, petrol) Astra G (1998-2004, petrol) Astra G (1998-2004) Astra H (2004-2009) Astra J (2009-2015, petrol)
  • Main
  • Astra
  • Astra G
  • Body
  • Doors and windows
  • Removal and installation the tailgate (Hatchback and Station Wagon models)

Removal and installation the tailgate (Hatchback and Station Wagon models) (Opel Astra G)

            0

Contents: Removal ⬇ Installation ⬇
Tailgate Installation Details (hatchback and Station Wagon models)
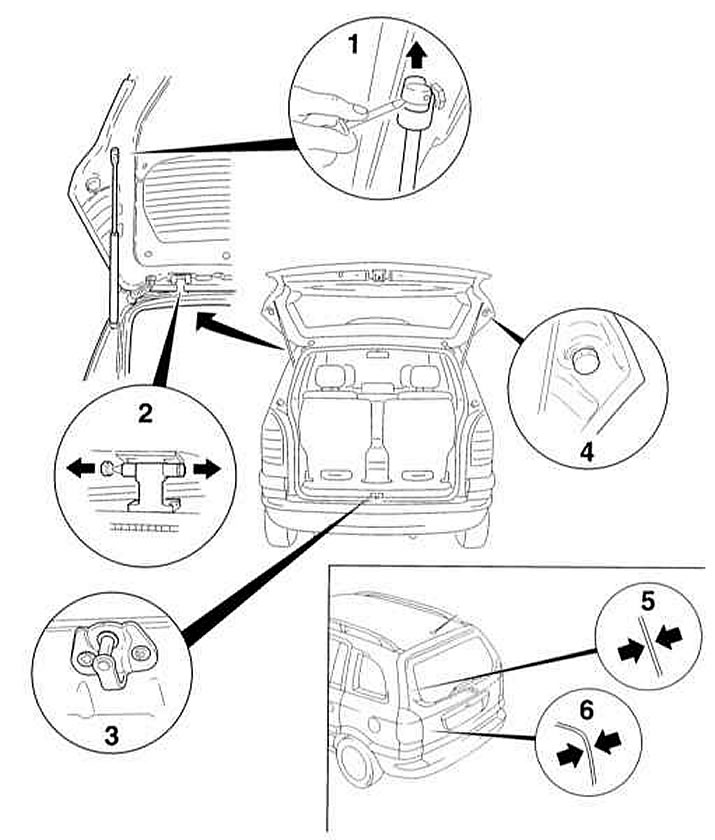
1 - Releasing the spring lock of the upper support of the door stop

1 - Releasing the spring lock of the upper support of the door stop

2 - Knocking out the door pivot pins should be done using a punch of a suitable size

3 - The striker must enter the lock assembly exactly in the middle

4 - Rubber cushion

5, 6 — Check the uniformity of the distribution of the door seating gaps in the body opening (gaps should be 4±1 mm)


(Material copied from this portal OPELBOOK.ru)

Removal


1. Open the tailgate, remove the plugs, unscrew the mounting screws and remove the upper and lower sections of the interior trim panel - note that the lower section has tabs that engage with grooves in the upper section.

2. Remove the mounting screws, release the clips and remove the high-level brake light.

3. Disconnect the ground wire from the inside of the door and tie a piece of wire to the wiring harness. Release the rubber grommet from the door frame and pull the wiring out - leave the wire threaded through the hole.
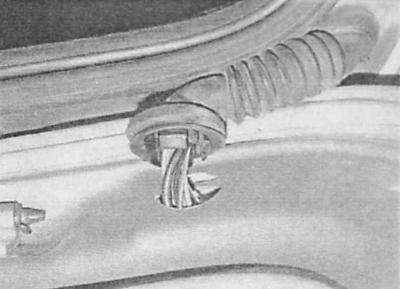
3. Disconnect the ground wire from the inside of the door and tie a piece of wire to the wiring…


4. Insert a screwdriver into the hole, press the fasteners and remove the rear window washer fluid supply nozzle. Disconnect the fluid supply hose from the nozzle and tie a piece of wire to it. Pull the hose out of the door, leaving the wire threaded through the hole.


5. Ask an assistant to hold the door and, using a screwdriver, release the spring clamps (1) of the telescopic posts (see illustration Tailgate Installation Details (hatchback and Station Wagon models)). Disconnect the struts from the hinges and lower them onto the body.

6. Remove the clamps and carefully, using a small punch, knock out the hinge pins (2) (see illustration Tailgate Installation Details (hatchback and Station Wagon models)).

7. Remove the door from the vehicle.

Installation


1. When replacing a door, transfer all removable components to it (rubber cushions, locking mechanism, etc.).

2. Installation is carried out in the reverse order of dismantling the components. Before installing the hinge pins, lubricate them with a layer of grease. Make sure that the clearances of the tailgate in the body opening (5 and 6) (see illustration Tailgate Installation Details (hatchback and Station Wagon models)) were the same along the entire perimeter of the door, - if necessary, loosen the hinge mounting bolts, having first removed the rear section of the ceiling trim, and make the appropriate adjustment. When closing the door, the striker (3) should enter the lock exactly in the middle, - if necessary, adjust the position of the striker. In the closed position, the fifth door should rest firmly on the rubber cushions (4) (see illustration Tailgate Installation Details (hatchback and Station Wagon models)), the position of which can also be adjusted if necessary.


This article is available at russian, bulgarian, belarusian, ukrainian, serbian, croatian, romanian, polish, slovak, hungarian
Checking the article: Pavlovsky Nikolay

Share information:

Previous articles
Opel Astra G: Doors and windows
Next articles

Removal and installation trunk lid components
Removal and installation the trunk lid hinges
Removal and installation the trunk lid (Sedan models)
Removal and installation the window regulator
Removal and installation of door glass
Removal and installation the door lock striker
Removal and installation tailgate hinges
Removal and installation tailgate components
Removal and installation the upper sunroof glass
Removal and installation sunroof components


See similar ones from other Opel car manuals:
▶ Rear side window (station wagon models) Opel Omega B (1993-1999)
▶ Rear door of station wagon models — removal and installation Opel Vectra B (1995-2002)
▶ Removal and installation the tailgate (Corsa and Tigra… Opel Corsa B (1993-2000)
▶ Removal and installation a hydraulic shock absorber… Opel Kadett D (1979-1984)
▶ Tailgate (5-door models) Opel Frontera A (1991-1998, petrol)
Link to this page in different formats

Visitor comments


No comments yet


How much will 42 + 43 =


Astra J (2009-2015, petrol) 
  • General information
  • Vehicle device
  • User manual
  • Faults en route
  • Maintenance
  • Power unit
  • Engine repair
  • Cooling and lubrication system
  • Engine power system
  • Exhaust system
  • Transmission
  • Clutch
  • Car gearbox
  • Drive shafts
  • Chassis
  • Front suspension
  • Rear suspension
  • Steering
  • Brake system
  • Wheels and tires
  • Body
  • Exterior
  • Interior
  • Doors and windows
  • Body Care
  • Heating and air conditioning
  • Security systems
  • Electrical equipment
  • Equipment and devices
  • Lighting and signaling
  • Power devices
  • Electrical circuits
Astra H (2004-2009) 
  • General information
  • Introduction to the guide
  • Troubleshooting
  • User manual
  • Maintenance
  • Power unit
  • Engine repair
  • Cooling and heating
  • Power and exhaust system
  • Ignition system
  • Launch and charge system
  • Transmission
  • Mechanical gearbox
  • Automatic gearbox
  • Drive shafts
  • Chassis
  • Brake system
  • Car suspension
  • Steering
  • Body
  • Interior
  • Exterior
  • Electrical equipment
  • Equipment and devices
  • Electrical circuits
Astra G (1998-2004) 
  • General information
  • Introduction to manual
  • User manual
  • Maintenance
  • Power unit
  • SOHC gasoline engines
  • DOHC gasoline engines
  • Diesel engines 1.7 and 2.0
  • Engine repair
  • Cooling system
  • Supply system
  • Injection system (gasoline)
  • Injection system (diesel)
  • Exhaust system
  • Charge and launch system
  • Ignition system (gasoline)
  • Preheat system (diesel)
  • Transmission
  • Manual gearbox
  • Automatic gearbox
  • Clutch
  • Drive shafts
  • Chassis
  • Brake system
  • Wheel suspension
  • Steering
  • Body
  • Exterior
  • Interior
  • Doors and windows
  • Ventilation and heating
  • Electrical equipment
  • Equipment and devices
  • Electrical circuits
Astra G (1998-2004, petrol) 
  • General information
  • User manual
  • Car care
  • Maintenance
  • Power unit
  • Single shaft engines
  • Twin shaft engines
  • Engine repair
  • Cooling and heating
  • Fuel and exhaust systems
  • Starting and charging system
  • Ignition system
  • Transmission
  • Clutch
  • Mechanical gearbox
  • Automatic gearbox
  • Drive shafts
  • Chassis
  • Brake system
  • Car suspension
  • Steering
  • Body
  • Interior
  • Exterior
  • Electrical equipment
  • Equipment and devices
  • Wiring diagrams Opel Astra
  • Wiring diagrams Opel Zafira
Astra F (1991-1998, petrol) 
  • General information
  • Maintenance
  • Power unit
  • Engine in car
  • Engine removed
  • Cooling system
  • Heating and ventilation
  • Fuel supply (carburetor)
  • Fuel supply (injector)
  • Emission control
  • Ignition system
  • Transmission
  • Clutch
  • Mechanical gearbox
  • Automatic gearbox
  • Drive shafts
  • Chassis
  • Brake system
  • Car suspension
  • Steering
  • Body
  • Exterior
  • Interior
  • Electrical equipment
  • Equipment and devices
  • Electrical circuits
OpelBook.ru © 2017–2026 · Mobile version · · Sitemap: EN BG BY UA RS HR RO PL SK HU · Feedback · Site search
Astra F, petrol · Astra G, petrol · Astra G · Astra H · Astra J, petrol · Corsa B · Corsa C, petrol · Corsa C · Insignia A · Kadett D · Kadett E · Omega A · Omega B · Omega B2 · Vectra A, petrol · Vectra A · Vectra B, petrol · Vectra B · Vectra C · Zafira A, petrol · Frontera A, petrol · Frontera B · Ascona C · Vivaro A ·
We want your visit to be comfortable 🤝! We use cookies 🍪 to make that happen.