
In an emergency, the clutch disc can be temporarily centered with another suitable rod (steel pin, round wooden stick, etc.).
Remove the gearbox.
First unscrew the 6 pressure plate fixing bolts only one turn in order to loosen the pressure plate.
If the flywheel rotates at the same time as the bolts are loosened, insert a screwdriver into the teeth of the flywheel as a retainer.
Completely unscrew the bolts, remove the pressure and driven discs.
Wipe the flywheel with a cloth soaked in gasoline.
Assess the wear of the driven disk:
There is still enough lining material or the brass rivets protrude dangerously far (most often at the beginning from the side of the pressure plate)? Opel does not give exact wear measurements, so you need to rely on your intuition.
There should be no one-sided wear of the linings, as well as cracks.
Next, check the strength of the fastening of the helical springs and lining rivets.
Estimate pressure plate wear:
Are the burn-in marks on the tops of the Belleville spring deeper than 0.3 mm?
Are the tops of the belleville spring exactly parallel to the rest of the pressure plate, or do they have a recess on one side?
Are all the rivets still strong?
Are the leaf springs under the adjacent ring OK?
Are there any cracks or nicks on the adjacent ring itself?
In addition, the ring towards the center should not be bent more than 0.3 mm (put a metal ruler). Otherwise, replace the pressure plate.
Check for ease of movement of the small needle bearing at the rear in the middle of the crankshaft and the clutch release bearing of the central release module.
Clutch installation
Removing the clutch is a labor intensive job. Therefore, each of the wear-sensitive parts, such as the driven plate, pressure plate and the central clutch release module, must be replaced at the slightest doubt about their functional suitability. Otherwise, there is a danger that the same work will have to be done again. Even better: mount the entire clutch assembly in the form in which it is offered by parts stores.
Leaking engine or transmission oil can also quickly destroy the new clutch. Therefore, pay attention to traces of oil in the clutch area and, if necessary, immediately replace the sealing rings of the crankshaft or the input shaft of the gearbox.
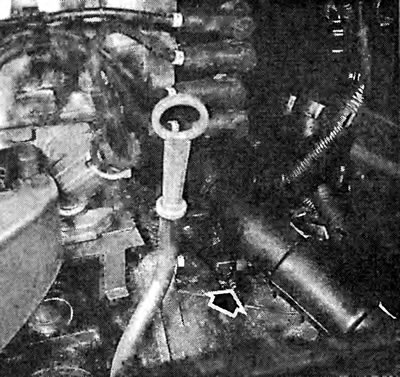
Bleeding the clutch hydraulics: remove the dust cap from the bleed valve (arrow). Put a suitable transparent hose on the valve, and lower the free end of the hose into a container partially filled with brake fluid. Open the bleed valve and bleed the clutch hydraulics as described in the text on the opposite page.
Lubricate the gearbox input shaft in the area of the teeth with Molykote Longterm 2 grease.
Completely remove the anti-corrosion wax on the new pressure plate.
Attach the driven disk to the flywheel so that the inscription is visible «Getriebeseite» — «gear side».
Place the pressure plate on the flywheel and tighten the bolts loosely.
Tighten the fixing bolts by hand and center the driven disc. It must be exactly centered on the flywheel so that the transmission shaft can then be inserted. Use a centering rod or an auxiliary tool for this purpose.
Tighten the bolts alternately, at least two times. Tighten the M7 bolts to 15 Nm, M8 to 28 Nm.
Tip: New clutch linings, due to the roughness of their surface, do not immediately adhere to the entire friction surface. Therefore, they must be run-in in order for their opposite friction surfaces to wear in. This should be done by soft and soft engagement of the clutch or even by grinding.
Visitor comments