
OpelBook.ru
Cars AvtoVAZ Cars Mitsubishi Cars BMW Cars Mercedes Cars Nissan Cars Toyota Cars Chevrolet
English Русский
Български
Беларускі
Український
Српски
Hrvatski
Română
Polski
Slovenský
Magyar
 |  Sitemap  |  Contacts  |    


Main Astra Corsa Insignia Kadett Omega Vectra Zafira Others Articles
Frontera A (1991-1998, petrol) Frontera B (1998-2004) Ascona C (1981-1988) Vivaro A (2001-2014)
  • Main
  • Opel
  • Frontera B
  • Body
  • Exterior
  • Hood — removal and installation

Hood — removal and installation (Opel Frontera B)

            0

Contents: Removal ⬇ Installation ⬇ Adjusting the hood position ⬇

Removal


Open the hood and place a clean rag under the corners of the hood to protect the vehicle's paintwork when removing the hood.

Use a marker to mark the position of the hood hinges.

Disconnect and pull the windshield washer fluid supply hose out of the hood.

Remove the 4 bolts securing the hinges to the hood. With an assistant, remove the hood from the car.
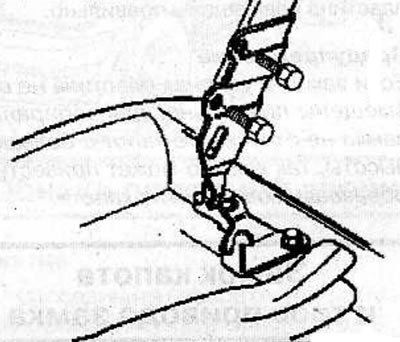
Remove the 4 bolts securing the hinges to the hood. With an assistant, remove the hood from the car.


Installation


Using two helpers, position the hood on the hinges and tighten the hinge mounting bolts by hand.

Install and connect the fluid supply hose to the windshield washer sprayers.

Adjusting the hood position


To adjust the position of the hood, the mounting holes in the hood hinges are made elongated, which allows you to change the relative position of the hood in relation to the hood hinge. When moving the hood, adjust its position so that the gap A between the hood and the fenders is uniform along the entire length of the hood and equals 4.5 mm. After adjustment, tighten the hood hinge bolts to a torque of 13 N·m.
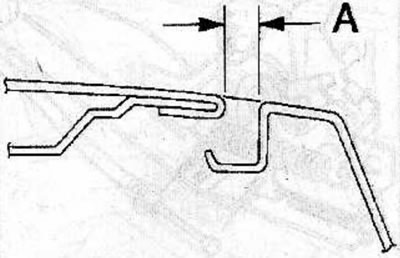
To adjust the position of the hood, the mounting holes in the hood hinges are made elongated, which…


By screwing in or out the rubber bonnet stops, adjust the installation height of the front part of the bonnet so that the bonnet is located at a height of B = 0±1.0 mm below the upper parts of the front fenders.
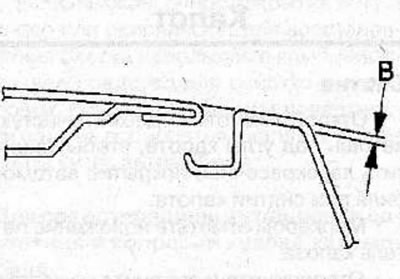


By screwing in or out the rubber bonnet stops, adjust the installation height of the front part of…


To check the reliability of the bonnet lock on the strike plate, release the bonnet from a height of 150 mm, then try to open the bonnet. If the hood does not open, the lock and strike plate are aligned correctly.

Warning: If the lock and striker plate are not aligned correctly, do not release the hood from a great height to lock the lock, as this may cause dents in the hood.


This article is available at russian, bulgarian, belarusian, ukrainian, serbian, croatian, romanian, polish, slovak, hungarian
Checking the article: Chernov Alexander

Share information:

Previous articles
Opel Frontera B: Exterior
Next articles

Longitudinal guides on the roof
Rear bumper
Front bumper
Radiator lining
General information
Technical data
Front wing
Fuel tank filler flap
Replacing body supports
Body dimensions


See similar ones from other Opel car manuals:
▶ Hood and hinges — removal and installation Opel Astra F (1991-1998, petrol)
▶ Removal and installation the hood Opel Corsa B (1993-2000)
▶ Replacing the hood Opel Insignia A (2008-2017)
▶ Engine hood Opel Kadett E (1984-1995)
▶ Hood — removal and installation Opel Omega A (1986-1993)
Link to this page in different formats

Visitor comments


No comments yet


How much will 38 + 19 =


Vivaro A (2001-2014) 
  • General information
  • User manual
  • Power unit
  • Petrol engine F4R
  • Diesel engine F9Q
  • Diesel engine G9U
  • Transmission
  • Clutch and drive shafts
  • Manual gearbox
  • Chassis
  • Front suspension
  • Rear suspension
  • Brake system
  • Body
  • Exterior
  • Interior
  • Electrical equipment
  • Heating and ventilation
  • Air conditioner
  • Equipment and devices
  • Electrical diagrams
Ascona C (1981-1988) 
  • General information
  • Maintenance
  • Power unit
  • Gasoline engines
  • Diesel engines
  • Cooling system
  • Fuel and exhaust system
  • Contact ignition system
  • Contactless ignition system
  • Transmission
  • Clutch
  • Mechanical gearbox
  • Automatic gearbox
  • Drive shafts
  • Chassis
  • Steering
  • Brake system
  • Car suspension
  • Body
  • Exterior
  • Interior
  • Doors and windows
  • Electrical equipment
  • Equipment and devices
  • Power devices
  • Electrical circuits
Frontera B (1998-2004) 
  • General information
  • User manual
  • Maintenance
  • Power unit
  • Petrol engines 2.2 l
  • Petrol engines 3.2 l
  • Diesel engines 2.2 l
  • Cooling system
  • Fuel system (petrol)
  • Fuel system (diesel)
  • Ignition system
  • Transmission
  • Clutch
  • Manual gearbox MUA5C
  • Automatic gearbox 4L30E
  • Chassis
  • Suspension and axles
  • Steering
  • Brake system
  • Body
  • Exterior
  • Interior
  • Doors, locks and windows
  • Heating and air conditioning
  • Electrical equipment
  • Power devices
  • Equipment and devices
  • Lighting and signaling
  • Electrical diagrams
Frontera A (1991-1998, petrol) 
  • General information
  • Introduction to guide
  • User manual
  • Maintenance
  • Power unit
  • Engine repair
  • Lubrication system
  • Cooling system
  • Power and exhaust system
  • Engine electrics
  • Transmission
  • Clutch
  • Mechanical gearbox
  • Cardan shafts
  • Chassis
  • Brake system
  • Front suspension
  • Rear suspension
  • Steering
  • Body
  • Repair and care
  • Electrical equipment
  • Equipment and devices
  • Electrical circuits
OpelBook.ru © 2017–2026 · Mobile version · · Sitemap: EN BG BY UA RS HR RO PL SK HU · Feedback · Site search
Astra F, petrol · Astra G, petrol · Astra G · Astra H · Astra J, petrol · Corsa B · Corsa C, petrol · Corsa C · Insignia A · Kadett D · Kadett E · Omega A · Omega B · Omega B2 · Vectra A, petrol · Vectra A · Vectra B, petrol · Vectra B · Vectra C · Zafira A, petrol · Frontera A, petrol · Frontera B · Ascona C · Vivaro A ·
We want your visit to be comfortable 🤝! We use cookies 🍪 to make that happen.