
OpelBook.ru
Cars AvtoVAZ Cars Mitsubishi Cars BMW Cars Mercedes Cars Nissan Cars Toyota Cars Chevrolet
English Русский
Български
Беларускі
Український
Српски
Hrvatski
Română
Polski
Slovenský
Magyar
 |  Sitemap  |  Contacts  |    


Main Astra Corsa Insignia Kadett Omega Vectra Zafira Others Articles
Frontera A (1991-1998, petrol) Frontera B (1998-2004) Ascona C (1981-1988) Vivaro A (2001-2014)
  • Main
  • Opel
  • Frontera A
  • General information
  • User manual
  • Rear windows of 3-door softtop models (with folding roof)

Rear windows of 3-door softtop models (with folding roof) (Opel Frontera A)

            0

Contents: Lowering and raising the convertible…⬇ Removal and installation side windows ⬇ Removal and installation the rear…⬇ Lowering the convertible top ⬇ Raising the convertible top ⬇ Pockets for storing removed side and…⬇

Lowering and raising the convertible top
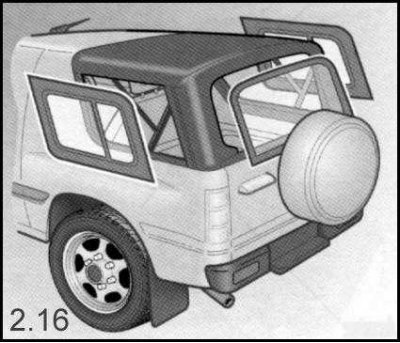


Convertible models are equipped with removable rear windows.


Convertible models are equipped with removable rear windows.

The convertible roof is intended for weather protection only. And it is not capable of ensuring the safety of passengers in the event of an accident. While the vehicle is moving, passengers must remain in their seats and wear seat belts.

Removal and installation side windows


1. To remove the side window, release the strap retainer from the inside of the window to the top edge of the window opening in the roof frame.
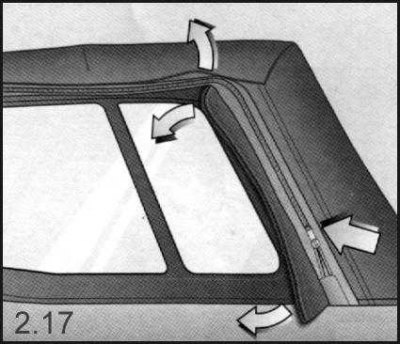
2. Release the Velcro fastener that secures the rear and top edges of the window assembly.


2. Release the Velcro fastener that secures the rear and top edges of the window assembly.


3. Locate the zipper catch at the lower rear corner of the window and unzip the zipper completely, freeing the window up to its upper front corner.

4. Slide the window forward to release the front and lower retaining straps from the guide channel in the body panel.

5. Roll the window film into a roll and place it in the special pocket in the tailgate (see below).

6. Repeat the procedure for the opposite side window.

Original source is on the website: OpelBook.ru
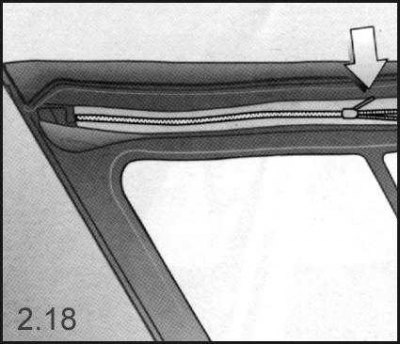
7. When installing, engage the zipper at the top front corner of the window opening and partially…


7. When installing, engage the zipper at the top front corner of the window opening and partially zip the zipper along the top edge of the window assembly.

8. Insert the front and lower strap retainers into the guide channel of the body panel, ensuring that the guide groove is properly aligned with the mating tab at the top of the channel.

9. Place the window assembly inside, under the roof material, and zip it up completely.

10. Attach the Velcro fastener strip to the roof material along the top and back edges of the window frame.

11. Finally, secure the inside edge of the window assembly to the roof frame with tape.

Removal and installation the rear window
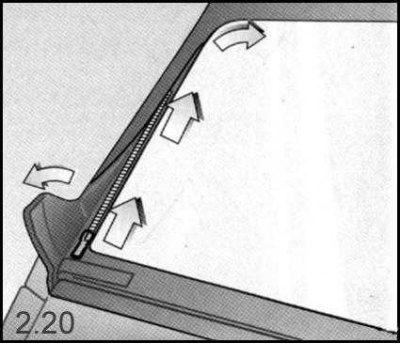


1. To remove the rear window, lift the flap in the lower left corner of the window and locate the…


1. To remove the rear window, lift the flap in the lower left corner of the window and locate the zipper.


2. Unzip the zipper completely, thereby separating the window assembly from the vehicle roof.

3. Open the tailgate and release the window mounting rod from the support brackets in the door pillars.
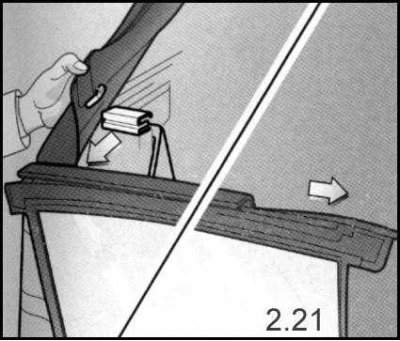
4. Remove the window film from the groove in the mounting rod and return the rod to its original…


4. Remove the window film from the groove in the mounting rod and return the rod to its original location in the support brackets.

5. Roll up the film window and place it in the special pocket on the tailgate.

Attention! To prevent exhaust gases from entering the passenger compartment, the tailgate and its window must be tightly closed while driving (see above).


6. Installation is carried out in reverse order.

7. If you have problems with the zipper, loosen the tension on the roof material by releasing the two latches at the front of the roof (see next subsection).

Lowering the convertible top


1. Remove the side windows (see above). There is no need to remove the rear window.

The convertible top is secured to the lower part of the roof panel by two latches, the handles of which are equipped with locks.
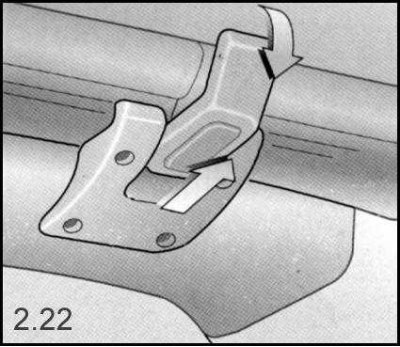
2. To release the latches, slide the locks in the direction shown in the illustration, then turn…


2. To release the latches, slide the locks in the direction shown in the illustration, then turn the handles downwards.


3. Slide the fabric top back and down, fitting the frame into the stops on the roller bar.

Be careful not to pinch your hands in the frame.
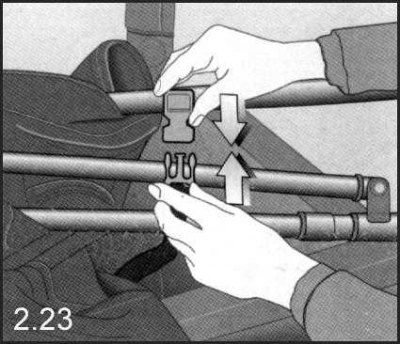
4. Secure the frame on both sides with straps, snapping their buckles securely.


4. Secure the frame on both sides with straps, snapping their buckles securely.

Raising the convertible top


1. To raise the convertible roof, unfasten the safety belt buckles, raise the roof and pull it forward.
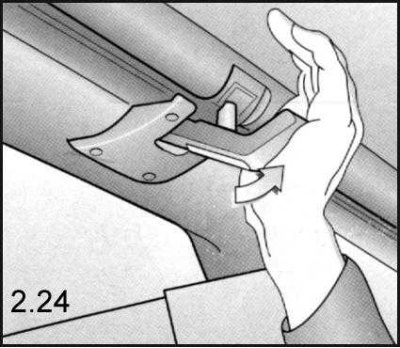
2. Snap the roof panel latches into place and rotate the latch handles upward to securely engage…


2. Snap the roof panel latches into place and rotate the latch handles upward to securely engage the latches.

3. Install the side windows in their regular places.
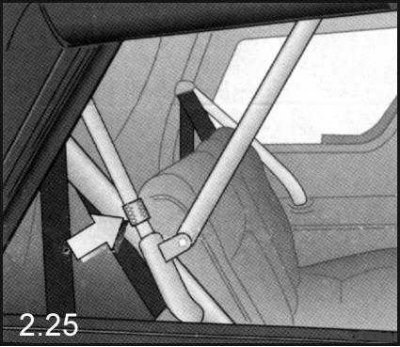
4. The tension on the fabric convertible top can be released by rotating the knurled frame coupling.


4. The tension on the fabric convertible top can be released by rotating the knurled frame coupling.


Pockets for storing removed side and rear windows


1. Special pockets are equipped on the inside of the car's tailgate.
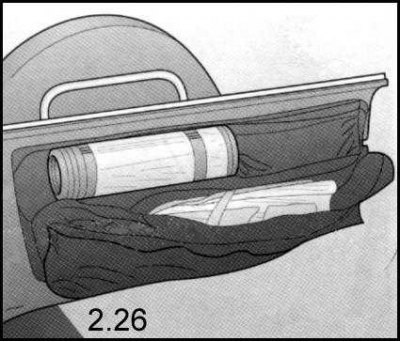
2. Roll up the rear window film slightly, securing the roll with two safety straps and place it in…


2. Roll up the rear window film slightly, securing the roll with two safety straps and place it in the door pocket.

3. The side window films are rolled into rolls and placed in the inner compartment.


This article is available at russian, bulgarian, belarusian, ukrainian, serbian, croatian, romanian, polish, slovak, hungarian
Checking the article: Meshcheryakov Damir

Share information:

Previous articles
Opel Frontera A: User manual
Next articles

Rear windows and roof panel of 3-door airtop models
Tailgate (3-door models)
Tailgate (5-door models)
Anti-theft alarm system
Electronic engine immobilization system
Single (central) lock
Opening and closing the hood
Expansion of luggage compartment volume (3-door models)
Expansion of luggage compartment volume (5-door models)
Cigarette lighter and ashtrays
Seat belts
Airbags


See similar ones from other Opel car manuals:
▶ Rear door of Hatchback models — removal and installation Opel Vectra B (1995-2002)
▶ Rear small side windows — removal and installation Opel Astra F (1991-1998, petrol)
▶ Replacing the rear wheel arch lining (Corsa and Combo… Opel Corsa B (1993-2000)
▶ Rear door adjustment Opel Insignia A (2008-2017)
▶ Removal and installation of rear wheel hubs on all models… Opel Kadett E (1984-1995)
Link to this page in different formats

Visitor comments


No comments yet


How much will 12 + 33 =


Vivaro A (2001-2014) 
  • General information
  • User manual
  • Power unit
  • Petrol engine F4R
  • Diesel engine F9Q
  • Diesel engine G9U
  • Transmission
  • Clutch and drive shafts
  • Manual gearbox
  • Chassis
  • Front suspension
  • Rear suspension
  • Brake system
  • Body
  • Exterior
  • Interior
  • Electrical equipment
  • Heating and ventilation
  • Air conditioner
  • Equipment and devices
  • Electrical diagrams
Ascona C (1981-1988) 
  • General information
  • Maintenance
  • Power unit
  • Gasoline engines
  • Diesel engines
  • Cooling system
  • Fuel and exhaust system
  • Contact ignition system
  • Contactless ignition system
  • Transmission
  • Clutch
  • Mechanical gearbox
  • Automatic gearbox
  • Drive shafts
  • Chassis
  • Steering
  • Brake system
  • Car suspension
  • Body
  • Exterior
  • Interior
  • Doors and windows
  • Electrical equipment
  • Equipment and devices
  • Power devices
  • Electrical circuits
Frontera B (1998-2004) 
  • General information
  • User manual
  • Maintenance
  • Power unit
  • Petrol engines 2.2 l
  • Petrol engines 3.2 l
  • Diesel engines 2.2 l
  • Cooling system
  • Fuel system (petrol)
  • Fuel system (diesel)
  • Ignition system
  • Transmission
  • Clutch
  • Manual gearbox MUA5C
  • Automatic gearbox 4L30E
  • Chassis
  • Suspension and axles
  • Steering
  • Brake system
  • Body
  • Exterior
  • Interior
  • Doors, locks and windows
  • Heating and air conditioning
  • Electrical equipment
  • Power devices
  • Equipment and devices
  • Lighting and signaling
  • Electrical diagrams
Frontera A (1991-1998, petrol) 
  • General information
  • Introduction to guide
  • User manual
  • Maintenance
  • Power unit
  • Engine repair
  • Lubrication system
  • Cooling system
  • Power and exhaust system
  • Engine electrics
  • Transmission
  • Clutch
  • Mechanical gearbox
  • Cardan shafts
  • Chassis
  • Brake system
  • Front suspension
  • Rear suspension
  • Steering
  • Body
  • Repair and care
  • Electrical equipment
  • Equipment and devices
  • Electrical circuits
OpelBook.ru © 2017–2026 · Mobile version · · Sitemap: EN BG BY UA RS HR RO PL SK HU · Feedback · Site search
Astra F, petrol · Astra G, petrol · Astra G · Astra H · Astra J, petrol · Corsa B · Corsa C, petrol · Corsa C · Insignia A · Kadett D · Kadett E · Omega A · Omega B · Omega B2 · Vectra A, petrol · Vectra A · Vectra B, petrol · Vectra B · Vectra C · Zafira A, petrol · Frontera A, petrol · Frontera B · Ascona C · Vivaro A ·
We want your visit to be comfortable 🤝! We use cookies 🍪 to make that happen.