
Attention! Installation will require new flywheel/drive plate mounting bolts.
Removing
Models with manual transmission
1. Remove the transmission (see Section 7A), then remove the clutch assembly as described in Section 6.
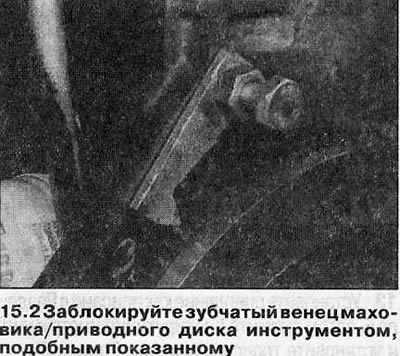
2. Block flywheel teeth as shown (see illustration). Alternatively, bolt a metal strip to the flywheel and crankcase. Align the flywheel and crankshaft with paint or a suitable marker.
3. Turn off bolts of fastening and remove a flywheel. Do not drop it - the component is very heavy.
Models with automatic transmission
4. Remove the transmission as described in Section 7B.
5. Block the drive (see point 2), then loosen the disc mounting bolts.
6. Unscrew the bolts and remove the mounting plate, centering ring and drive disk from the end of the crankshaft, marking the location of the components.
Inspection
7. On manual transmission models, inspect the flywheel for scratches on the clutch disc contact surface. If this surface is worn out, the flywheel can theoretically be reground, but it is preferable to replace it. Check flywheel teeth for wear and chipping. If the teeth are damaged, the flywheel must be replaced (replacement of its ring gear is not possible).
8. On models with automatic transmission, carefully inspect the drive disc and teeth of its crown for damage and signs of wear.
9. If there is any doubt about the condition of the flywheel/drive plate, consult your Opel dealer.
Installation
Models with manual transmission
10. Clean the contact surfaces of the flywheel and crankshaft and remove all traces of blocking compound from the threads of the bolt holes in the crankshaft.
11. Attach the flywheel and install new mounting bolts. If the old component is being installed, align the marks made before removal.
12. Block the flywheel using the method used for removal and tighten the mounting bolts to the Stage 1 torque. Turn the bolts to the Stage 2 corner using the socket and extension rod, and then to the Stage 3 angle. It is recommended to use an angle template when doing this to ensure accuracy. If a template is not available, apply alignment marks to the bolt head and flywheel to help ensure the bolt is turned to the correct angle.
13. Install the clutch as described in Section 6, then remove the locking tool and install the transmission (see Section 7A).
Models with automatic transmission
14. Clean the contact surfaces of the drive plate and crankshaft and remove all traces of blocking compound from the threads of the bolt holes in the crankshaft.
15. Place the drive disc together with the centering ring and mounting plate in working position, then screw in the new mounting bolts.
16. Tighten the fastening bolts with the tightening torque specified in the Specifications and tighten them as described in paragraph 12. When finished, remove the locking tool and install the transmission (see Section 7B).
Visitor comments