
Cleaning
1. Remove all external components and electrical switches/sensors from the unit. For complete cleaning, the cork plugs must be removed. On 4-cylinder engines, the plugs are pressed in; To remove the plug, drill a small hole, then screw a self-tapping screw into it and use pliers or a slide hammer to pry the plug out. On 6-cylinder engines, cork plugs are threaded.
2. Clean the cylinder block of any gasket or sealant residue, being careful not to damage the surfaces.
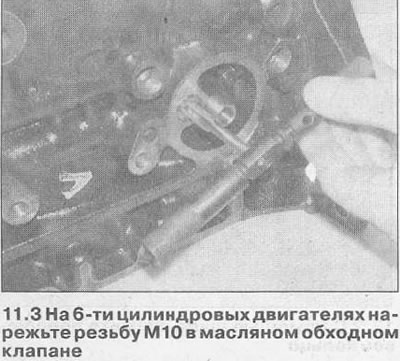
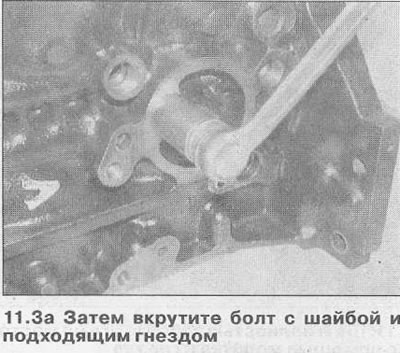
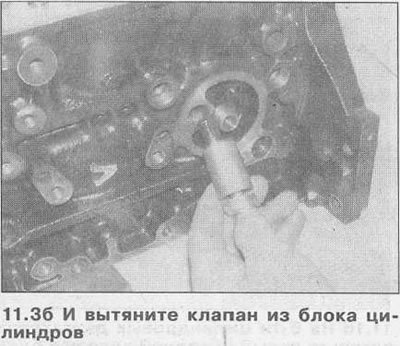
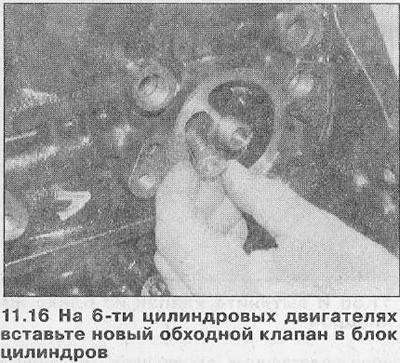
3. Remove all oil port plugs (where there are). They are usually very tight and will probably need to be drilled out. When assembling the engine, use new plugs. On 6-cylinder engines, it is also recommended to remove the oil bypass valve; The valve is behind the oil filter (when installing, use a new one). To remove the bypass valve, cut the thread in the center of the valve using an M10 tap. Screw a bolt with a washer and a socket into the hole as a spacer (see illustrations).
4. If any part of the crankcase is heavily soiled, steam cleaning will be required.
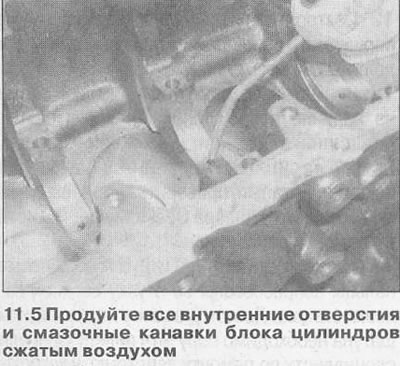
5. Clean all oil holes and passages one more time. Rinse all channels with warm water. Dry all contact surfaces thoroughly and apply a thin layer of oil to them to prevent corrosion. Also lubricate the cylinder walls with oil. To speed up the drying process and blow out all oil holes and channels, it is recommended to use compressed air (see illustration).
6. If the crankcase is not very dirty, cleaning can be done with hot soapy water and a stiff brush. Regardless of the cleaning method, carefully keep all lubrication holes and passages clean, and dry all components thoroughly. Protect the cylinder walls as described above to prevent corrosion.
7. All tapped holes must be clean and dry so that accurate tightening torques can be achieved during assembly. To clean the threads of each of the holes from rust, deposits or traces of sealant and restore it, run a tap of the appropriate size through it. When finished, blow out the holes again with compressed air to clear them of dirt particles resulting from this action. Also at the same time clean the threads of the cylinder head bolts and the main bearing cap bolts.
8. Apply a suitable sealant to the new oil port plugs and insert them into the holes in the block and tighten securely.
9. If the engine will not be assembled immediately, cover it with a large plastic bag; Protect all contact surfaces and cylinder walls as described above to prevent corrosion.
Inspection
10. Inspect crankcase parts for cracks and corrosion. Check the integrity of the threads in the holes. If there are signs of an internal coolant leak, have a technician diagnose the unit using special equipment. If defects are found, repair (if it is possible) or replace the block.
11. Check up channels of cylinders on presence of nicks and notches.
12. Measure the diameter of each cylinder at the top (just below the wear step), in the central and lower part of the cylinder, parallel to the axis of the crankshaft. Please note that there are different nominal diameter size groups subject to manufacturing tolerances; the size group marking is printed on the top side of the cylinder block.
13. Compare the results with the Specifications at the beginning of this Section. If any dimension exceeds the specification limit, the cylinder block must be bored out, if possible, or replaced and new piston assemblies installed.
14. If the cylinder walls are heavily developed, or in case of excessive ovality, taper, or if the clearance between the piston and the cylinder wall is exceeded (see chapter 12), the cylinder block must be bored (if it is possible), or replace and install new pistons. Overhaul pistons are available for all engines (0.5 mm).
15. If the cylinders are in good condition and not worn to the limit values specified in the Specifications, then the piston rings should be replaced. In this case, the cylinders must be honed so that the new rings fit properly. As a result, the bearing surface of the piston rings increases, and, accordingly, the tightness between the piston and the cylinder improves. The honing tool is driven by an electric drill. In addition, you will need some kerosene (or honing oil) and rags. Lubricate the cylinder channels with honing oil, insert the tool into the hole, squeezing the stones. Turn on the drill and move it up and down in the hole. Ideally, the honing lines should intersect at a 60°angle, although some piston ring manufacturers may specify a different angle. Use oil when honing. Do not remove more material than necessary. At the end of the work, do not remove the tool from the hole while it is rotating; slide it down until the tool stops, then remove the tool by turning it by hand in the normal direction. If new pistons are being installed, manufacturers may specify different honing angles, so refer to the ring manufacturer's instructions first. After honing, wipe off all honing oil. If you do not have the necessary tools or skills, contact an engine repair specialist.
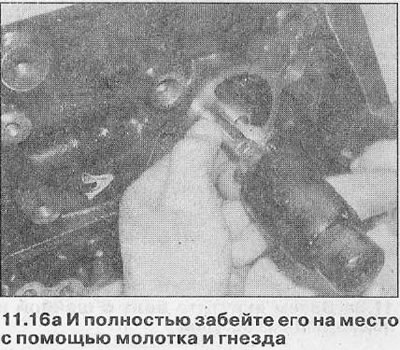
16. On 6-cylinder engines, drive the new oil bypass valve completely into the cylinder block using a hammer and drift (15mm jack fits perfectly) (see illustrations).
Visitor comments