


Contents: Left steering column switch ⬇ Tempostat Management ⬇ Right steering column switch ⬇ Adjustable steering column lock…⬇ Horn switch ⬇ Ignition Switch/Steering Column Lock ⬇
Left steering column switch
Note: The steering column switch has a touch-sensitive design; the lever returns to its original position after each manipulation.
Left steering column switch (see illustrations 15.1, 17.1a, 17.1b) it is designed to activate/deactivate the high beam mode, high beam signaling, control the operation of the direction indicators, and on models with the corresponding configuration, also to control the cruise control (see below).
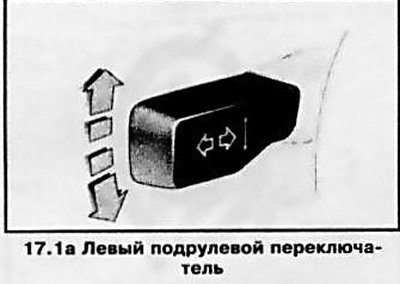
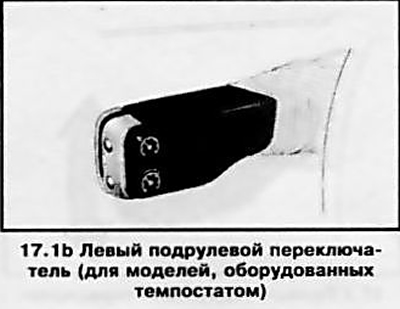
The low beam mode is activated when the ignition is on and the rotary switch on the switch panel to the left of the steering column is set to the appropriate position (see below)
To activate the high beam, you should press the switch lever away from you; the corresponding indicator light on the instrument cluster should light up (see Section 16). Switching to the low beam mode will occur when you press the lever away from you again, or when you pull it towards you. Signaling with high beam headlights is done by pulling the lever towards you (to the steering wheel) and can be performed in any position of the rotary switch.
The corresponding direction indicators are activated by pressing the lever up or down in the plane of the steering wheel until the resistance point is overcome (when released, the lever will automatically return to the neutral position, while the indicators continue to function) — the correct activation is confirmed by the operation of the corresponding one of the two green light indicators built into the instrument cluster in flashing mode (see section 16). The indicators are switched off automatically when the steering wheel is returned to the straight-ahead position, and if necessary, they can be forced by pressing the switch lever again. There is also the possibility of briefly (3-fold) activating the indicators by lightly pressing (without overcoming the point of resistance) pressing the lever in the corresponding direction, which is very convenient, for example, when changing lanes into the next lane on roads with multi-lane markings.
If necessary, when parking the car, you can activate the front and rear side lights on one side of the car. The rotary switch on the switch panel to the left of the steering column (see below) should be in the "O" or "AUTO" position, turn off the ignition and press the lever to the uppermost position (right side lights) or to the extreme bottom (left side lights) position. The correct operation of the function is confirmed by an audible gong and short-term activation of the direction indicator indicators on the instrument cluster (see above). The backlight is switched off when the ignition is turned on or when the lever is pressed in the opposite direction.
The left steering column switch also activates the "Homeward Bound Light" function (with appropriate equipment). To activate it, remove the key from the ignition, open the driver's door and pull the lever towards you - the low beam headlights and reversing lights are activated for 30 seconds. The function will be deactivated before the specified period when the key is inserted into the ignition or when the lever is pulled again.
If the vehicle is equipped with an adaptive headlight system, it is activated/deactivated by pulling the lever towards you - see below for details.
Tempostat Management
When equipped accordingly, the cruise control system (tempostat) allows you to automatically maintain the selected cruising speed of the car without using the gas pedal. The minimum supported cruising speed is 30 km/h. Using the cruise control becomes especially convenient during long trips on lightly loaded straight country highways. For safety reasons, it is not recommended to turn on the cruise control when driving in the city, on winding roads with many turns, on slippery road surfaces, in heavy rain and in other adverse weather and road conditions, as well as in other road situations that require frequent changes in speed. In the above cases, the driver must be able to fully control the vehicle's driving mode.
Attention: Incorrect use of the cruise control may cause an accident!
On cars with automatic transmission, the cruise control should be activated only when the selector lever is switched to position D, and if the Easytronic system is available, only in automatic mode. The cruise control is controlled by a push-button switch built into the end of the left steering column switch (see illustration 17.1b). The activation of the cruise control is performed by pressing the switch button, then button (1) - the corresponding indicator on the instrument cluster should light up (see Section 16). At a speed above 30 km/h, the current value is entered into the device memory when the button (1) is pressed - release the gas pedal. Short-term acceleration of the car (for example, when overtaking) can be done by pressing the gas pedal without turning off the cruise control - after releasing the pedal, the speed will automatically decrease to the cruising speed entered into the cruise control memory. The cruising speed value can be increased by accelerating the car and, after reaching the desired speed, entering its new value into the system memory by pressing the button (1). An increase in the cruising speed value without affecting the gas pedal can be done by briefly pressing or holding down the button (1) - after each press (when holding) the button will increase the value of the selected cruising speed in increments of 2 km/h, when released the new value will be entered into memory. The cruising speed is reduced by pressing or holding the button (hereinafter referred to as button (2)). After each press (when holding) the button will decrease the selected cruising speed value in 2 km/h increments. When the button is released, the new value will be entered into the device's memory.
To exit the automatic speed control mode and deactivate the cruise control, press the "O" button - the corresponding indicator will go out. The same result will be achieved by pressing the brake pedal or reducing the vehicle speed below 30 km/h. In addition, on models with AT/Easytronic, automatic speed control of the vehicle will stop when the selector lever is moved to the "N" position, and on models with a manual transmission - when the clutch pedal is depressed.
After accelerating the vehicle above 30 km/h, the last selected cruising speed value can be recalled from the system memory by briefly pressing button (2).
Note: The speed value stored in memory is erased after the ignition is turned off.
Caution: Activate the recall of the cruising speed from the system memory only if you remember its last value and are ready to drive in the corresponding speed mode!
Right steering column switch
Note: The steering column switch has a touch-sensitive design - the lever returns to its original position after each manipulation.
Note: To avoid damage to the drive mechanism, do not turn on the windshield wipers when the glass surface is dry, and do not move the brushes by hand. Do not allow gasoline or other solvents to come into contact with the rubber working elements of the windshield wipers. To prevent the risk of failure of the washer fluid supply pumps, try not to activate them when the reservoir is empty.
Note: The fluid for washing both windows and the headlight lenses is supplied from one reservoir.
Right steering column switch (see illustration 17.2) is designed to control the operation of the windshield and rear window wipers/washers, as well as headlight lenses. The windshield wipers can only be started when the ignition is on.
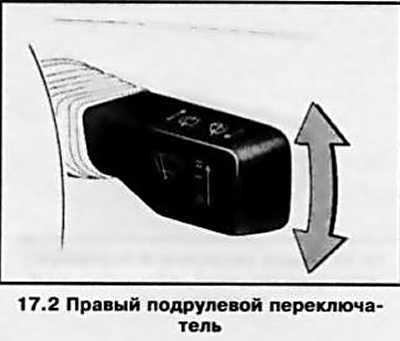
Moving the switch lever up and down in the plane of the steering wheel allows you to select the operating modes of the windshield wipers.
- O In this switch mode, the windshield wipers are off;
- -- Intermittent windshield wiper operation mode;
- - Continuous operation of windshield wipers with normal frequency of strokes;
- = High-speed windshield wiper mode.
To switch to the next/previous mode, you need to slightly press the lever up/down. If you hold the lever in the pressed position, switching between modes will occur automatically. In this case, a sound signal will sound at the moment of switching to the "O" mode.
When the lever is pressed down from the "O" position, a short pause will occur (2-3 swings) windscreen wiper activation. The duration of the pause between the activation of the windscreen wipers in the interval mode can be adjusted within the range from 2 to 15 seconds. To set the required interval for the activation of the windscreen wipers with the ignition on, press the switch lever down and hold for the desired period of time, then switch the lever to the interval mode position - the duration of the pause is stored in the device's memory until the next change is made or until the ignition is turned off.
Note: Each time the ignition is turned on, the pause duration is automatically set to 4 seconds.
To supply the windshield with washer fluid, pull the switch lever towards you. In this case, if the switch is in the "O" position (see above), the windshield wipers will be activated simultaneously with the supply of fluid, and will stop functioning after another 2-3 strokes after releasing the lever.
On models with the corresponding configuration, when the headlights are on, the supply of washer fluid to their lenses is carried out simultaneously with its supply to the windshield of the car. The headlight washer operates in interval mode - after a short supply of fluid, it switches off for about 2 minutes.
On models equipped with an automatic windshield wiper control with a rain sensor, automatic mode is activated by lightly pressing the lever upwards - the rain sensor detects the amount of water on the windshield and automatically adjusts the speed of the windshield wipers and, if necessary, the supply of washer fluid.
Attention: Keep the rain sensor window clean, regularly clean it from dust and dirt!
The rear window wiper and the supply of washer fluid to the rear window of the car are controlled by pressing the right steering column switch. The first time the lever is pressed, the rear window wiper is activated in interval mode. Holding the lever in the pressed position supplies washer fluid. The rear window wiper is switched off by briefly pressing the lever again.
Note: The rear window wiper is switched on/off automatically when reverse gear is engaged/disengaged if the windscreen wipers are activated.
Adjustable steering column lock release lever
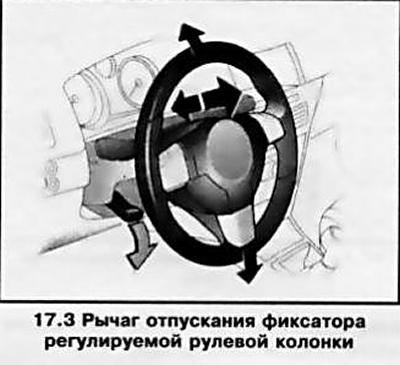
The steering column should be adjusted so that the steering wheel hub is opposite the driver's chest. A position in which the steering wheel hub is opposite the driver's face is incorrect, since it reduces the protective functions of the airbag built into it.
Caution: Do not adjust the tilt of the steering column while driving!
To release the lock, move the lever located on the left side of the steering column to the lower position (see illustration 17.3). Move the steering wheel to adjust the column position as required, then lock it again by returning the lock release lever to the upper position - to check the reliability of the lock, tug the steering wheel.
Horn switch
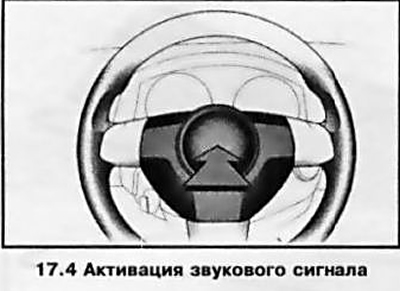
To activate the sound signal, press the decorative panel on the steering wheel hub (see illustration 17.4) in the area of the pictogram
Ignition Switch/Steering Column Lock
(Source is on this resource: opelbook)
Ignition Switch/Steering Column Lock (with appropriate equipment) is located on the right side of the steering column and can be in one of the following four positions (see illustration 17.5).
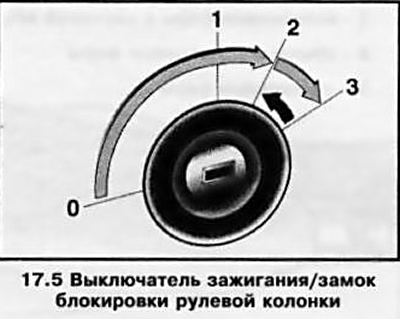
A — The ignition key can be inserted or removed from the ignition switch only in this position. On models equipped with automatic transmission, the key can be removed from the ignition switch only after the automatic transmission selector lever is moved to the "P" position and the foot brake pedal is released.
Note: Until the key is inserted into the ignition switch and the foot brake pedal is depressed, it is not possible to move the selector lever out of the "P" position.
On models with manual transmission, do not forget to engage first gear and set the parking brake before leaving the car. If the key is in position O, the steering column is automatically locked when you try to turn the steering wheel.
1 - When turning the ignition key from position O to position 1, the steering column is unlocked, and it is necessary to turn the steering wheel slightly in one direction or another (in order to relieve the load from the retainer).
2 — The ignition key is kept in this position at all times while the vehicle is moving, as well as when the engine is idling. On diesel models, turning the key to position 2 before starting the engine in cold weather activates the pre-heating system. At the same time, it supplies electrical power to all systems and additional equipment installed on the vehicle. When the key is turned to position 2, some of the control lamps located on the vehicle's instrument panel briefly turn on, confirming that the relevant systems are functioning properly (see section 16).
3 — In this position of the lock, the starter is activated. After the engine has started, the key should be released, it should automatically return to position 2. If the car is equipped with an immobilization system, the engine will not start if the anti-theft system does not identify the key code.
Visitor comments