
OpelBook.ru
Cars AvtoVAZ Cars Mitsubishi Cars BMW Cars Mercedes Cars Nissan Cars Toyota Cars Chevrolet
English Русский
Български
Беларускі
Український
Српски
Hrvatski
Română
Polski
Slovenský
Magyar
 |  Sitemap  |  Contacts  |    


Main Astra Corsa Insignia Kadett Omega Vectra Zafira Others Articles
Astra F (1991-1998, petrol) Astra G (1998-2004, petrol) Astra G (1998-2004) Astra H (2004-2009) Astra J (2009-2015, petrol)
  • Main
  • Astra
  • Astra H
  • General information
  • User manual
  • Controls located on the overhead console

Controls located on the overhead console (Opel Astra H)

            0

Contents: Interior lighting mode selection…⬇ Switches for individual directional…⬇ Switches for individual directional…⬇ Battery discharge protection ⬇ Additional lighting ⬇ Panoramic glass (astra GTS models) ⬇

Interior lighting mode selection switches


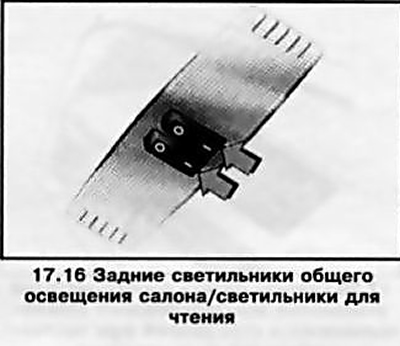
The interior lighting is provided by activating the lamps built into the ceiling panels of the interior (see illustrations 17.15, 17.16).
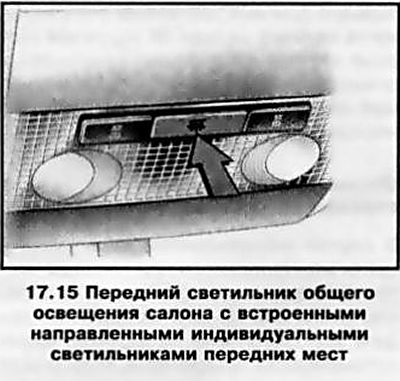
The interior lighting is provided by activating the lamps built into the ceiling panels of the…


The interior lighting is provided by activating the lamps built into the ceiling panels of the…


The front light is activated when one of the side doors of the car is opened and goes out with a slight delay when the door is closed. To activate the light with the doors closed, you must press the switch button. The light is turned off by pressing the same button again.


Rear lights (with appropriate equipment) are equipped with 3-position switches. In the middle position of the switches, the lighting is activated automatically when any of the side doors of the car is opened and goes out with a short delay when closing. When you press the left/right switch, the corresponding lamp starts to function as an individual reading light (see below).

Switches for individual directional lights in front seats


If equipped accordingly, the individual directional lights for the front seats are integrated into the front interior light (see above). The lights are activated when the ignition is on by pressing the button on the corresponding switch (see illustration 17.15) and provide individual illumination of the driver's and front passenger's seats. Pressing the button again deactivates the corresponding light.

Switches for individual directional rear seat lights


Rear reading lights if equipped (see illustration 17.16) are activated separately (right and left) with the ignition on when the corresponding switch is moved to the "I" position. To deactivate, move the switch to the "O" position

Battery discharge protection


On models with the appropriate equipment, the interior lighting, reading lamps, luggage compartment lighting and main glove compartment lighting are automatically switched off after 20 minutes when the ignition is switched off, regardless of the switch position.

Caution: Do not leave the lights on for a long time with the engine off!


Additional lighting


To ensure ease of use of some controls and vehicle equipment in low light conditions, internal lighting is provided.


The interior lighting of the luggage compartment and main storage compartment is activated when the tailgate/glove compartment lid is opened.

If equipped accordingly, the backlight can be activated:
  • Instrument panels - for a few seconds when unlocking the car;
  • License plate - for a few seconds when unlocking the car;
  • Interior front door handles - with exterior lighting activated;
  • Makeup mirror in sun visors - when opening the mirror cover;
  • Illumination of the cigarette lighter and ashtray - when the ignition is turned on.

Panoramic glass (astra GTS models)


Some models are equipped with a special panoramic windshield, partially covered by a sliding roof panel, to increase forward visibility (see illustration 17.17). To move the panel, turn the handle in its central part clockwise and move the panel to the required distance. To reduce the view/close the panoramic glass, simply move the ceiling trim panel forward - in the extreme forward position, the lock will work and it will be fixed.
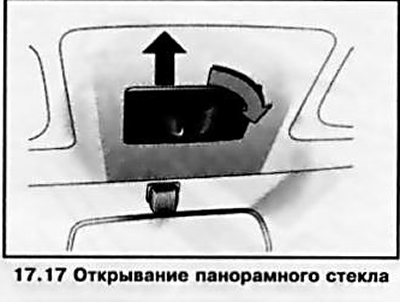
Some models are equipped with a special panoramic windshield, partially covered by a sliding roof…


Note: When moving the panel, the sun visors must be folded upwards.


Switches for controlling the operation of the electric sunroof and sunblind


Attention: To ensure that the sunroof drive functions properly, never place heavy objects on the sunroof, and before using the sunroof, remember to remove snow, ice, water and sand from its surface!


Caution: When using the roof rack, to avoid damage, make sure there is sufficient space to move the roof hatch!


The electric sunroof operates only when the ignition is on. To protect against sunlight, the sunroof can be covered with a sunshade when closed. The sunroof and sunshade are controlled by key switches (see illustration 17.18) built into the ceiling console.
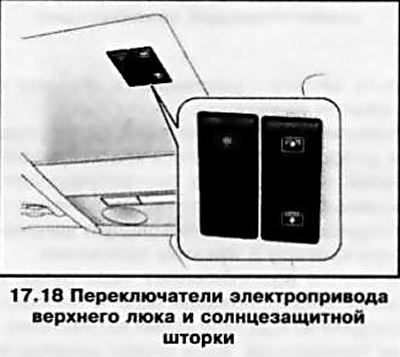
The electric sunroof operates only when the ignition is on. To protect against sunlight, the…


To open the upper hatch, simply press the corresponding edge of the electric drive control key switch. When the hatch is completely closed, the first press will slightly raise the rear edge of the hatch, and the next press will completely open the upper hatch.

Note: When the sunroof is opened, the sunshade opens automatically.


To close the hatch, you need to press the other side of the same key, and for safety reasons, the hatch will stop 20 cm before reaching the end point; to completely close the hatch, hold the key down.

Opening/closing of the sun blind is done by pressing the corresponding side of the other key: opening, closing.


Note: For safety reasons, the curtain will stop 20 cm before the end point. To close the curtain completely, hold the button down.


Partial opening/closing of the hatch and curtain is performed by short presses on the corresponding key. For full automatic opening/closing, hold the key down.

If an overload occurs in the electric drive circuits, the power supply will be automatically interrupted for a short time. If after some time the electric drive does not activate, check the corresponding fuses (see Chapter 12 and Appendices). If failures or malfunctions occur in the operation of the electric drive mechanism, it is necessary to synchronize the system as follows: with the ignition on, press the corresponding edge of the key, close the upper hatch/curtain and continue to hold the key in the pressed position for at least another 10 seconds - the control electric circuits will be coordinated. If synchronization does not eliminate the failures, contact an Opel service station for assistance.


This article is available at russian, bulgarian, belarusian, ukrainian, serbian, croatian, romanian, polish, slovak, hungarian
Checking the article: Simonov Timofey

Share information:

Previous articles
Opel Astra H: User manual
Next articles

Controls located on the center console
Controls located on the console section of the instrument panel
Controls located on the instrument panel to the left of the steering column
Switches and controls located on the steering column and steering wheel
Anti-theft system
Airbags
Controls located on door assemblies
Cigarette lighter, ashtrays
Power take-off socket
Storage compartments and pockets
Interior rear view mirror
Sun visors


See similar ones from other Opel car manuals:
▶ Overhead console controls Opel Corsa C (2000-2006)
▶ Steering wheel controls Opel Insignia A (2008-2017)
▶ Controls and instrumentation for Opel «Kadett E» cars Opel Kadett E (1984-1995)
▶ Center console — removal and installation Opel Omega A (1986-1993)
▶ Single Overhead Cam Engine Specifications Opel Vectra A (1988-1995, petrol)
Link to this page in different formats

Visitor comments


No comments yet


How much will 44 + 35 =


Astra J (2009-2015, petrol) 
  • General information
  • Vehicle device
  • User manual
  • Faults en route
  • Maintenance
  • Power unit
  • Engine repair
  • Cooling and lubrication system
  • Engine power system
  • Exhaust system
  • Transmission
  • Clutch
  • Car gearbox
  • Drive shafts
  • Chassis
  • Front suspension
  • Rear suspension
  • Steering
  • Brake system
  • Wheels and tires
  • Body
  • Exterior
  • Interior
  • Doors and windows
  • Body Care
  • Heating and air conditioning
  • Security systems
  • Electrical equipment
  • Equipment and devices
  • Lighting and signaling
  • Power devices
  • Electrical circuits
Astra H (2004-2009) 
  • General information
  • Introduction to the guide
  • Troubleshooting
  • User manual
  • Maintenance
  • Power unit
  • Engine repair
  • Cooling and heating
  • Power and exhaust system
  • Ignition system
  • Launch and charge system
  • Transmission
  • Mechanical gearbox
  • Automatic gearbox
  • Drive shafts
  • Chassis
  • Brake system
  • Car suspension
  • Steering
  • Body
  • Interior
  • Exterior
  • Electrical equipment
  • Equipment and devices
  • Electrical circuits
Astra G (1998-2004) 
  • General information
  • Introduction to manual
  • User manual
  • Maintenance
  • Power unit
  • SOHC gasoline engines
  • DOHC gasoline engines
  • Diesel engines 1.7 and 2.0
  • Engine repair
  • Cooling system
  • Supply system
  • Injection system (gasoline)
  • Injection system (diesel)
  • Exhaust system
  • Charge and launch system
  • Ignition system (gasoline)
  • Preheat system (diesel)
  • Transmission
  • Manual gearbox
  • Automatic gearbox
  • Clutch
  • Drive shafts
  • Chassis
  • Brake system
  • Wheel suspension
  • Steering
  • Body
  • Exterior
  • Interior
  • Doors and windows
  • Ventilation and heating
  • Electrical equipment
  • Equipment and devices
  • Electrical circuits
Astra G (1998-2004, petrol) 
  • General information
  • User manual
  • Car care
  • Maintenance
  • Power unit
  • Single shaft engines
  • Twin shaft engines
  • Engine repair
  • Cooling and heating
  • Fuel and exhaust systems
  • Starting and charging system
  • Ignition system
  • Transmission
  • Clutch
  • Mechanical gearbox
  • Automatic gearbox
  • Drive shafts
  • Chassis
  • Brake system
  • Car suspension
  • Steering
  • Body
  • Interior
  • Exterior
  • Electrical equipment
  • Equipment and devices
  • Wiring diagrams Opel Astra
  • Wiring diagrams Opel Zafira
Astra F (1991-1998, petrol) 
  • General information
  • Maintenance
  • Power unit
  • Engine in car
  • Engine removed
  • Cooling system
  • Heating and ventilation
  • Fuel supply (carburetor)
  • Fuel supply (injector)
  • Emission control
  • Ignition system
  • Transmission
  • Clutch
  • Mechanical gearbox
  • Automatic gearbox
  • Drive shafts
  • Chassis
  • Brake system
  • Car suspension
  • Steering
  • Body
  • Exterior
  • Interior
  • Electrical equipment
  • Equipment and devices
  • Electrical circuits
OpelBook.ru © 2017–2026 · Mobile version · · Sitemap: EN BG BY UA RS HR RO PL SK HU · Feedback · Site search
Astra F, petrol · Astra G, petrol · Astra G · Astra H · Astra J, petrol · Corsa B · Corsa C, petrol · Corsa C · Insignia A · Kadett D · Kadett E · Omega A · Omega B · Omega B2 · Vectra A, petrol · Vectra A · Vectra B, petrol · Vectra B · Vectra C · Zafira A, petrol · Frontera A, petrol · Frontera B · Ascona C · Vivaro A ·
We want your visit to be comfortable 🤝! We use cookies 🍪 to make that happen.