
OpelBook.ru
Cars AvtoVAZ Cars Mitsubishi Cars BMW Cars Mercedes Cars Nissan Cars Toyota Cars Chevrolet
English Русский
Български
Беларускі
Український
Српски
Hrvatski
Română
Polski
Slovenský
Magyar
 |  Sitemap  |  Contacts  |    


Main Astra Corsa Insignia Kadett Omega Vectra Zafira Others Articles
Vectra A (1988-1995, petrol) Vectra A (1988-1995) Vectra B (1995-2002, petrol) Vectra B (1995-2002) Vectra C (2002-2008)
  • Main
  • Vectra
  • Vectra C
  • Power unit
  • Power and control system
  • Removal and installation of the exhaust system

Removal and installation of the exhaust system (Opel Vectra C)

            0

Contents: Removal ⬇ Installation ⬇

Removal


Raise and place the vehicle on stands; if equipped, remove the engine sump guard (see Chapter 2). Tie the exhaust system sections to the bottom of the car with wire.

On 4-cylinder petrol engines, disconnect the connector (see accompanying illustration) post-catalytic lambda probe wiring. On the Z22YH engine, also release the wiring harness from the holder. On diesel engines with a volume of 1.9 liters, remove the diesel particulate filter (see below)
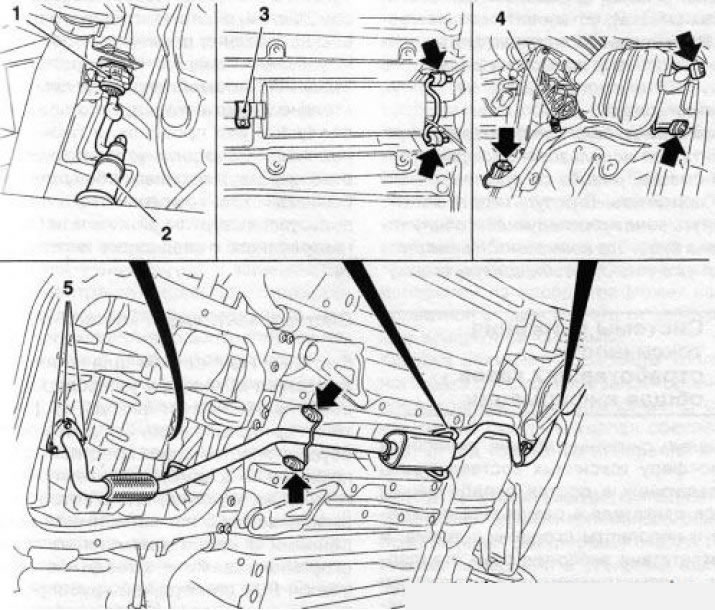
21.13 Removing the exhaust system (using the Z16XE engine as an example) - the arrows indicate the…

21.13 Removing the exhaust system (using the Z16XE engine as an example) - the arrows indicate the damping holders: 1. Electrical wiring connector; 2. Post-catalytic lambda probe; 3, 4. Connecting clamps of sections; 5. Nuts for fastening the inlet pipe


If only one section of the exhaust system is being replaced, disconnect adjacent sections at the connecting clamps (see illustrations 21.1 and 21.13).

On 4-cylinder petrol engines, remove 3 nuts (see illustration 21.13) and disconnect the exhaust pipe. On a 6-cylinder petrol engine, disconnect the exhaust pipe from both pre-catalysts by unscrewing 4 nuts.


On diesel engines, disconnect the exhaust pipe from the front catalytic converter by removing three nuts.

Remove the exhaust system components from the damper holders (see illustration 21.13) and remove them with the help of one or two assistants (depending on the model). If necessary, separate the exhaust tract sections.

Installation


To prevent fasteners from "sticking", it is recommended to lubricate all threaded connections with copper-containing grease during installation (for example Liqui Moly LM-508-ASC) Used clamps and nuts must be replaced with new ones. Check the rubber holders for porosity and damage, replace if necessary - with high mileage of the car, the holders must be replaced without fail.

If the exhaust system sections were separated, connect them and tighten the clamps. Pay attention to the tightness of the section mating, otherwise the exhaust gas composition analysis may yield an unreliable result.

Install the exhaust system with an assistant (two assistants) into the holders, without fully tightening the fastening nuts, secure the inlet pipe to the catalytic converter with a new seal.

Install the rear muffler and insert it into the holders and without tightening the fastener connect it to the central muffler. On Z19DT(H) engines install a soot filter (see below).

Check that the exhaust system is installed in accordance with the profile of the bottom and that there is no stress on the exhaust pipes due to bending. At the same time, make sure that there is sufficient distance between the exhaust system and the body everywhere, the holders with elastic rubber elements must be evenly loaded.


Tighten the exhaust system fasteners.

Reinstall the lambda probe and crankcase guard if they were removed and lower the car. Check the system for leaks (see above).


This article is available at russian, bulgarian, belarusian, ukrainian, serbian, croatian, romanian, polish, slovak, hungarian
Checking the article: Meshcheryakov Damir

Share information:

Previous articles
Opel Vectra C: Power and control system
Next articles

Exhaust gas system
Particulate filter (engines with a working volume of 1.9 l)
Turbocharger and Intercooler — General Information
Removal and installation of fuel injection pump
Removal and installation fuel injectors
The operating principle of diesel engine fuel injection systems
Removal and installation the particulate filter (engine Z19DT(H))
Removal and installation lambda probes
Emission control systems


See similar ones from other Opel car manuals:
▶ Exhaust gas cleaning system Opel Astra F (1991-1998, petrol)
▶ Checking the exhaust system Opel Corsa B (1993-2000)
▶ Replacing the exhaust system Opel Insignia A (2008-2017)
▶ Device of the exhaust gas system Opel Kadett E (1984-1995)
▶ Exhaust system — removal and installation Opel Omega A (1986-1993)
Link to this page in different formats

Visitor comments


No comments yet


How much will 27 + 42 =


Vectra C (2002-2008) 
  • General information
  • User manual
  • Vehicle device
  • Maintenance
  • Troubleshooting
  • Power unit
  • Engine repair
  • Cooling system
  • Power and control system
  • Engine electrics
  • Transmission
  • Clutch
  • Car gearbox
  • Drive shafts
  • Chassis
  • Car suspension
  • Steering
  • Brake system
  • Body
  • Exterior
  • Interior
  • Doors, locks and windows
  • Heating and ventilation
  • Electrical equipment
  • Equipment and devices
  • Headlights and lighting
  • Electrical circuits
Vectra B (1995-2002) 
  • General information
  • User manual
  • Weekly checks
  • Maintenance (gasoline)
  • Maintenance (diesel)
  • Troubleshooting
  • Power unit
  • SOHC gasoline engine
  • DOHC petrol engine
  • Diesel engine 1.7 liter
  • Diesel engine 2.0 liters
  • Engine repair
  • Cooling system
  • Fuel system (gasoline)
  • Fuel system (diesel)
  • Charging system
  • Launch system
  • Ignition and preheat
  • Transmission
  • Clutch
  • Mechanical gearbox
  • Automatic gearbox
  • Drive shafts
  • Chassis
  • Brake system
  • Wheel suspension
  • Steering
  • Body
  • Exterior
  • Interior
  • Doors and windows
  • Heating and ventilation
  • Electrical equipment
  • Equipment and devices
  • Electrical circuits
Vectra B (1995-2002, petrol) 
  • General information
  • Maintenance
  • Help with malfunctions
  • Power unit
  • Engine repair
  • Exhaust system
  • Cooling system
  • Fuel system
  • Multec injection system
  • Four point injection
  • Transmission
  • Clutch
  • Gearbox and drive
  • Chassis
  • Wheel suspension
  • Steering
  • Brake system
  • Wheels and tires
  • Body
  • Exterior
  • Interior
  • Electrical equipment
  • Fuses and electronics
  • Power devices
  • Ignition system
  • Lighting and signaling
  • Equipment and devices
  • Heating and ventilation
  • Electrical circuits
Vectra A (1988-1995) 
  • Power unit
  • Engine repair
  • Ignition system
  • Lubrication system
  • Cooling system
  • Injection system
  • Fuel system (carburetor)
  • Fuel system (diesel)
  • Exhaust system
  • Transmission
  • Clutch
  • Car gearbox
  • Chassis
  • Front suspension
  • Rear suspension
  • Steering
  • Brake system
  • Wheels and tires
  • Body
  • Exterior
  • Interior
  • Electrical equipment
  • Electrical circuits
Vectra A (1988-1995, petrol) 
  • General information
  • User manual
  • Maintenance
  • Power unit
  • SOHC engine
  • DOHC engine
  • Cooling and ventilation
  • Fuel system (carburetor)
  • Fuel system (injector)
  • Exhaust converter
  • Transmission
  • Clutch
  • Mechanical gearbox
  • Automatic gearbox
  • Drive shafts
  • Chassis
  • Brake system
  • Car suspension
  • Steering
  • Body
  • Body elements
  • Electrical equipment
  • Power devices
  • Equipment and devices
  • Electrical circuits
OpelBook.ru © 2017–2026 · Mobile version · · Sitemap: EN BG BY UA RS HR RO PL SK HU · Feedback · Site search
Astra F, petrol · Astra G, petrol · Astra G · Astra H · Astra J, petrol · Corsa B · Corsa C, petrol · Corsa C · Insignia A · Kadett D · Kadett E · Omega A · Omega B · Omega B2 · Vectra A, petrol · Vectra A · Vectra B, petrol · Vectra B · Vectra C · Zafira A, petrol · Frontera A, petrol · Frontera B · Ascona C · Vivaro A ·
We want your visit to be comfortable 🤝! We use cookies 🍪 to make that happen.