


Contents: Engines Z16XE/Z18XE ⬇ Features of the Z19DT engine ⬇ Features of the Z19DTH engine ⬇ Features of Y20DTH/Y22DTR engines ⬇ Specially for Z32SE engine ⬇
1. This Section describes in detail the operation of removing the water pump only for the Z16XE/Z18XE engine, for others only additional operations and features are given.
Engines Z16XE/Z18XE
Note: On these engine models, the water pump is driven by a toothed belt.
2. Drain the coolant (see Section 3).
3. Remove the timing belt and tension roller (see Chapter 2).
4. Remove the 3 mounting bolts and remove the water pump (see accompanying illustration).
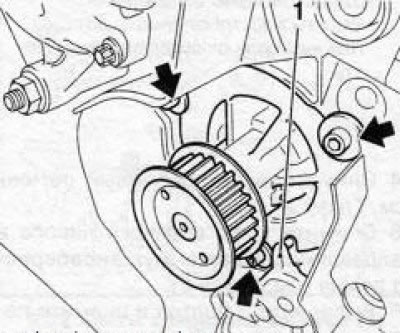
8.4 Mounting bolts (indicated by arrows) water pump (engines Z16XE/Z18XE): 1. Oil pump tide
5. Installation is carried out in the reverse order of removal. Thoroughly clean the mating surfaces of the cylinder block and the pump, lightly lubricate the mating surface on the cylinder block and the sealing ring of the pump body with silicone grease (e.g, OPEL 19 70206 white color).
Note: The sealing ring must be replaced without fail (see accompanying illustration).
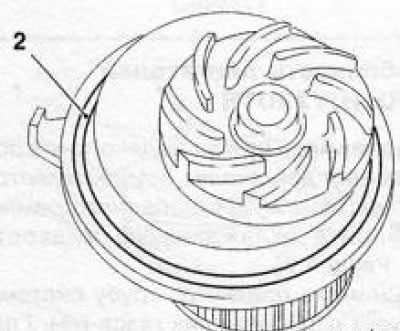
8.5 Sealing ring (2) of water pump (engines Z16XE/ Z18XE)
6. When installing, make sure that the oil pump lug fits into the water pump groove (see illustration 8.4) and tighten the pump mounting bolts to the required torque.
(The source is on the online website: OPELBOOK)
Features of the Z19DT engine
7. On these engines, to remove the water pump, it is necessary to additionally remove the toothed wheel and the camshaft sensor (see Chapter 2).
Features of the Z19DTH engine
8. Remove the timing belt and tension roller (see Chapter 2).
9. Unscrew the mounting bolts and remove the water pump (see accompanying illustration).
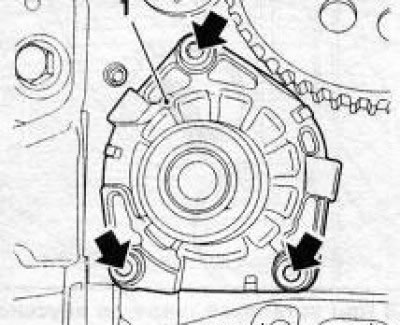
8.9 Mounting bolts (indicated by arrows) water pump (1) (z19DTH engine)
10.. When installing, tighten the new mounting bolts with force 25 Nm.
Features of Y20DTH/Y22DTR engines
Note: The water pump on these engines is driven by a multi-rib belt.
11. Drain the coolant (see Section 3).
12. Remove the exhaust pipe (see Chapter 4).
13. Loosen the water pump pulley mounting bolts and remove the multi-rib belt (see Chapter 2).
14. After unscrewing the mounting bolt, separate the cooling system hose from the front engine mount.
15. Remove the engine cover (see Chapter 2) and the upper charge air pipe.
16. Remove the air cleaner (see Chapter 4).
17. Remove the upper cooling system hose.
18. Disconnect the 2 fuel lines from the cylinder head cover and set them aside.
19. Lift the power unit using a lifting device/hoist (it will be necessary to lift the power unit to remove the bolts), remove the right engine mount and the mount bracket to the cylinder block (see Chapter 2).
20. Remove the water pump pulley, unscrew the three mounting bolts and remove the water pump housing.
21. Installation is carried out in the reverse order of removal. Do not forget to replace the water pump sealing ring.
Specially for Z32SE engine
Note: The water pump on this engine is driven by a multi-rib belt.
22. Remove the air cleaner (see Chapter 4).
23. Remove the 3 bolts securing the water pump pulley.
24. Remove the multi-rib belt (see Chapter 2).
25. Remove the water pump pulley and the multi-rib belt guide roller (see Chapter 2).
26. Remove 5 bolts and remove the front timing belt cover (see Chapter 2).
27. Remove the 3 mounting bolts and remove the water pump.
Caution! When removing the pump, some coolant may spill. Make sure that no coolant gets on the toothed belt!
28. Installation is performed in the reverse order of removal. Before installing the water pump pulley, lubricate its mounting bolts with a fixing compound.
Visitor comments