


Warning! Replacing the A/C refrigeration line hoses should be left to a professional workshop with the necessary equipment and qualifications to safely discharge the system. Never disconnect any refrigeration lines until the system has been completely discharged!
Note: Detailed information on checking the condition of the engine cooling and passenger compartment heating system hoses is provided in Section 10.
General information
Attention! Never ignore cases of technical fluid leaks, or even small leaks under the bottom of the car in the parking lot! Immediately conduct a full and thorough check of all systems to avoid subsequent expensive repairs!
1. Hoses tend to fail at the most inopportune moment. Exposure to high temperatures in the engine compartment leads to the gradual destruction of rubber and plastic hoses used in various systems. Metal pipelines can wear out when rubbing against protruding parts of the body or units during vibration that occurs during engine operation or when the car is moving. To avoid problems associated with hose rupture, they should be regularly checked for cracks, loose clamps and nipple connectors, abrasions, traces of burnout and signs of leaks.
2. Most (but not all) hoses are secured with clamps. Where clamps are used, check that they are securely fastened to prevent leaks. If clamps are not used, check that the hose at the connection to the fitting has not swelled and/or hardened, allowing leaks. The use of homemade wire clamps, as well as careless tightening of band clamps, can lead to gradual fraying of the hose material - replace such clamps with standard clamps, preferably screw type, at the earliest opportunity.
3. If there are signs of a leak of any liquid, but you cannot identify its source, you should place a large piece of paper or cardboard under the car and wait for some time (quite long) time, this will help identify the source of the leak.
Note: Some leaks may only become apparent when the engine is running.
Vacuum hoses
4. The concept of a vacuum hose leak means that air is being sucked into the hose (but does not come out of it), making the leak very difficult to detect. A small piece of vacuum hose can be used as a stethoscope to detect vacuum losses. When the end of the hose is directly over the leak, a hissing sound will be clearly audible through the hose. Listen to all vacuum hoses and connections for the characteristic hissing sound that indicates a leak. Avoid contact with hot or moving parts - the engine must be running when checking.
Examples of typical defects of radiator hoses
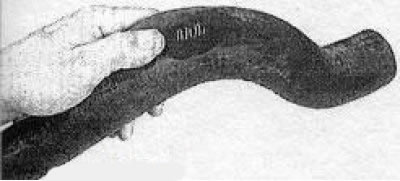
Check the hoses for frayed areas.

Softening of rubber indicates the beginning of its destruction as a result of aging
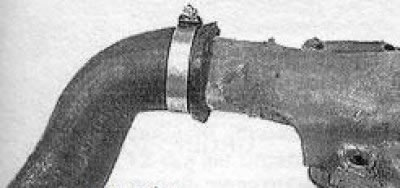
Tightening the clamp too tightly in order to secure it more securely on the nipple/socket of a hardened hose does not help stop the leak, but only leads to the destruction of the hose material
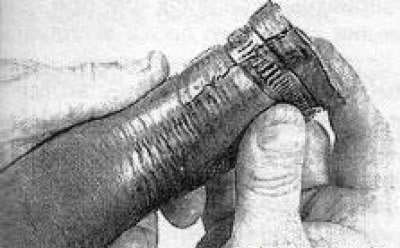
Check all hoses for bulges and signs of oil seepage at the ends. Cracks and small breaks in the rubber are easier to detect when squeezing the hose
5. Often, a reliable assessment of the condition of a vacuum hose can only be made by removing it from the vehicle. If more than one hose has to be removed, make sure to clearly mark them in advance to ensure proper connection during assembly.
6. When checking the vacuum hose, do not forget to also assess the condition of its plastic nipple connections - inspect the nipple for cracks and make sure the hose fits tightly on it. When pulled onto the nipple, the hose should not deform unevenly, causing vacuum losses.
Fuel hoses
Warning! When inspecting or servicing fuel system components, certain precautions must be taken. Perform all work in a well-ventilated area and keep away from open flames (for example, lit cigarettes) or unprotected lampshades to the work site. Immediately collect spilled fuel with a rag, which is then put in a place where it cannot spontaneously ignite. Try to avoid fuel coming into contact with exposed areas of skin - prolonged contact of this kind can lead to the development of cancer. If fuel comes into contact with skin, immediately wash it off with plenty of water and soap. When working with the fuel system, wear protective glasses and always have a fire extinguisher at hand.
7. Fuel lines and hoses are usually under pressure, so when disconnecting them, be prepared for fuel to splash out and need to be collected.
Caution! Before servicing the fuel hoses, it is necessary to relieve the pressure in the fuel supply system (see Chapter 4)! Dismantling of fuel system pipes equipped with injection can only be done at a service station!
Never, under any circumstances, use non-reinforced vacuum hoses, clear plastic tubing or water hoses as fuel lines.
8. Check all rubber fuel hoses for signs of material aging and other defects. Pay particular attention to the condition of kinked areas and areas located directly in front of the ends placed on the fittings. Usually, spring-type clamps are used to secure fuel hoses to the fittings. Such clamps lose their strength over time, and often unexpectedly jump off when the hose is disconnected. It would be reasonable to replace such clamps with more reliable and safe worm or screw clamps.
9. Fuel leaks are difficult to pinpoint until the leak is significant and therefore easily visible. Fuel tends to evaporate quickly once it comes into contact with air, especially in a hot engine bay. Small droplets may disappear before you can pinpoint the leak. If you suspect a fuel leak in the engine bay area, then cool the engine and start it while it is cold with the hood open. Metal objects shrink as they cool and rubber hoses tend to loosen, so any leaks will be more obvious as the engine warms up when starting from cold.
Metallic lines
10. In vehicle systems operating under high pressure (for example in the fuel injection system or the braking system) often sections of metal tubing are inserted or the entire system is made of them. Check these tubes carefully for dents, twists, or cracks.
11. If a section of metal line must be replaced, use only seamless tubing recommended by the manufacturer - non-standard tubing may not withstand the vibration loads caused by engine operation.
12. Check the metal brake lines where they connect to the master cylinder and to the pressure regulator or ABS for cracks or loose fittings. Any signs of brake fluid leakage require immediate and thorough inspection of the entire brake system.
Visitor comments