
All models
Attention: When equipping a car with head airbags, strictly follow the safety precautions!
1. Before performing work, disconnect the wires and insulate the battery terminals. Wait at least 1 minute for the SRS battery pack capacitor to fully discharge.
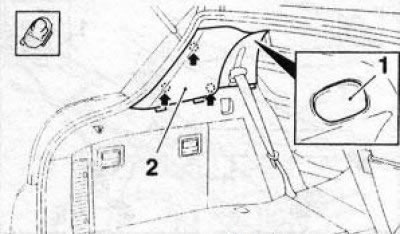
2. Remove the upper seat belt anchor cover, remove the fixing screw (see resist. illustration) and remove the anchor from the C-pillar.
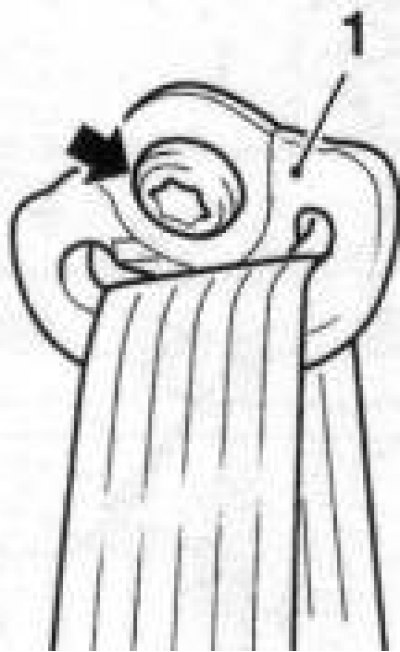
45.2 Screw (indicated by an arrow) top anchor fastening (1) seat belt
3. Install on all models in reverse order of removal, ensuring that the inside edge of the seal is over the trim. After completing the work, check the correct functioning of the seat belt.
Sedan Models
4. Remove the rear seat cushion (see Section 50).
5. Pry off the service cover on the C-pillar trim with a screwdriver (see resist. illustration) and carefully separate it by gradually moving the screwdriver along the perimeter of the cover.
6. Insert a plastic wedge under the trim of the C-pillar, wring out the clips (see illustration 45.5) and remove trim.
Hatchback Models (GTS)
7. Open the tailgate and remove the luggage compartment cover.
8. Fold the backrest and remove the rear seat cushion (see Section 50).
9. Remove luggage compartment side trim (see Section 46).
10. Pry off the service cover on the C-pillar trim with a screwdriver (see resist. illustration) and carefully separate it by gradually moving the screwdriver along the perimeter of the cover.

45.10 C-pillar trim (Hatchback models) - the arrows indicate the fixing screws: 1. Service cover; 2. Clips
11. Turn out 4 fixing screws, by means of a plastic wedge wring out clamps (see illustration 45.10) and remove the trim from the C-pillar.
Models Wagon
C-pillar
12. Fold the backrest and remove the rear seat cushion (see Section 50).
13. Open a back door and remove a ceiling overlay of a luggage space.
14. Separate the bottom trim of the rear side window frame from the side of the luggage compartment (see illustration 45.23 below).
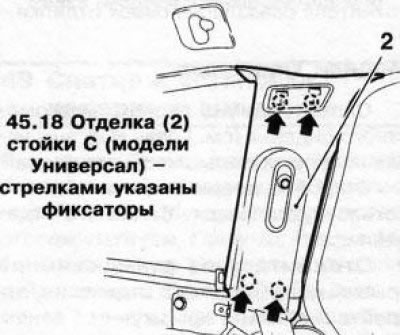
15. Using a plastic wedge, wring out the clips and remove the top trim from the rear side window frame (see resist. illustration).

45.15 Top trim (1) rear side window frames (station wagon models) - Arrows indicate clamps
16. Separate the seal from the C-pillar (see Section 41).
17. Pry off the service cover on the C-pillar trim with a screwdriver and carefully pry it off by gradually moving the screwdriver along the perimeter of the cover.
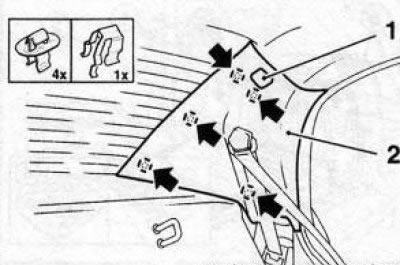
18. Using a plastic wedge, wring out 4 latches (see resist. illustration) and remove the C-pillar trim.
3. Top lining trim sidewall luggage compartment; 4. D-pillar trim
D-pillar
19. Fold the backrest and remove the rear seat cushion (see Section 50).
20. Open the tailgate and remove the roof lining of the luggage compartment.
21. Using a plastic wedge, wring out the clips and remove the top trim from the rear side window frame (see illustration 45.15)
45.5 Removing trim (2) drains C (Sedan models) - the arrows indicate the clamps: 1. Service cover
22. Using a plastic wedge, wring out 4 latches and separate the rear edge of the ceiling panel.
23. Turn out 2 fixing screws, wring out with a plastic wedge clamps and separate the lower overlay of a frame of a back lateral window (see resist. illustration) from the side of the luggage compartment.
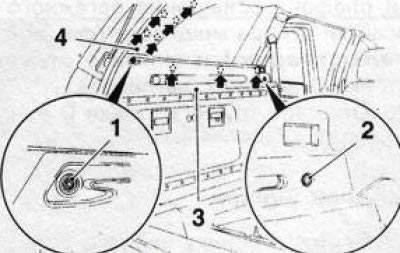
45.23 Removing trim (4) D-pillars (station wagon models) - the arrows indicate the clamps: 1, 2. Fixing screws; 3. Luggage compartment side trim upper trim
24. Insert a plastic wedge under the trim of the D-pillar and wring out 5 clips (see illustration 45.23).
25. On the reverse side of the lower lining of the frame of the rear side window, disconnect the electrical wiring connectors for the luggage cover and the power take-off socket (see resist. illustration) and remove the D-pillar trim along with the trim.-
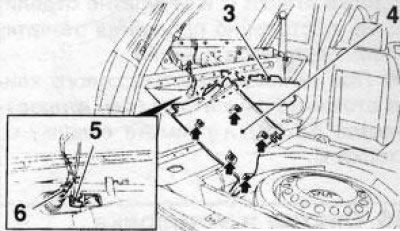
45.25 Socket connectors (6) power take-off and ceiling (5) luggage compartment lighting (station wagon models)
26. Separate finishing of a rack D from an overlay.
Signum Models
27. Fold down a back of a back seat.
28. Open the tailgate and remove the roof lining of the luggage compartment.
29. Pry off the service cover with a screwdriver (see resist. illustration) on the C-pillar trim and carefully pry it off by gradually moving the screwdriver along the perimeter of the cover.
45.29 Finishing (2) C-pillars (Signum models) - Arrows show clamps: 1. Service cover
30. Using a plastic wedge, wring out the latches (see illustration 45.29) and remove the trim from the C-pillar.
Visitor comments