


Contents: Top finish ⬇ Bottom trim ⬇
Top finish
1. Disconnect the wires and insulate the battery terminals. Wait at least 1 minute to allow the SRS independent power supply capacitor to discharge completely.
2. Open the front and rear doors and separate the door seals from the B-pillar.
On models equipped with head airbags, use a screwdriver to pry the service cover on the B-pillar trim and gently separate it by gradually moving the screwdriver along the perimeter of the cover.
3. Move the front seat forward and unbolt the seat belt anchor from it (see Section 49).
4. Insert the plastic wedge from the top side of the trim and press the 2 top fasteners (see accompanying illustration). Gradually moving the wedge along the side edge, press the side fasteners of the trim, then squeeze its lower part and, pulling it up, separate the trim from the B-post.
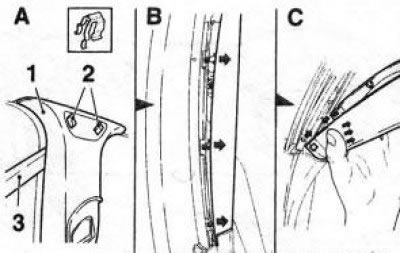
44.4 Removing the upper trim (1) of the B-pillar: 2. Upper fasteners; 3. Plastic wedge
Original source on the website (www.opelbook.ru)
5. Pull the seat belt out of the upper anchor height adjuster and remove the upper trim section from the B-pillar
6. Installation is performed in the reverse order of removal, making sure that the inner edge of the seal is on top of the trim. Tighten the seat belt fastening screw with the required force, having previously lubricated its thread with a fixing compound. Check that the belt strap is not twisted and can be freely wound on the drum. Check the proper functioning of the belt.
Bottom trim
7. Open the front and rear doors and separate the door seals from the B-pillar.
8. Move the front seat forward.
9. Using a plastic wedge, separate the threshold trim in the area of the B pillar (see Section 42).
10. In a similar manner, separate the lower trim of the B-pillar from the upper one; the wedge should be inserted under the trim from the side.
11. Separate the lower trim from the B-pillar (see accompanying illustration) and take it off.
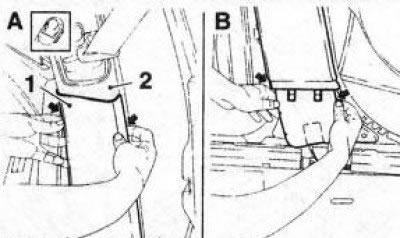
44.11 Removing the lower trim (1) of the B-pillar: 2. Upper trim of the B-pillar
12. Installation is carried out in the reverse order of removal, while ensuring that the inner edge of the seal is on top of the trim. Check the condition of the clamps, replace if necessary.
Visitor comments