
Removal and installation of a pillow of a back bench seat
Sedan/Hatchback Models
1. Lift up the rear bench seat cushion and release it from the anchors on the vehicle floor (see resist. illustration).
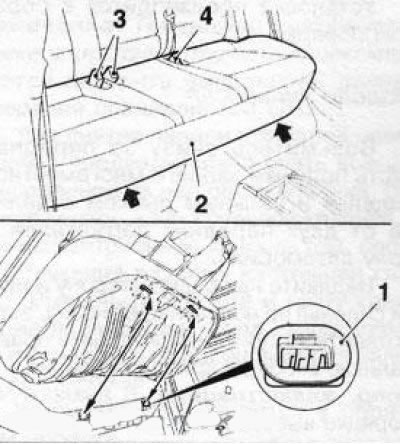
50.1 Removing the rear bench seat cushion (2) (Sedan / Hatchback models)
2. Remove the seat belt buckles from the rear bench seat and remove the cushion.
On models equipped with heated rear bench seat, disconnect the wiring connectors from the back of the cushion.
3. Remove the pillow from the car interior.
4. Installation is carried out in the reverse order.
Models Wagon
5. Grasp the bottom of the front of the rear bench seat cushion and with a strong pull separate it from the two front holders on the floor of the vehicle.
6. Push the right side of the seat cushion towards the rear, then pull outward to release the right rear brace from the mounting hook (see resist. illustration). In the same order, release the left bracket from the mount.
Note: The rear mounting brackets are difficult to remove from the hooks. Therefore, it is recommended to first remove the side cushion of the rear seat back (see below).
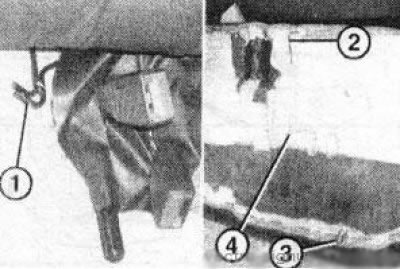
50.6 Rear bench seat cushion attachments (4) (station wagon models) - the back of the pillow: 1. Fixing hook; 2. Back brace; 3. Front brace
7. Remove the seat belt buckles from the rear bench seat and remove the cushion.
On models equipped with heated rear bench seat, disconnect the wiring connectors from the back of the cushion.
8. Take out a pillow from inside of the car.
9. Installation is carried out in the reverse order.
Side rear seat
Signum Models
10. These models are equipped with outboard luxury rear seats, similar in design to the front seats.
11. Remove 2 decorative covers of the seat mounting slide and unscrew the mounting screws (see resist. illustration).
50.11 Screw (arrow) fastening of a sled of a back lateral seat (Signum models)
12. Move the rear seat forward and fold the seatback after removing the head restraint (see chapter «Controls and methods of operation»).
13. Turn out the screw of fastening of the bottom anchor of a seat belt (see resist. illustration) and separate the anchor from the rear seat. Remove the screw (3) securing the seat belt lug and remove the seat belt from the rear seat.
50.13 Bolts (2) rear seat mounts (Signum models) 1 Rear seat back cover: 3. Seat belt fixing screw
14. Separate and remove the cover from the back of the seat back, unscrew the 2 rear bolts securing the sled (see illustration 50.13).
15. Carefully raise the front of the rear seat and disconnect the harness connectors for the seat belt tensioner and seat heater.
16. Remove the seat from the car.
17. Drive the threads of the front seat mounting bolts and the seat belt mounting screw, clean it and lubricate it with a fixing compound (e.g. Loctite 243).
18. Connect the electrical connectors and secure the seat sled.
19. Further installation is carried out in the reverse order of removal. When finished, turn on the ignition and use the warning lamp on the instrument panel to check that the SRS is working (see chapter «Controls and methods of operation», Section 17).
Center rear seat
20. At the corresponding complete set remove a ware box from the central back seat.
21. Move forward and set the right rear seat to the middle position.
22. Fold the right seat back so that the right side surface of the center support is fully visible. Move the support forward, press it down and hold it in this position. Open the valve on the floor of the car and unscrew the right bolt of the center seat.
Attention: When the support is released, it automatically returns to its original position and is fixed. Be careful - do not pinch your hands!
23. In the same order, remove the left bolt securing the center rear seat.
24. Fold the backs of all rear seats and loosen the 2 nuts securing the center seat at the rear right and left.
25. Return the backs of the right and left rear seats to a vertical position and remove the center seat forward. Installation is in the reverse order
Removal and installation of lateral pillows of a back of a back seat (Sedan/Hatchback/Station wagon models)
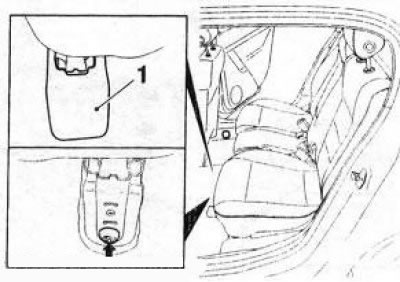
26. Grasp the upper edge of the side cushion of the rear bench seat backrest and with a strong jerk release the mounting bracket from the upper holder (see resist. illustration). Then grasp the pillow from below and pull it up from the bottom holder.
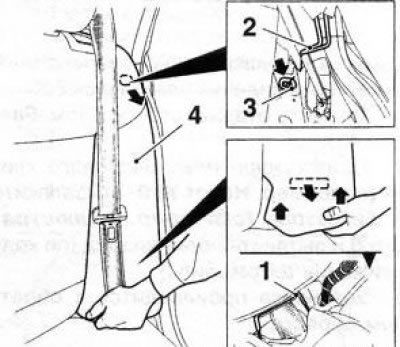
50.26 Removing the side cushion (4) rear bench seat backs: 1. Lower holder; 2. Mounting bracket; 3. Upper holder
27. Installation is carried out in the reverse order.
Removal and installation of a back of a back bench seat (Sedan/Hatchback/Station wagon models)
28. Remove the rear bench seat cushion (see above).
29. Remove the side cushion of the back of the rear bench seat (see above).
30. To remove the left back section, loosen the nut and remove the center seat belt buckle from the floor.
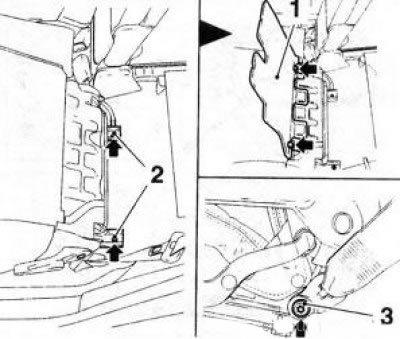
31. Fold down the corresponding section of the backrest of the rear bench seat. Using a screwdriver, press the outer support of the section inward and unlock (see resist. illustration).
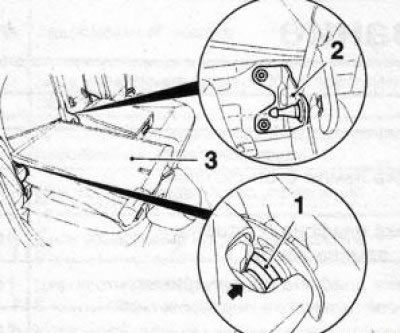
50.31 Backrest fixings (3) rear bench seat: 1. Outer support; 2. Pin of the left section of the back
32. Remove the backrest section up from the outer support.
33. To remove the right section of the backrest, disconnect it from the trunnion of the left section at the inner support lug.
34. The left section of the backrest is removed along with the trunnion (see illustration 50.31) - wring out a pin and separate it from an internal basic lug.
35. Remove the removed section of the back from the car.
36. Installation is carried out in the reverse order.
Visitor comments