
Dismantling the hood
Open the hood.
Where present, disconnect the heated windshield washer nozzle wire connectors.
Disconnect the windshield washer hose. Attach a cord to the end of the hose before removing the supply hose from the hood. Remove the hose and remove from the cord. When installing, tighten the hose into the hood again with a cord.

After installing the hood rubber buffers (the photo shows the left buffer) are unscrewed until the upper edge of the hood is in the same plane with the wings.
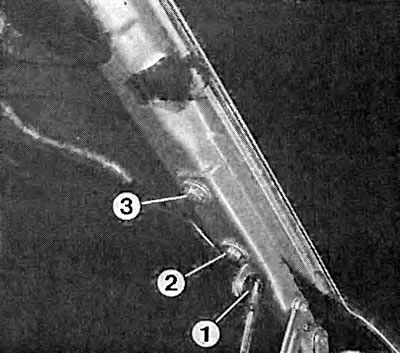
Here, the numbers indicate the following details: 1 - gas-filled shock absorber; 2 and 3 - hood hinge mounting bolts.
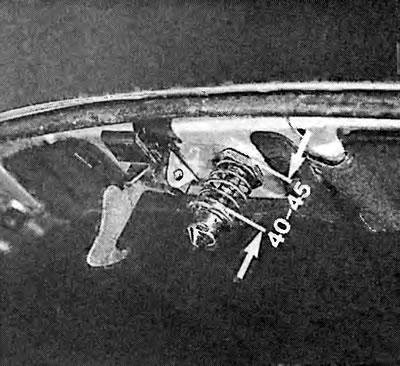
To set the height of the front side of the hood, loosen the sheet metal nut on the hood. Accordingly, turn the lock trunnion until the distance from the hood metal to the washer is 40-45 mm on the lock trunnion.
Mounting clamp (arrow), shown in the photo, you can adjust the free play of the hood cable.
Mark the mounting position of the hinged hood.
Loosen the bolts on the hood on the right and left.
The hood is too heavy to dismantle it alone. Therefore, hold the hood with an assistant on the right and left.
Now completely unscrew the loose bolts and remove the hood.
Replacement of the hinge of a cowl assy
To replace the hood hinges, you must first dismantle the water repellent assembly, see section «Removing the wiper motor» in the chapter on tools.
Open the hood and remove from the hinges.
Unscrew fastening bolts of the hinge of a cowl and remove the hinge.
Insert new hinge and screw on.
Adjust the hood.
Tightening torque: Hood hinge 20 Nm, side wall hinge 25 Nm.
Hood adjustment
With the hood closed, the distance to both fenders must be the same. The front edge of the hood must be in the same plane as the fenders. The height setting must also match: the top edge of the hood must be at the same height as the fenders. To achieve this mounting position, there are mounting possibilities, which are listed below:
To adjust the height, the bolts between the hinge and the body are loosened. The hinge moves accordingly.
For lateral adjustment, the bolts between the hinge and the hood are loosened. The hood slides in the right direction, and the hinges are tightened again.
On the front edge of the hood, height adjustment is carried out by means of a hood lock:
Screw the rubber buffers on the right and left into the hood
Loosen the lock nut with a gas wrench and screw or unscrew the lock trunnion with an open-end wrench until the distance from the hood to the washer on the lock trunnion is 40-45 mm.
With the hood closed, check the height adjustment (right and left).
Tighten the locknut again.
Make sure that the pin of the lock fits exactly into the hole on the front side of the body. If not, then after loosening the locknut, the lock pin can move laterally.
Unscrew the rubber buffer in the hood so that the hood along its upper edge is in the same plane with the wings.
Replacing the instrument cable
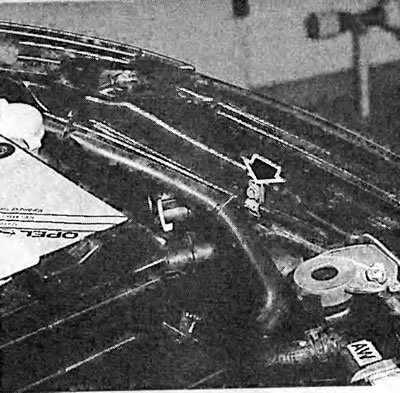
Unscrew the hood cable retaining clip on the front of the body next to the battery.
Remove the grille.
Put your hand into the hole and unhook the cable from the hood latch.
In the space at the feet of the driver, dismantle the lining under the dashboard. To do this, turn the plastic bracket a quarter of a turn to the left with a screwdriver and remove the lining.
Release the release handle and unhook. Remove the cable from the cabin side.
Pull a new cable into the engine compartment and hook it to the hood lock.
Secure the cable sheath with a retaining clip at the front of the body so that the cable has sufficient free play. The check is carried out with the release handle. To tangible resistance, it should be pulled out by 5-10 mm.
Visitor comments