


Contents: Removal the door lock ⬇ Removal the outer door handle ⬇ Removal the lock drum ⬇ Removal window lifters ⬇ Removal electric window lifts ⬇ Dismantling the window door ⬇ Removal the rear side window ⬇
This work is taken from the chapter "Salon", because it is important for further steps in disassembling the door. The dismantling of the front door trim is described. The rear door trim is dismantled, naturally, in the same way.
At the top of the door, carefully pry up the decorative triangular panel of the exterior mirror.
Use a narrow screwdriver to press the mirror adjustment switch on the inner handle.
Pull the handle off the inner handle with a jerk.
Use a narrow screwdriver to pry the tweeter bar out of the inner handle.
Remove a total of four inner handle mounting bolts.
Remove the window lift handle. The workshop uses a special tool KM-317 for this purpose. Take a strong rag as an auxiliary tool and stretch it between the door crank and the synthetic ring.
Pull the cloth down firmly while slowly rotating the door crank handle until it comes off the axle.
Make sure that when the door crank handle comes off, the fastening clip is not lost.
Remove the synthetic ring from the door trim.
At the bottom of the receiving pocket, unscrew the three Phillips-head screws.
Where present, remove the door light, see the chapter on lighting.
From one corner, use a wide screwdriver or spoon handle to pry the trim away from the door. Reach behind the trim and loosen the remaining clamps.
Pull carefully and never jerk, otherwise the clips will be torn out of the plastic holes in the trim.
Disconnect the multi-pin connector for the power mirror adjustment motor and tweeter behind the door trim.
Also disconnect the wire connector for the electric windows.
Remove the trim from the door metal upwards.
Carefully remove the applied film so that it can be re-applied later.
When assembling, the film must be glued. It does not allow water condensation from the door frame to reach the facing cardboard, so it cannot swell. If the old film is torn, then you need to cut a piece of the appropriate size from the protective film.
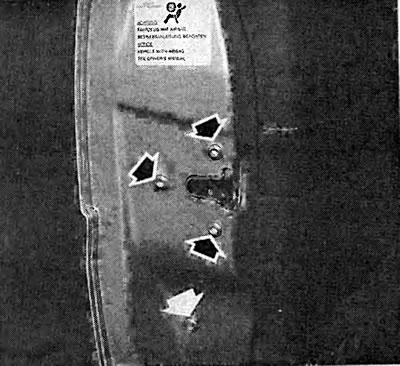
The black arrows show the three Phillips-head bolts that secure the door lock to the door frame. The white arrow shows the mounting bolt that secures the window track to the front door.
When installing, first attach the door trim at the top.
When installing, make sure that the locking button is correctly inserted into the hole in the door trim.
Insert the mounting clips one by one into the holes provided in the door and press in.
The clips can move slightly in the synthetic receiving holes of the lining, so they always fit into them. In order to press into the holes, the clips must be exactly in front of them. Anyone who blindly hits the fastening clips will simply crush them.
To install the window crank, you must slide the mounting clamp onto the door crank until it fits into the recesses.
Now place the window crank handle with the clamp installed on the window regulator toothed shaft. Press the palm of your hand on the crank so that the clamp fits into the groove of the shaft.
Screw on the remaining parts.
Removal the door lock
Remove the door trim.
Partially remove the protective film.
Rear door lock: Remove the outer door handle.
For all: Unscrew the window guide from the door metal and remove.
Disconnect the locking lever mechanism on the door lock.
Disconnect the door lock control rod.
Unscrew the three star key head bolts (T30) and remove the lock from the door frame.
Where available, disconnect the central locking plug connection.
Removal the outer door handle
Remove the door trim.
Remove the protective film from the door handle area. Make sure that the film does not tear.
Unscrew the window guide from the door metal and remove it.
Where available, disconnect the central locking plug connection.
[Original source is on the website: OPELBOOK.ru]
Unscrew the two nuts securing the handle bowl and remove it from the outer handle.
Disconnect the locking lever mechanism from the door lock and unhook the outer handle. To do this, press the clamps. Remove the inner part from the handle.
Unscrew both door handle mounting nuts.
Remove the door handle from the outside.
Remove the handle bowl from the door shaft.
After installation, turn the knurled nut on the lever mechanism downwards until the lever mechanism starts to operate without free play.
Removal the lock drum
Remove the handle bowl, see the chapter "Removing the outer door handle" above.
Insert the key into the lock drum to prevent the locking plates and springs from falling out when the drum is removed.
Press down on the spring retaining ring at the rear end of the lock drum.
Remove the control plate.
Remove the lock drum from the handle bowl.
Lubricate the new lock drum with an anti-corrosion sealant spray.
Removal window lifters
To attach the window regulator, you will need a blind rivet pliers and four (front window lifter) or five (rear window lift) 4.8 x 11 mm countersunk rivets. If you do not have countersunk rivet pliers, you can also screw the window regulator with the corresponding short screws.
Remove the inner door trim.
Remove the protective film.
Place the glass at half height and secure it in the door shaft with two wooden wedges.
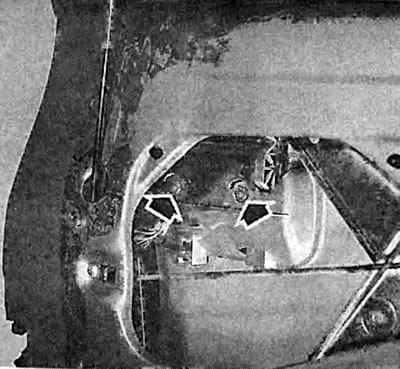
Before you can push the outer handle away from the door metal, you need to unscrew the handle cup (arrows).
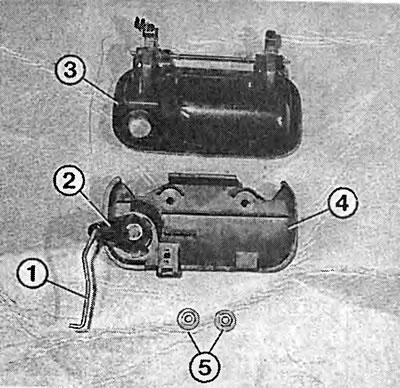
The door handle includes the following parts: 1 - lever locking mechanism; 2 - lock drum; 3 - outer door handle; 4 - handle bowl; 5 - fastening nuts.
In the front door, unscrew the glass guide rail from the door and remove it.
Drill out the window regulator mounting rivets with an 8.5 mm drill bit. Drill carefully until the rivet head falls off. Do not drill through the metal of the door.
Knock out the remaining rivets with a punch.
On the front door, unscrew the window regulator mounting rail from the door. First mark the installation position of the window regulator.
Lift the window slightly.
Disconnect the window regulator from the guide rail.
Remove the window regulator from the lower hole in the door shaft.
Insert the window lifter into the door shaft. Hang the lifting arm onto the glass rail.
Align the window regulator with the holes and use the adjustable clamping pliers to secure it to the door metal.
Rivet the window regulator.
Tighten the screw of the window mounting strip in the front door in accordance with the marks applied. If necessary, adjust the window installation using this screw. To do this, lower the window down and then up. Tighten the screw in this position.
Before installing the door trim, check the operation of the window lift control. The window glass should rise and fall easily.
Removal electric window lifts
Dismantling electric window lifters is almost no different from dismantling manual window lifters. Here is a description of the different work:
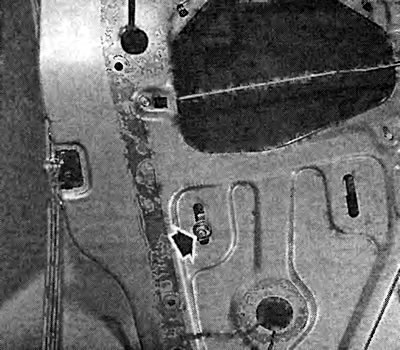
Left: This screw (arrow) can be used to adjust the window installation if necessary.
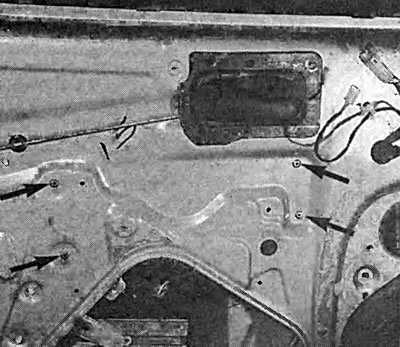
Right: The window lifter is attached to the door metal with so-called hidden rivets (arrows). When dismantling, drill out the rivets.
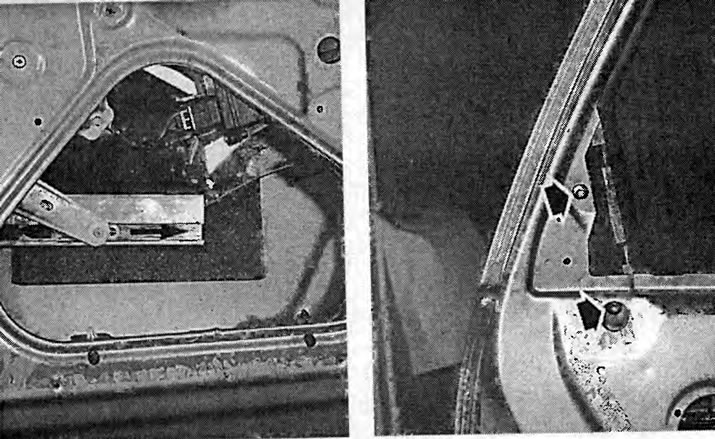
Left: when removing the window regulator, unhook the lifting lever from the window channel backwards and then forwards (arrow).
Right: in the rear door, the glass guide channel is secured at the top with two star-head bolts (arrows).
Before removing the window regulator, disconnect the plug-in connection of the wire to the window regulator motor.
After installing the window lift, check its operation: the electric motor should move the glass without jerking.
If your car has electric windows on the front and rear doors, then after installing the window lifter, its electronics must be reprogrammed.
Close all doors, turn on the ignition.
Close all windows one by one by continuously pressing the control switch. Keep the switch pressed for at least 5 seconds.
Reprogramming of the window lift electronics is also necessary if the corresponding fuses have been replaced, the battery has been disconnected, or the window lift electrics have been disconnected from the vehicle's electrical system.
Dismantling the window door
Remove the door trim and remove the protective film.
Remove the window regulator.
Remove the door frame seal from the outside of the door metal.
On the rear door, unscrew the window lifter guide channel and pull it up together with the seal. Additionally, partially remove the window frame seal.
Lift the window slightly from the rear and remove it upwards from the door opening.
When installing, slide the window into the guide channel first with the front sliding parts.
Make sure that both sliding parts are inserted into the guide groove.
Install the window regulator.
Screw the guide channel in place.
Install the window frame seal and the opening strips.
Adjust the window as described in the section "Removing the window regulator".
After installation, check the operation and, where necessary, reprogram the electric windows.
Removal the rear side window
The rear side windows in the Vectra are attached to the body with plastic nuts.
When removing a side window, remove the surrounding interior trim in the vehicle, see the "Interior" chapter.
Unscrew the seven (model with a slanted back) or four (with stepped rear) plastic nuts around the side window.
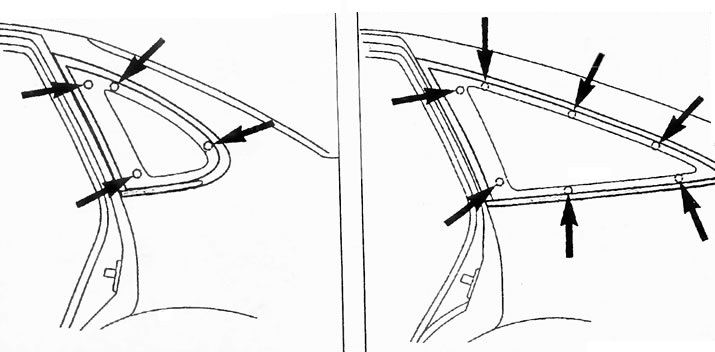
The rear side window on the stepped rear model is secured to the body with four plastic nuts (illustration on the left). And the window in the Vectra model with a beveled back is screwed with a total of seven nuts (illustration on the right).
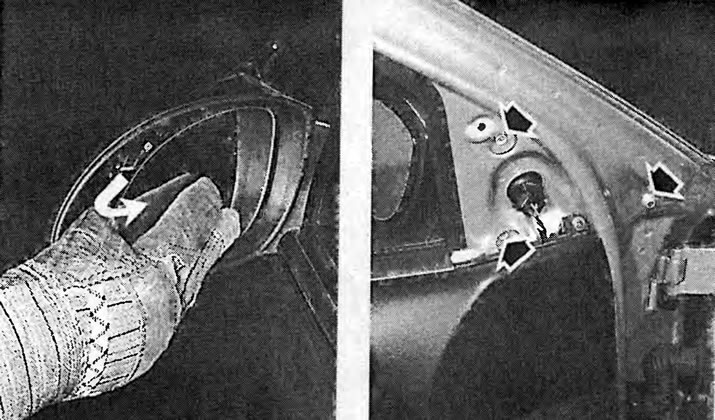
Left: to remove the mirror glass, you need to press the glass inward in the inner upper corner, while simultaneously grabbing the diagonally opposite corner of the mirror and removing the glass from the spring clamps.
Right: the arrows show the mounting screws of the external viewing mirror.
Carefully push the side window out of the cutout.
When installing, secure the side window with new plastic nuts.
Visitor comments