


Contents: Fuel line and injectors ⬇ Pressure regulator ⬇ Idle speed control motor ⬇ Throttle potentiometer ⬇ Coolant temperature sensor ⬇ Engine Air Intake Temperature Sensor ⬇ Air flow meter ⬇ Crankshaft sensor ⬇ Camshaft sensor ⬇ Knock sensor ⬇ Electronic control device ⬇ Fuel pump relay ⬇
Fuel line and injectors
Removal and installation
1. Relieve the pressure in the fuel system and disconnect the ground cable from the battery.
2. Disconnect the electrical connectors from the engine air temperature sensor and air flow meter.
3. Loosen the clamps and remove the crankcase ventilation hoses from the rear of the head cover.
4. Loosen the clamps and disconnect the intake duct from the air cleaner housing and throttle body and remove it from the engine compartment.
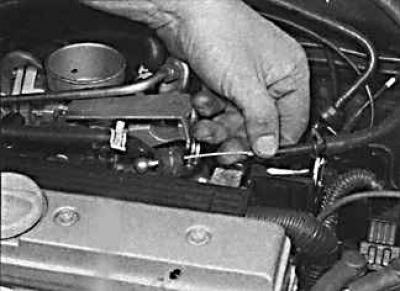
5. Remove the bracket and separate the accelerator cable from the throttle cam ball joint.
6. Disconnect the electrical connector from the idle speed control stepper motor, remove the bolts and remove the accelerator cable bracket from the throttle body.
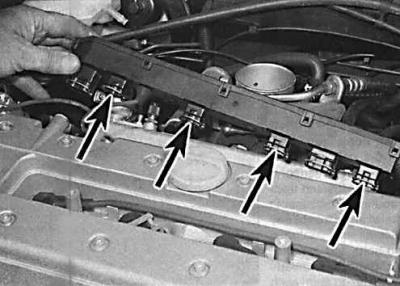
7. Loosen the mounting brackets (indicated by arrows) and remove the cover from the top of the fuel injectors.
8. Unscrew the union nuts and disconnect the fuel hoses from the fuel line.
9. Unscrew the three bolts, remove the fuel line together with the injectors from the manifold. Remove the lower sealing rings from the fuel injectors.
10. Release the retaining clip and remove the fuel injector from the fuel line. Remove the upper sealing ring from the fuel injector.
11. Installation is performed in the reverse order of removal. In this case, new sealing rings must be installed on the fuel injectors.
Pressure regulator
Removal and installation
1. Relieve the pressure in the fuel system and remove the ground cable from the battery.
2. To improve access to the pressure regulator, loosen the clamp and remove the crankcase ventilation hose from the rear of the head cover.
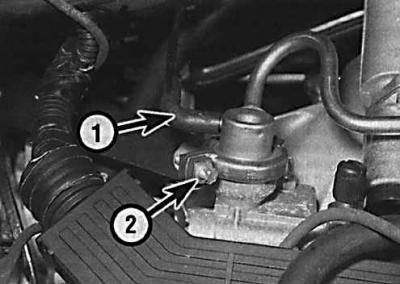
3. Disconnect the vacuum hose (1) from the regulator. Loosen the mounting clamp (2) and remove the regulator from the top of the fuel line.
4. Installation is performed in the reverse order of removal. In this case, it is necessary to use new sealing rings.
Idle speed control motor
Removal and installation
1. Disconnect the electrical connectors from the intake air temperature sensor and air flow meter. Loosen the clamp and disconnect the crankcase ventilation hose from the rear of the head cover. Loosen the clamps and remove the air intake duct from the engine.
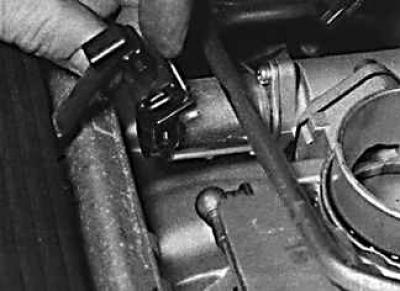
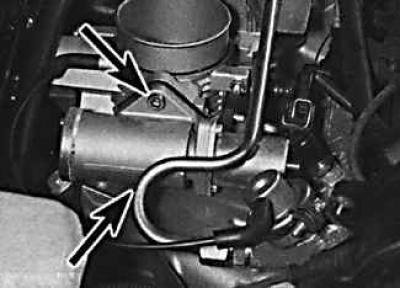
2. Disconnect the electrical connector (photo on the left), unscrew the screws (indicated by arrows in the photo on the right) and remove the idle speed control motor from the side of the throttle body.
3. Installation is carried out in the reverse order of removal.
Throttle potentiometer
Removal and installation
1. Turn off the ignition and disconnect the electrical connector from the throttle potentiometer, which is located on the rear of the throttle body.
2. Unscrew the screws and remove the potentiometer from the throttle body.
3. Installation is performed in the reverse order of removal. In this case, the potentiometer must be installed so that it is precisely aligned with the throttle valve axis.
Coolant temperature sensor
The coolant temperature sensor is screwed into the housing on the left front end of the cylinder head.
Engine Air Intake Temperature Sensor
Removal and installation
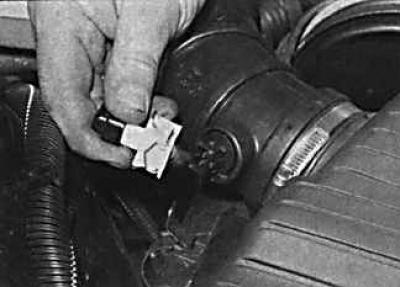
1. Turn off the ignition and disconnect the electrical connector from the sensor
2. Loosen the clamps and disconnect the air intake duct from the air flow meter and air cleaner housing and remove it from the engine compartment.
3. Remove the sensor.
4. Installation is carried out in the reverse order of removal.
Air flow meter
Removal and installation
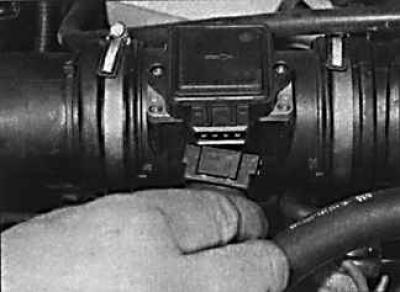
1. Turn off the ignition and disconnect the electrical connector from the air flow meter.
2. Loosen the clamps, disconnect the intake ports and remove the air flow meter.
3. Installation is carried out in the reverse order of removal.
Crankshaft sensor
The sensor is mounted on the front of the cylinder block and is accessible from below.
Removal and installation
1. Raise the front of the vehicle and support it on stands.
2. Remove the front powertrain mount.
3. Release the sensor wiring from the mounting brackets and disconnect the electrical connector.
4. Unscrew the bolt and remove the sensor.
5. Installation is performed in the reverse order of removal. In this case, it is necessary to install a new sealing ring on the sensor.
Camshaft sensor
Removal and installation
1. Remove the screws and remove the spark plug housing from the top of the head cover.
2. Turn off the ignition and disconnect the electrical connector from the camshaft sensor.
3. Remove the front timing belt cover.
4. Remove the bolt and remove the camshaft sensor from the top of the head.
5. Installation is carried out in the reverse order of removal.
Knock sensor
The knock sensor is mounted on the rear of the cylinder block and is accessible from below.
Removal and installation
1. Raise the front of the vehicle and support it on stands.
2. Disconnect the sensor wiring from the mounting brackets.
3. Release the retaining clips and lift the electrical wire cover over the rear of the cylinder head to access the sensor electrical connector. Disconnect the electrical connector.
4. Unscrew the bolt and remove the sensor.
5. Check that the mating surfaces of the sensor and the cylinder block are clean and dry. Install the sensor and secure it with a bolt. Further installation is performed in the reverse order of removal.
Electronic control device
The ECU is located under the water deflector in front of the windshield.
Removal and installation
1. Remove the ground cable from the battery. Remove the wiper arms.
2. Remove the upper seal from the engine compartment bulkhead and remove the water deflector.
3. Unscrew the nuts and remove the protective cover of the ECU unit.
4. Disconnect the electrical connectors, unscrew the nuts and remove the ECU unit.
5. Installation is carried out in the reverse order of removal.
Fuel pump relay
The fuel pump relay is located in the engine compartment in the relay block.
Original article on the web portal: OPELBOOK.ru
Removal and installation
1. Remove the relay box cover and remove the fuel pump relay which is colored purple.
2. Installation is carried out in the reverse order of removal.
Visitor comments