
OpelBook.ru
Cars AvtoVAZ Cars Mitsubishi Cars BMW Cars Mercedes Cars Nissan Cars Toyota Cars Chevrolet
English Русский
Български
Беларускі
Український
Српски
Hrvatski
Română
Polski
Slovenský
Magyar
 |  Sitemap  |  Contacts  |    


Main Astra Corsa Insignia Kadett Omega Vectra Zafira Others Articles
Vectra A (1988-1995, petrol) Vectra A (1988-1995) Vectra B (1995-2002, petrol) Vectra B (1995-2002) Vectra C (2002-2008)
  • Main
  • Vectra
  • Vectra B
  • Power unit
  • Diesel engine 1.7 liter
  • Replacing the timing belt — removal and installation

Replacing the timing belt — removal and installation (Opel Vectra B)

            0

Contents: Removal ⬇ Installation ⬇
Warning! The timing belt must be replaced on a cold engine.


Removal


1. Set the piston of the first cylinder to the top dead center in the compression stroke. Secure the camshaft and fuel pump pulleys with bolts.

2. Remove the crankshaft pulley.

3. Unscrew the bolts and remove the lower timing belt cover together with the rubber seal.

4. Loosen the timing belt tensioner mounting bolts and disconnect the tensioner spring from the mounting pins.

5. Remove the timing belt. If the timing belt is to be reinstalled, mark its direction of rotation

6. Check the condition of the timing belt for wear, delamination or contamination with oil. If the belt is contaminated with oil, it is necessary to find the place of oil leakage and fix it.

Installation
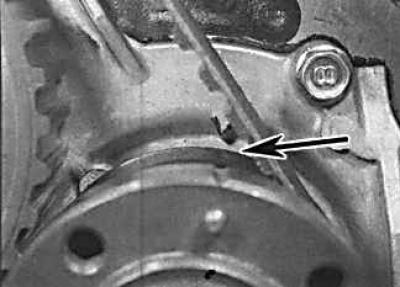


Installation


1. Clean the timing belt pulleys. Check that the camshaft and fuel pump pulleys are secured with bolts. Temporarily install the crankshaft pulley to the timing pulley and check that the mark on the pulley aligns with the pointer on the oil pump housing. Also, the mark on the crankshaft timing pulley should align with the pointer on the oil pump housing (the mark is indicated by an arrow).


2. Remove the crankshaft auxiliary pulley and install the timing belt on the crankshaft pulley, oil pump pulley, fuel pump pulley, camshaft pulley and check that the rear branch of the belt is tight. Check that the timing marks on the pulleys are aligned with the pointers.

3. Tighten the timing belt with the tensioner pulley spring.

4. Check that the crankshaft pulley timing mark is aligned with the pointer, then remove the clamp bolts from the fuel pump pulleys and camshaft pulley.
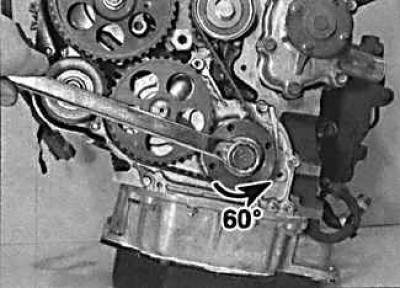
4. Check that the crankshaft pulley timing mark is aligned with the pointer, then remove the clamp…


5. Loosen the tensioner pulley mounting bolt and turn the crankshaft pulley back 60° (counterclockwise).
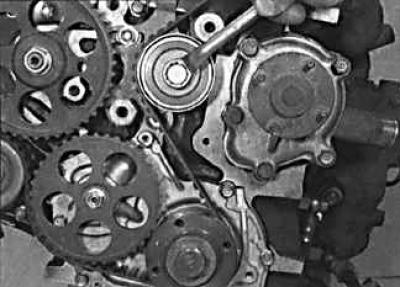
5. Loosen the tensioner pulley mounting bolt and turn the crankshaft pulley back 60°…


6. To automatically adjust the timing belt tension, secure the crankshaft pulley from turning and tighten the tensioner pulley mounting bolt.


7. Rotate the crankshaft two full revolutions and check that all timing marks on the pulleys are aligned with the pointer.

8. Loosen the tensioner pulley mounting bolt and turn the crankshaft 60° counterclockwise to adjust the timing belt tension. Secure the crankshaft pulley from turning and tighten the tensioner mounting bolt.

9. Set the engine crankshaft to a position where the piston of the first cylinder is at top dead center in the compression stroke and check that all timing marks on the pulleys are aligned with the pointers.

10. Install the timing belt covers and crankshaft pulley.


This article is available at russian, bulgarian, belarusian, ukrainian, serbian, croatian, romanian, polish, slovak, hungarian
Checking the article: Pavlovsky Nikolay

Share information:

Previous articles
Opel Vectra B: Diesel engine 1.7 liter
Next articles

Timing Belt Covers — Removal and Installation
Crankshaft pulley — removal and installation
Cylinder head cover — removal and installation
Top dead center (TDC) of the piston of the first cylinder
Checking the compression pressure
Technical specifications
Timing Belt Tensioner and Pulleys
Replacing the camshaft sealing ring
Checking and adjusting valve clearances
Camshaft and tappets — removal and installation
Cylinder head — removal and installation
Oil pan — removal and installation


See similar ones from other Opel car manuals:
▶ Replacing the timing belt Opel Astra J (2009-2015, petrol)
▶ Replacing or adjusting the timing belt Opel Insignia A (2008-2017)
▶ Timing Belt — Checking Condition, Adjusting Tension and… Opel Zafira A (1999-2005, petrol)
▶ Replacing the engine timing belt Opel Frontera A (1991-1998, petrol)
▶ Checking the condition and replacing the auxiliary drive… Opel Corsa B (1993-2000)
Link to this page in different formats

Visitor comments


No comments yet


How much will 27 + 38 =


Vectra C (2002-2008) 
  • General information
  • User manual
  • Vehicle device
  • Maintenance
  • Troubleshooting
  • Power unit
  • Engine repair
  • Cooling system
  • Power and control system
  • Engine electrics
  • Transmission
  • Clutch
  • Car gearbox
  • Drive shafts
  • Chassis
  • Car suspension
  • Steering
  • Brake system
  • Body
  • Exterior
  • Interior
  • Doors, locks and windows
  • Heating and ventilation
  • Electrical equipment
  • Equipment and devices
  • Headlights and lighting
  • Electrical circuits
Vectra B (1995-2002) 
  • General information
  • User manual
  • Weekly checks
  • Maintenance (gasoline)
  • Maintenance (diesel)
  • Troubleshooting
  • Power unit
  • SOHC gasoline engine
  • DOHC petrol engine
  • Diesel engine 1.7 liter
  • Diesel engine 2.0 liters
  • Engine repair
  • Cooling system
  • Fuel system (gasoline)
  • Fuel system (diesel)
  • Charging system
  • Launch system
  • Ignition and preheat
  • Transmission
  • Clutch
  • Mechanical gearbox
  • Automatic gearbox
  • Drive shafts
  • Chassis
  • Brake system
  • Wheel suspension
  • Steering
  • Body
  • Exterior
  • Interior
  • Doors and windows
  • Heating and ventilation
  • Electrical equipment
  • Equipment and devices
  • Electrical circuits
Vectra B (1995-2002, petrol) 
  • General information
  • Maintenance
  • Help with malfunctions
  • Power unit
  • Engine repair
  • Exhaust system
  • Cooling system
  • Fuel system
  • Multec injection system
  • Four point injection
  • Transmission
  • Clutch
  • Gearbox and drive
  • Chassis
  • Wheel suspension
  • Steering
  • Brake system
  • Wheels and tires
  • Body
  • Exterior
  • Interior
  • Electrical equipment
  • Fuses and electronics
  • Power devices
  • Ignition system
  • Lighting and signaling
  • Equipment and devices
  • Heating and ventilation
  • Electrical circuits
Vectra A (1988-1995) 
  • Power unit
  • Engine repair
  • Ignition system
  • Lubrication system
  • Cooling system
  • Injection system
  • Fuel system (carburetor)
  • Fuel system (diesel)
  • Exhaust system
  • Transmission
  • Clutch
  • Car gearbox
  • Chassis
  • Front suspension
  • Rear suspension
  • Steering
  • Brake system
  • Wheels and tires
  • Body
  • Exterior
  • Interior
  • Electrical equipment
  • Electrical circuits
Vectra A (1988-1995, petrol) 
  • General information
  • User manual
  • Maintenance
  • Power unit
  • SOHC engine
  • DOHC engine
  • Cooling and ventilation
  • Fuel system (carburetor)
  • Fuel system (injector)
  • Exhaust converter
  • Transmission
  • Clutch
  • Mechanical gearbox
  • Automatic gearbox
  • Drive shafts
  • Chassis
  • Brake system
  • Car suspension
  • Steering
  • Body
  • Body elements
  • Electrical equipment
  • Power devices
  • Equipment and devices
  • Electrical circuits
OpelBook.ru © 2017–2026 · Mobile version · · Sitemap: EN BG BY UA RS HR RO PL SK HU · Feedback · Site search
Astra F, petrol · Astra G, petrol · Astra G · Astra H · Astra J, petrol · Corsa B · Corsa C, petrol · Corsa C · Insignia A · Kadett D · Kadett E · Omega A · Omega B · Omega B2 · Vectra A, petrol · Vectra A · Vectra B, petrol · Vectra B · Vectra C · Zafira A, petrol · Frontera A, petrol · Frontera B · Ascona C · Vivaro A ·
We want your visit to be comfortable 🤝! We use cookies 🍪 to make that happen.