
OpelBook.ru
Cars AvtoVAZ Cars Mitsubishi Cars BMW Cars Mercedes Cars Nissan Cars Toyota Cars Chevrolet
English Русский
Български
Беларускі
Український
Српски
Hrvatski
Română
Polski
Slovenský
Magyar
 |  Sitemap  |  Contacts  |    


Main Astra Corsa Insignia Kadett Omega Vectra Zafira Others Articles
Vectra A (1988-1995, petrol) Vectra A (1988-1995) Vectra B (1995-2002, petrol) Vectra B (1995-2002) Vectra C (2002-2008)
  • Main
  • Vectra
  • Vectra A
  • Chassis
  • Car suspension
  • Rear Wheel Bearing (DOHC Models) — Replacement

Rear Wheel Bearing (DOHC Models) — Replacement (Opel Vectra A)

            0

Contents: Removal ⬇ Installation ⬇
Note: Bearing replacement is a complex procedure, be sure to read the entire Chapter before starting work. A torque wrench and a special puller are required. When assembling, use a new hub nut and locking rim.


Removal


1. Loosen the rear wheel bolts, block the front wheels, then jack up and support the rear of the vehicle on axle stands. Remove the wheels.

2. Remove the bracket and release the brake line from the bracket on the trailing arm. Note that the bracket also supports the ABS sensor wire.

3. Loosen the mounting bolts and remove the brake caliper and ABS bracket from the brake support shield. Move the caliper and ABS sensor bracket to the side and tie them to the bottom of the car with a sling or wire.

4. Unscrew the mounting screw and remove the brake disc. If necessary, move the handbrake pads away from it by turning the regulator with a screwdriver inserted through one of the holes in the disc (see Section 9).

5. Using a slotted wrench inserted through one of the unthreaded holes in the hub flange, remove the four brake backing plate mounting bolts. Note that the top bolts are shorter than the bottom bolts.

6. Using a screwdriver as a lever, remove the plastic cover from the back of the ABS sensor gear to gain access to the rear wheel hub nut (see illustrations).
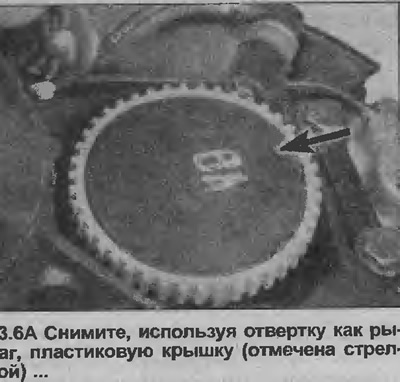
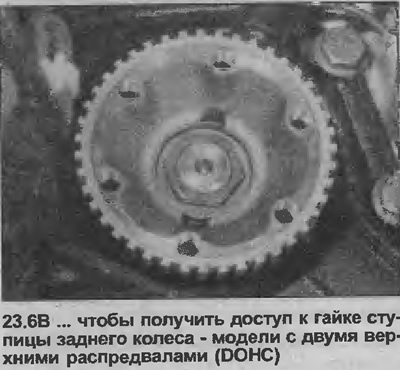
6. Using a screwdriver as a lever, remove the plastic cover from the back of the ABS sensor gear to…


6. Using a screwdriver as a lever, remove the plastic cover from the back of the ABS sensor gear to…


7. Bend back the locking collar of the hub nut, then remove it from the ABS sensor wheel using a screwdriver as a lever.


8. Screw the two wheel bolts into the hub flange and insert a long metal rod between the bolts to hold the hub still. Loosen the hub nut using the socket and the extended rod. Note that the hub nut is extremely tight.

9. Remove the ABS sensor assembly from the hub using a three-legged puller if necessary.

10. Remove the rear wheel hub from the bearing using a puller mounted on the trailing arm. Note that the inner bearing race may remain on the hub.

11. Remove the bearing retaining ring from the outer edge of the trailing arm (see illustration). Then press or tap out the bearing by pressing on the outer bearing race. If necessary, remove the bearing in the same way as the rear wheel hub (using a puller), remembering that you should press only on the outer ring.
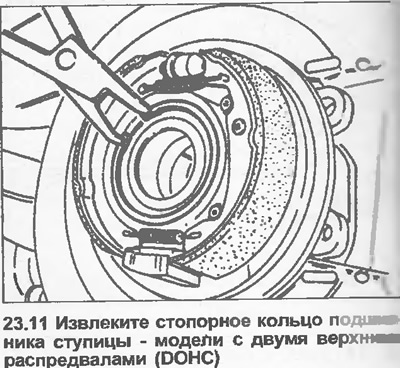
11. Remove the bearing retaining ring from the outer edge of the trailing arm (see illustration).…


12. If the inner bearing race remains on the hub, remove it using a puller.

Installation


13. Clean all components and inspect them for signs of wear or damage.

14. Install the new bearing into the trailing arm by pressing on the outer race of the bearing. If necessary, use a tubular drift or a socket with a long bolt, nut and washers to install the bearing. The installed bearing should rest against the shoulder of the arm.


15. Install the bearing retaining ring, making sure it fits correctly into the groove.

16. Have an assistant support the inner bearing race in the trailing arm (from the back side) using a metal tube, then gently tap the hub into place from the outside. Do not hit the mallet too hard, as the bearing can be easily damaged.

17. Install the ABS sensor unit onto the hub. If necessary, have an assistant support the outer end of the hub. Be careful not to damage the sensor wheel teeth.

18. Install the new hub nut and tighten it to the torque specified in Specifications, holding the hub still as when removing it.

19. Install a new locking rim onto the hub nut and bend it towards the ABS sensor.

20. Install the plastic cover on the back of the ABS sensor.

21. Install the brake backing plate mounting bolts and tighten them to the torque specified in the Specifications. Make sure the shorter bolts are installed at the top of the plate.

22. Install the brake disc and tighten the mounting screw, then apply the handbrake several times to engage the adjuster mechanism and move the pads to the correct position.

23. Install the brake caliper and ABS sensor bracket onto the support shield and tighten the mounting bolts to the specified tightening torque Specifications.

24. Install the brake pipe into the bracket on the diagonal arm and secure it with the locking bracket.

25. Install the wheel, then lower the car to the ground. Tighten the wheel bolts completely.


This article is available at russian, bulgarian, belarusian, ukrainian, serbian, croatian, romanian, polish, slovak, hungarian
Checking the article: Chernov Alexander

Share information:

Previous articles
Opel Vectra A: Car suspension
Next articles

Rear Ride Control Components — Removal and Installation
Rear Suspension Rigidity Control System — Adjustment
Rear Suspension Pivot Pin (SOHC Models) — Removal and Installation
Rear Trailing Arm Bushings (SOHC Models) — Replacement
Rear Anti-Roll Bar (SOHC Models) — Removal and Installation
Rear suspension longitudinal arm assembly (single overhead camshaft (SOHC) models) — removal and installation
Rear Wheel Hub (DOHC Models) — Removal and Installation
Rear Suspension Coil Spring (DOHC Models) — Removal and Installation
Rear Suspension Assembly — Removal and Installation (DOHC Models)
Rear Suspension Tail Arm (DOHC Models) — Removal and Installation
Rear Suspension Crossmember (DOHC Models) — Removal and Installation
Rear Anti-Roll Bar (DOHC Models) — Removal and Installation


See similar ones from other Opel car manuals:
▶ Replacing the rear wheel arch lining (Corsa and Combo… Opel Corsa B (1993-2000)
▶ Removal and installation of rear wheel hubs on all models… Opel Kadett E (1984-1995)
▶ Rear Wheel Hub and Bearing — Removal and Installation Opel Omega B2 (1999-2003)
▶ Rear Brake Wheel Cylinder — Removal, Repair and Installation Opel Astra F (1991-1998, petrol)
▶ Replacing the rear wheel drive shaft Opel Insignia A (2008-2017)
Link to this page in different formats

Visitor comments


No comments yet


How much will 37 + 18 =


Vectra C (2002-2008) 
  • General information
  • User manual
  • Vehicle device
  • Maintenance
  • Troubleshooting
  • Power unit
  • Engine repair
  • Cooling system
  • Power and control system
  • Engine electrics
  • Transmission
  • Clutch
  • Car gearbox
  • Drive shafts
  • Chassis
  • Car suspension
  • Steering
  • Brake system
  • Body
  • Exterior
  • Interior
  • Doors, locks and windows
  • Heating and ventilation
  • Electrical equipment
  • Equipment and devices
  • Headlights and lighting
  • Electrical circuits
Vectra B (1995-2002) 
  • General information
  • User manual
  • Weekly checks
  • Maintenance (gasoline)
  • Maintenance (diesel)
  • Troubleshooting
  • Power unit
  • SOHC gasoline engine
  • DOHC petrol engine
  • Diesel engine 1.7 liter
  • Diesel engine 2.0 liters
  • Engine repair
  • Cooling system
  • Fuel system (gasoline)
  • Fuel system (diesel)
  • Charging system
  • Launch system
  • Ignition and preheat
  • Transmission
  • Clutch
  • Mechanical gearbox
  • Automatic gearbox
  • Drive shafts
  • Chassis
  • Brake system
  • Wheel suspension
  • Steering
  • Body
  • Exterior
  • Interior
  • Doors and windows
  • Heating and ventilation
  • Electrical equipment
  • Equipment and devices
  • Electrical circuits
Vectra B (1995-2002, petrol) 
  • General information
  • Maintenance
  • Help with malfunctions
  • Power unit
  • Engine repair
  • Exhaust system
  • Cooling system
  • Fuel system
  • Multec injection system
  • Four point injection
  • Transmission
  • Clutch
  • Gearbox and drive
  • Chassis
  • Wheel suspension
  • Steering
  • Brake system
  • Wheels and tires
  • Body
  • Exterior
  • Interior
  • Electrical equipment
  • Fuses and electronics
  • Power devices
  • Ignition system
  • Lighting and signaling
  • Equipment and devices
  • Heating and ventilation
  • Electrical circuits
Vectra A (1988-1995) 
  • Power unit
  • Engine repair
  • Ignition system
  • Lubrication system
  • Cooling system
  • Injection system
  • Fuel system (carburetor)
  • Fuel system (diesel)
  • Exhaust system
  • Transmission
  • Clutch
  • Car gearbox
  • Chassis
  • Front suspension
  • Rear suspension
  • Steering
  • Brake system
  • Wheels and tires
  • Body
  • Exterior
  • Interior
  • Electrical equipment
  • Electrical circuits
Vectra A (1988-1995, petrol) 
  • General information
  • User manual
  • Maintenance
  • Power unit
  • SOHC engine
  • DOHC engine
  • Cooling and ventilation
  • Fuel system (carburetor)
  • Fuel system (injector)
  • Exhaust converter
  • Transmission
  • Clutch
  • Mechanical gearbox
  • Automatic gearbox
  • Drive shafts
  • Chassis
  • Brake system
  • Car suspension
  • Steering
  • Body
  • Body elements
  • Electrical equipment
  • Power devices
  • Equipment and devices
  • Electrical circuits
OpelBook.ru © 2017–2026 · Mobile version · · Sitemap: EN BG BY UA RS HR RO PL SK HU · Feedback · Site search
Astra F, petrol · Astra G, petrol · Astra G · Astra H · Astra J, petrol · Corsa B · Corsa C, petrol · Corsa C · Insignia A · Kadett D · Kadett E · Omega A · Omega B · Omega B2 · Vectra A, petrol · Vectra A · Vectra B, petrol · Vectra B · Vectra C · Zafira A, petrol · Frontera A, petrol · Frontera B · Ascona C · Vivaro A ·
We want your visit to be comfortable 🤝! We use cookies 🍪 to make that happen.