


Contents: Removal ⬇ Installation ⬇
Note: A torque wrench is required. If the tool is not available, have this work done by your Opel dealer.
Removal
1. Block the front wheels, then jack up the rear of the vehicle and support it on axle stands.
2. Remove the socket head bolts securing the drive shaft to the rear wheel hub. Remove the lock washers.
3. Press the drive shaft away from the rear wheel hub, move it to the side and tie it to the body.
4. Remove the rear wheel.
5. Release the brake hose from the bracket on the trailing arm by pulling out the locking plate.
6. Unscrew the bolts and remove the brake caliper. Tie it to the body, being careful not to stretch the brake hose. Unscrew the mounting screw and remove the brake disc (see Section 9).
7. See. Chapter 10 and remove the lower shock absorber mounting bolt from the wishbone. Support the wishbone with a jack.
[Article published on the website www.OpelBook.ru]
8. Using an Allen key inserted through the hole in the hub drive flange, remove the brake backing plate mounting bolts. Note that the upper bolts are shorter and have a locking plate.
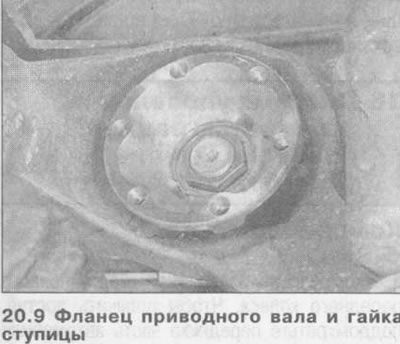
9. Insert the wheel bolts and use a long rod to lock the hub, then remove the locking plate and unscrew the center hub nut (see illustration).
10. Remove the drive shaft flange using a suitable puller.
11. Press the rear wheel hub out of the bearing (outward) using a suitable puller bolted to the trailing arm.
12. Remove the snap ring from the diagonal arm, then press out the bearing using the same puller.
13. If the inner bearing race remains on the hub, remove it with a bearing puller.
14. Clean all components and inspect them for signs of wear and damage. Purchase a new bearing.
Installation
15. Install the new bearing into the trailing arm, pressing only on its outer race. If necessary, use a long bolt and a set of flat washers for this purpose.
16. Install the bearing retaining ring.
17. Support the inner bearing race from the inside with a metal tube, then carefully push the hub into place.
18. Install the drive shaft flange onto the hub. If necessary, support the outside of the hub.
19. Install the hub nut and tighten it to the specified tightening torque Specifications. Drive the locking plate into place to secure the nut in the working position.
20. Then install in the reverse order of removal, paying attention to the following:
- a) Tighten all nuts and bolts to the specified tightening torque Specifications.
- b) Adjust the handbrake (see the relevant section).
Visitor comments