
OpelBook.ru
Cars AvtoVAZ Cars Mitsubishi Cars BMW Cars Mercedes Cars Nissan Cars Toyota Cars Chevrolet
English Русский
Български
Беларускі
Український
Српски
Hrvatski
Română
Polski
Slovenský
Magyar
 |  Sitemap  |  Contacts  |    


Main Astra Corsa Insignia Kadett Omega Vectra Zafira Others Articles
Vectra A (1988-1995, petrol) Vectra A (1988-1995) Vectra B (1995-2002, petrol) Vectra B (1995-2002) Vectra C (2002-2008)
  • Main
  • Vectra
  • Vectra A
  • Chassis
  • Car suspension
  • Rear Anti-Roll Bar (DOHC Models) — Removal and Installation

Rear Anti-Roll Bar (DOHC Models) — Removal and Installation (Opel Vectra A)

            0

Contents: Removal ⬇ Installation ⬇

Removal


1. Block the front wheels, then jack up and support the rear of the vehicle on axle stands.

2. Working under the rear of the vehicle, remove the brackets and release the brake lines from the brackets on both sides of the vehicle's underbody. Note that the brackets also support the ABS sensor wires.

3. Disconnect the fuel outlet hose from the fuel filter located on the right side of the underbody in front of the fuel tank. Plug the open holes in the filter and hose to prevent further fuel loss and dirt from entering the system.

4. Support the rear plate of the suspension cross member with a jack, then unscrew and remove the two bolts securing the rear cross member beam.

[Article posted on Internet portal: Opelbook.ru]

5. Carefully lower the jack (being careful not to deform the hoses, tubes and wires), to gain access to the stabilizer bar to crossmember mounting brackets.

6. Disconnect the anti-roll bar ends from the diagonal arms by unscrewing the fastening nut. Remove the rubber and spacer bushings.

7. Loosen and remove the two bolts securing the stabilizer bar brackets to the suspension crossmember and remove the stabilizer bar from under the vehicle (see illustration).
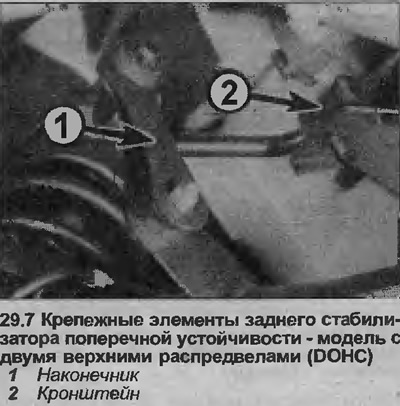
7. Loosen and remove the two bolts securing the stabilizer bar brackets to the suspension…


8. After removing the stabilizer, its tips can be pulled off the ends of the rod.


9. Inspect the stabilizer bar mounting bushings for signs of wear or damage and replace them as necessary.

10. If required, the rubber bushings can be removed from the tips for replacement by pushing them out using a suitable rod or tube, and a nut, bolts and washers.

11. The mounting bushings installed on the brackets can be pulled off the end of the stabilizer after removing one of the tips.

12. Wet the new bushings with soapy water to make installation easier.

13. If removed, install the ends onto the anti-roll bar.

Installation


14. Position the anti-roll bar under the rear of the vehicle and attach the ends. Use new rubber and spacer bushings and tighten the nuts to the specified torque Specifications, holding the bolts with a wrench.

15. Install the clamps securing the anti-roll bar to the suspension crossmember and tighten the mounting bolts to the specified tightening torque Specifications.

16. Carefully lift the jack supporting the crossmember, then install the bolts securing the rear crossmember beam to the underbody and tighten them to the specified tightening torque Specifications.

17. Connect the fuel outlet hose to the fuel filter and tighten the clamp screw.

18. Install the brake pipes into the brackets on the bottom and secure them with clamps.

19. Lower the car to the ground.


This article is available at russian, bulgarian, belarusian, ukrainian, serbian, croatian, romanian, polish, slovak, hungarian
Checking the article: Chernov Alexander

Share information:

Previous articles
Opel Vectra A: Car suspension
Next articles

Rear Suspension Crossmember (DOHC Models) — Removal and Installation
Rear Suspension Tail Arm (DOHC Models) — Removal and Installation
Rear Suspension Assembly — Removal and Installation (DOHC Models)
Rear Suspension Coil Spring (DOHC Models) — Removal and Installation
Rear Wheel Hub (DOHC Models) — Removal and Installation
Rear Wheel Bearing (DOHC Models) — Replacement
Troubleshooting suspension and steering


See similar ones from other Opel car manuals:
▶ Rear Anti-Roll Bar — Removal and Installation Opel Astra F (1991-1998, petrol)
▶ Removal and installation the anti-roll bar (Corsa and Tigra… Opel Corsa B (1993-2000)
▶ Rear Anti-Roll Bar — Removal and Installation Opel Omega A (1986-1993)
▶ Rear suspension anti-roll bar Opel Frontera B (1998-2004)
▶ Replacing the anti-roll bar of the GNE suspension Opel Insignia A (2008-2017)
Link to this page in different formats

Visitor comments


No comments yet


How much will 40 + 28 =


Vectra C (2002-2008) 
  • General information
  • User manual
  • Vehicle device
  • Maintenance
  • Troubleshooting
  • Power unit
  • Engine repair
  • Cooling system
  • Power and control system
  • Engine electrics
  • Transmission
  • Clutch
  • Car gearbox
  • Drive shafts
  • Chassis
  • Car suspension
  • Steering
  • Brake system
  • Body
  • Exterior
  • Interior
  • Doors, locks and windows
  • Heating and ventilation
  • Electrical equipment
  • Equipment and devices
  • Headlights and lighting
  • Electrical circuits
Vectra B (1995-2002) 
  • General information
  • User manual
  • Weekly checks
  • Maintenance (gasoline)
  • Maintenance (diesel)
  • Troubleshooting
  • Power unit
  • SOHC gasoline engine
  • DOHC petrol engine
  • Diesel engine 1.7 liter
  • Diesel engine 2.0 liters
  • Engine repair
  • Cooling system
  • Fuel system (gasoline)
  • Fuel system (diesel)
  • Charging system
  • Launch system
  • Ignition and preheat
  • Transmission
  • Clutch
  • Mechanical gearbox
  • Automatic gearbox
  • Drive shafts
  • Chassis
  • Brake system
  • Wheel suspension
  • Steering
  • Body
  • Exterior
  • Interior
  • Doors and windows
  • Heating and ventilation
  • Electrical equipment
  • Equipment and devices
  • Electrical circuits
Vectra B (1995-2002, petrol) 
  • General information
  • Maintenance
  • Help with malfunctions
  • Power unit
  • Engine repair
  • Exhaust system
  • Cooling system
  • Fuel system
  • Multec injection system
  • Four point injection
  • Transmission
  • Clutch
  • Gearbox and drive
  • Chassis
  • Wheel suspension
  • Steering
  • Brake system
  • Wheels and tires
  • Body
  • Exterior
  • Interior
  • Electrical equipment
  • Fuses and electronics
  • Power devices
  • Ignition system
  • Lighting and signaling
  • Equipment and devices
  • Heating and ventilation
  • Electrical circuits
Vectra A (1988-1995) 
  • Power unit
  • Engine repair
  • Ignition system
  • Lubrication system
  • Cooling system
  • Injection system
  • Fuel system (carburetor)
  • Fuel system (diesel)
  • Exhaust system
  • Transmission
  • Clutch
  • Car gearbox
  • Chassis
  • Front suspension
  • Rear suspension
  • Steering
  • Brake system
  • Wheels and tires
  • Body
  • Exterior
  • Interior
  • Electrical equipment
  • Electrical circuits
Vectra A (1988-1995, petrol) 
  • General information
  • User manual
  • Maintenance
  • Power unit
  • SOHC engine
  • DOHC engine
  • Cooling and ventilation
  • Fuel system (carburetor)
  • Fuel system (injector)
  • Exhaust converter
  • Transmission
  • Clutch
  • Mechanical gearbox
  • Automatic gearbox
  • Drive shafts
  • Chassis
  • Brake system
  • Car suspension
  • Steering
  • Body
  • Body elements
  • Electrical equipment
  • Power devices
  • Equipment and devices
  • Electrical circuits
OpelBook.ru © 2017–2026 · Mobile version · · Sitemap: EN BG BY UA RS HR RO PL SK HU · Feedback · Site search
Astra F, petrol · Astra G, petrol · Astra G · Astra H · Astra J, petrol · Corsa B · Corsa C, petrol · Corsa C · Insignia A · Kadett D · Kadett E · Omega A · Omega B · Omega B2 · Vectra A, petrol · Vectra A · Vectra B, petrol · Vectra B · Vectra C · Zafira A, petrol · Frontera A, petrol · Frontera B · Ascona C · Vivaro A ·
We want your visit to be comfortable 🤝! We use cookies 🍪 to make that happen.