
OpelBook.ru
Cars AvtoVAZ Cars Mitsubishi Cars BMW Cars Mercedes Cars Nissan Cars Toyota Cars Chevrolet
English Русский
Български
Беларускі
Український
Српски
Hrvatski
Română
Polski
Slovenský
Magyar
 |  Sitemap  |  Contacts  |    


Main Astra Corsa Insignia Kadett Omega Vectra Zafira Others Articles
Frontera A (1991-1998, petrol) Frontera B (1998-2004) Ascona C (1981-1988) Vivaro A (2001-2014)
  • Main
  • Opel
  • Frontera A
  • Transmission
  • Clutch
  • Removal and installation the clutch

Removal and installation the clutch (Opel Frontera A)

            0

To access the clutch mounting bolts, the gearbox must be removed.

1. Mark the position of the clutch in relation to the flywheel. This can be done using a center punch, making marks on the edges of the flywheel and clutch.
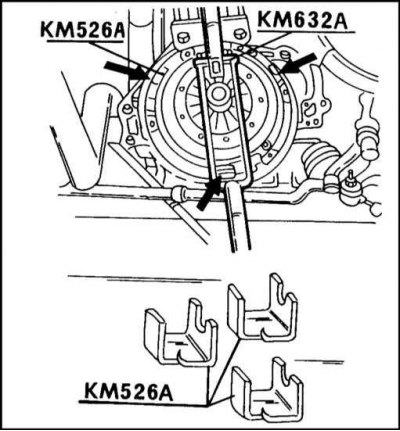
2. After this, the pressure spring is compressed. In auto repair shops, a lever is used for this…


2. After this, the pressure spring is compressed. In auto repair shops, a lever is used for this purpose, as shown in the illustration. The lever is attached to the top side with two M12x30 bolts. If you now press the clutch lever from below, the pressure spring is compressed, as happens when the clutch is disengaged. If you observe the installation locations of the rotating supports, indicated by arrows in the illustration, you can see that the pressure plate moves away, leaving some space behind it. Steel brackets must be inserted into the resulting gap (kM-526-A fixture), shown in the illustration below. When the lever is released, the plates are clamped. In this position, you can unscrew the clutch mounting bolts. If the above mentioned device is not available, the spring can be compressed in some other way.
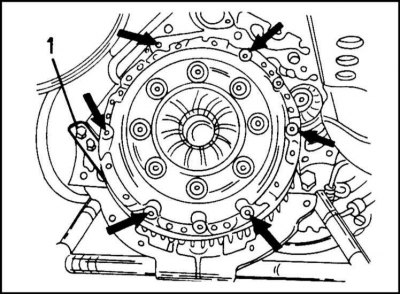
3. Loosen the six clutch mounting bolts evenly in a crisscross pattern and remove the clutch. In…


3. Loosen the six clutch mounting bolts evenly in a crisscross pattern and remove the clutch. In this case, it is necessary to properly hold the flywheel from turning. To do this, you can insert a sufficiently strong screwdriver between the teeth of the ring gear, or you can use a flywheel stopper, as shown in the illustration.


4. Remove the clutch and take out the driven disc. One side of the driven disc is marked as the gearbox side. Please keep this in mind when installing the disc.

5. Wipe the inside of the flywheel with a rag (blowing with compressed air is not allowed) and check the friction surface of the flywheel. If the driven disk is worn down to the rivet heads, the rivets may leave marks on the flywheel or pressure plate surfaces.

6. If a new clutch basket is installed, the steel brackets must be transferred to it. Now it's easier to do. Place the clutch on the friction surface and press the heel in the center of the pressure spring down (with due care). Remove the staples. Install brackets under the rotating support locations.

If it is necessary to disconnect the gearbox from the engine, loosen the clutch mounting bolts so that the clutch can be controlled.

Material provided by this website opelbook.ru


This article is available at russian, bulgarian, belarusian, ukrainian, serbian, croatian, romanian, polish, slovak, hungarian
Checking the article: Meshcheryakov Damir

Share information:

Previous articles
Opel Frontera A: Clutch
Next articles

Clutch specifications
Clutch — General Information
Clutch repair
Clutch installation
Checking the clutch without removing it
Clutch release mechanism — removal and installation
Bleeding the Clutch Hydraulic System
Adjusting the height and free travel of the pedal


See similar ones from other Opel car manuals:
▶ General information about the clutch Opel Astra F (1991-1998, petrol)
▶ Checking the clutch pedal adjustment Opel Corsa B (1993-2000)
▶ Brake and clutch fluids Opel Insignia A (2008-2017)
▶ Clutch Opel Kadett E (1984-1995)
▶ Clutch specifications Opel Omega A (1986-1993)
Link to this page in different formats

Visitor comments


No comments yet


How much will 24 + 23 =


Vivaro A (2001-2014) 
  • General information
  • User manual
  • Power unit
  • Petrol engine F4R
  • Diesel engine F9Q
  • Diesel engine G9U
  • Transmission
  • Clutch and drive shafts
  • Manual gearbox
  • Chassis
  • Front suspension
  • Rear suspension
  • Brake system
  • Body
  • Exterior
  • Interior
  • Electrical equipment
  • Heating and ventilation
  • Air conditioner
  • Equipment and devices
  • Electrical diagrams
Ascona C (1981-1988) 
  • General information
  • Maintenance
  • Power unit
  • Gasoline engines
  • Diesel engines
  • Cooling system
  • Fuel and exhaust system
  • Contact ignition system
  • Contactless ignition system
  • Transmission
  • Clutch
  • Mechanical gearbox
  • Automatic gearbox
  • Drive shafts
  • Chassis
  • Steering
  • Brake system
  • Car suspension
  • Body
  • Exterior
  • Interior
  • Doors and windows
  • Electrical equipment
  • Equipment and devices
  • Power devices
  • Electrical circuits
Frontera B (1998-2004) 
  • General information
  • User manual
  • Maintenance
  • Power unit
  • Petrol engines 2.2 l
  • Petrol engines 3.2 l
  • Diesel engines 2.2 l
  • Cooling system
  • Fuel system (petrol)
  • Fuel system (diesel)
  • Ignition system
  • Transmission
  • Clutch
  • Manual gearbox MUA5C
  • Automatic gearbox 4L30E
  • Chassis
  • Suspension and axles
  • Steering
  • Brake system
  • Body
  • Exterior
  • Interior
  • Doors, locks and windows
  • Heating and air conditioning
  • Electrical equipment
  • Power devices
  • Equipment and devices
  • Lighting and signaling
  • Electrical diagrams
Frontera A (1991-1998, petrol) 
  • General information
  • Introduction to guide
  • User manual
  • Maintenance
  • Power unit
  • Engine repair
  • Lubrication system
  • Cooling system
  • Power and exhaust system
  • Engine electrics
  • Transmission
  • Clutch
  • Mechanical gearbox
  • Cardan shafts
  • Chassis
  • Brake system
  • Front suspension
  • Rear suspension
  • Steering
  • Body
  • Repair and care
  • Electrical equipment
  • Equipment and devices
  • Electrical circuits
OpelBook.ru © 2017–2026 · Mobile version · · Sitemap: EN BG BY UA RS HR RO PL SK HU · Feedback · Site search
Astra F, petrol · Astra G, petrol · Astra G · Astra H · Astra J, petrol · Corsa B · Corsa C, petrol · Corsa C · Insignia A · Kadett D · Kadett E · Omega A · Omega B · Omega B2 · Vectra A, petrol · Vectra A · Vectra B, petrol · Vectra B · Vectra C · Zafira A, petrol · Frontera A, petrol · Frontera B · Ascona C · Vivaro A ·
We want your visit to be comfortable 🤝! We use cookies 🍪 to make that happen.