
1. With the clutch removed, check the needle bearing inside the crankshaft (for manual transmission).
2. Insert the staples as described above.
3. Install the driven disk on the flywheel in accordance with the marking "Getriebseite" - Gearbox side.
4. If a used clutch is installed, install it in accordance with the markings. The new clutch can be installed in any position.
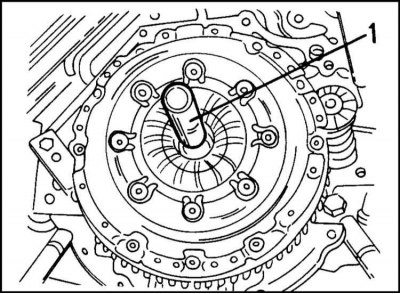
5. A centering mandrel is used to center the driven disk (1) (illustrations). Centering with experience can be done by eye. You can use the old input shaft for this. Be aware that not all models have the same gearbox.
6. Tighten the clutch bolts evenly and crosswise. Tighten bolts M7 to 15 Nm, M8 to 28 Nm. In this case, it is necessary to keep the flywheel from turning. In some cases, screws are used for fastening "Torx". Move the arbor back and forth while centering to avoid pinching.
7. After tightening the clutch, remove the three brackets. Sometimes they fall out on their own when tightening the clutch. If the staples fall out, they can get inside the clutch. Make sure this doesn't happen.
8. Install the gearbox.
Visitor comments