OpelBook.ru
Cars AvtoVAZ Cars Mitsubishi Cars BMW Cars Mercedes Cars Nissan Cars Toyota Cars Chevrolet
English Русский
Български
Беларускі
Український
Српски
Hrvatski
Română
Polski
Slovenský
Magyar
 |  Sitemap  |  Contacts  |    


Main Astra Corsa Insignia Kadett Omega Vectra Zafira Others Articles
Frontera A (1991-1998, petrol) Frontera B (1998-2004) Ascona C (1981-1988) Vivaro A (2001-2014)
  • Main
  • Opel
  • Ascona C
  • Electrical equipment
  • Equipment and devices
  • Windscreen wiper arms and blades — removal and installation

Windscreen wiper arms and blades — removal and installation (Opel Ascona C)

            0

1. Before removing the wiper arm, make sure it is in the "off" position - that is, the wiper mechanism has been turned off by its switch, and not simply by removing the key from the ignition.

2. To make subsequent installation of the arms easier, stick a piece of electrical tape to the windshield parallel to the wiper blade before removing the arm.

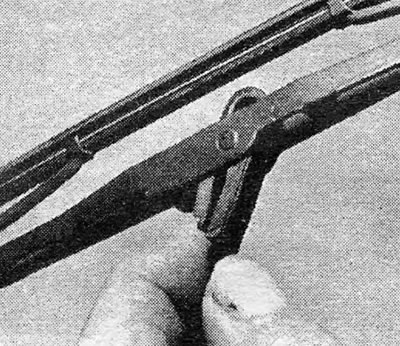
3. Move the wiper arm away from the glass, rotate the "wiper" on the arm, and then press the latch on the U-shaped fastening, and remove the wiper blade ("wiper") from the arm (see photo 35.3).

Photo 35.3 Removing the wiper blade («wiper blade»)

Photo 35.3 Removing the wiper blade ("wiper blade")


4. Lift the plastic cover and unscrew the lever mounting nut (see photo 35.4).
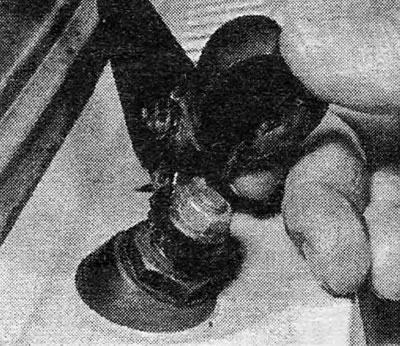
Photo 35.4 Windscreen wiper arm nut

Photo 35.4 Windscreen wiper arm nut


(Original source on the website: «OpelBook»)

5. Remove the lever from the drive spindle.

6. Reinstallation is done by performing the above steps in reverse order, do not tighten the nut more than necessary. If you did not apply the marking tape to the glass, install the wipers according to the given parameters (see Figure 12.29).
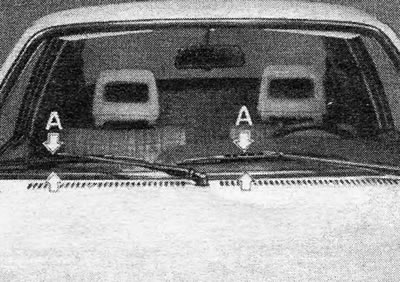
Figure 12.29. Setting the windshield wiper arm position - left-hand drive model shown. For right…

Figure 12.29. Setting the windshield wiper arm position - left-hand drive model shown. For right hand drive models, use mirror placement A = 35.0 to 45.0 mm


This article is available at russian, bulgarian, belarusian, ukrainian, serbian, croatian, romanian, polish, slovak, hungarian
Checking the article: Kornev Georgy

Share information:

Previous articles
Opel Ascona C: Equipment and devices
Next articles

Reversing lights and rear fog lights (Estate) — removal and installation of the structure
Tail Light Assembly — Removal and Installation of the Complete Saloon and Hatchback Assembly
Front fog lights — adjustment
Headlight beams — adjustment
Headlights — removal, installation, modifications
Light bulbs — replacement
Windshield Wiper Motor and Linkages — Removal and Installation
Rear Window Wiper Motor — Removal and Installation
Windshield washer system
Rear window washer system
Headlamp Washer/Wiper System
Washer fluid


See similar ones from other Opel car manuals:
▶ Windscreen wiper blades and arms — removal and installation Opel Omega A (1986-1993)
▶ Windscreen wiper arms — removal and installation Opel Astra F (1991-1998, petrol)
▶ Windscreen wiper blades — replacement Opel Vectra A (1988-1995, petrol)
▶ Windscreen wiper blades — replacement Opel Zafira A (1999-2005, petrol)
▶ Windscreen wiper control Opel Corsa C (2000-2006, petrol)
Link to this page in different formats

Visitor comments


No comments yet


How much will 41 + 28 =


Vivaro A (2001-2014) 
  • General information
  • User manual
  • Power unit
  • Petrol engine F4R
  • Diesel engine F9Q
  • Diesel engine G9U
  • Transmission
  • Clutch and drive shafts
  • Manual gearbox
  • Chassis
  • Front suspension
  • Rear suspension
  • Brake system
  • Body
  • Exterior
  • Interior
  • Electrical equipment
  • Heating and ventilation
  • Air conditioner
  • Equipment and devices
  • Electrical diagrams
Ascona C (1981-1988) 
  • General information
  • Maintenance
  • Power unit
  • Gasoline engines
  • Diesel engines
  • Cooling system
  • Fuel and exhaust system
  • Contact ignition system
  • Contactless ignition system
  • Transmission
  • Clutch
  • Mechanical gearbox
  • Automatic gearbox
  • Drive shafts
  • Chassis
  • Steering
  • Brake system
  • Car suspension
  • Body
  • Exterior
  • Interior
  • Doors and windows
  • Electrical equipment
  • Equipment and devices
  • Power devices
  • Electrical circuits
Frontera B (1998-2004) 
  • General information
  • User manual
  • Maintenance
  • Power unit
  • Petrol engines 2.2 l
  • Petrol engines 3.2 l
  • Diesel engines 2.2 l
  • Cooling system
  • Fuel system (petrol)
  • Fuel system (diesel)
  • Ignition system
  • Transmission
  • Clutch
  • Manual gearbox MUA5C
  • Automatic gearbox 4L30E
  • Chassis
  • Suspension and axles
  • Steering
  • Brake system
  • Body
  • Exterior
  • Interior
  • Doors, locks and windows
  • Heating and air conditioning
  • Electrical equipment
  • Power devices
  • Equipment and devices
  • Lighting and signaling
  • Electrical diagrams
Frontera A (1991-1998, petrol) 
  • General information
  • Introduction to guide
  • User manual
  • Maintenance
  • Power unit
  • Engine repair
  • Lubrication system
  • Cooling system
  • Power and exhaust system
  • Engine electrics
  • Transmission
  • Clutch
  • Mechanical gearbox
  • Cardan shafts
  • Chassis
  • Brake system
  • Front suspension
  • Rear suspension
  • Steering
  • Body
  • Repair and care
  • Electrical equipment
  • Equipment and devices
  • Electrical circuits
OpelBook.ru © 2017–2026 · Mobile version · · Sitemap: EN BG BY UA RS HR RO PL SK HU · Feedback · Site search
Astra F, petrol · Astra G, petrol · Astra G · Astra H · Astra J, petrol · Corsa B · Corsa C, petrol · Corsa C · Insignia A · Kadett D · Kadett E · Omega A · Omega B · Omega B2 · Vectra A, petrol · Vectra A · Vectra B, petrol · Vectra B · Vectra C · Zafira A, petrol · Frontera A, petrol · Frontera B · Ascona C · Vivaro A ·
We want your visit to be comfortable 🤝! We use cookies 🍪 to make that happen.