
Attention! Condensate at the pump vent should not be taken into account unless there is a significant drop in its level in the expansion tank.
Vehicles with 4-cylinder petrol engines
Removing
1. Disconnect the wire terminal from the battery «masses» (-).
2. Drain the coolant (see relevant chapter).
3. Remove the toothed belt (see relevant chapter).
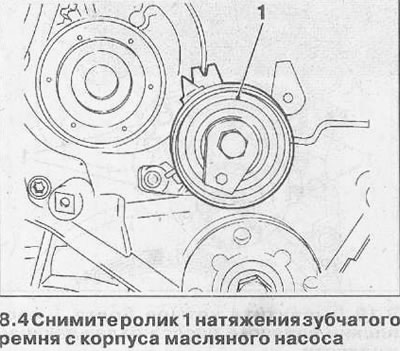
4. Remove roller 1 of the toothed belt tension from the oil pump housing (see illustration).
5. Release the wire of the crankshaft position sensor on the rear cover of the timing gear. It is recommended to mark the laying of the wire in order to properly lay it later.
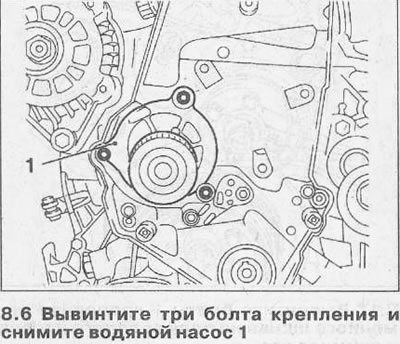
6. Unscrew the three mounting bolts and remove the water pump 1 (see illustration).
Installation
7. Clean the mating surfaces of the water pump and cylinder block and remove the remnants of the old seal. To prevent «accretion» water pump to the cylinder block, it is recommended to lubricate the sealing surfaces on the cylinder block and the O-ring in the pump housing with a thin layer of silicone grease, e.g. Opel 19 70 206 (90 167 353).
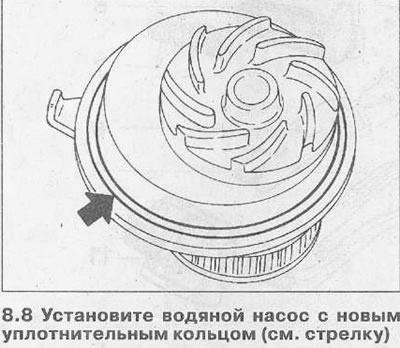
8. Install water pump with new o-ring (see arrow in illustration).
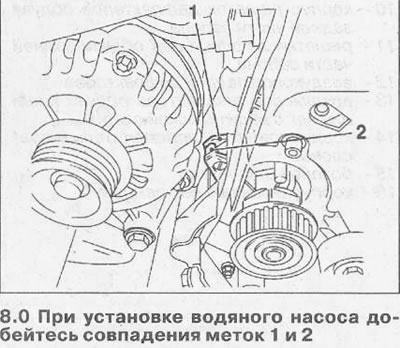
Attention! The water pump should be installed like this; so that mark 1 on its body coincides with mark 2 on the cylinder block (see illustration 8.0). Tighten the water pump mounting bolts with a force of 25 Nm.
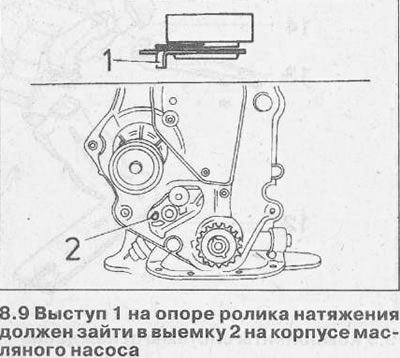
9. Install the toothed belt tension roller so that the protrusion 1 on the roller support enters the recess 2 on the oil pump housing (see illustration). Tighten the roller mounting bolt with a torque of 20 Nm.
10. Lay the wire of the crankshaft position sensor and fix it in the holders on the rear cover of the timing gear.
11. Lay and tighten the toothed belt (see relevant chapter).
12. Fill the expansion tank with coolant.
13. Connect the wire terminal to the battery «masses» (-), set the clock and enter the code into the radio.
Vehicles with 100-/120- and 130 hp diesel engines.
Removing
The drive of the water pump in vehicles with a diesel engine is carried out by a ribbed belt. A radiator fan is installed on the pump shaft in front.
14. Drain the coolant (see relevant chapter).
15. Vehicles with a 2.5 liter diesel engine. Remove the viscous fan (see relevant chapter).
16. Remove the ribbed belt.
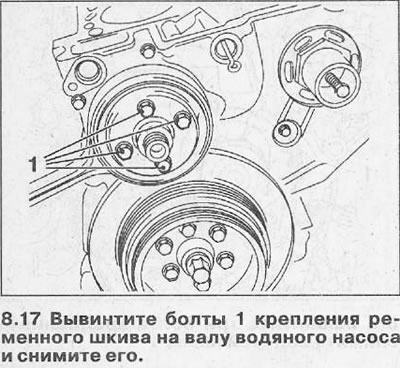
17. Unscrew the bolts 1 fastening the belt pulley on the water pump shaft, pulling the V-belt to prevent the pulley from turning, and remove the pulley (see illustration). The illustration shows a 2.5L diesel engine.
18. Vehicles with a 2.5L diesel engine. Unscrew four bolts 1 of fastening of the water pump of a cooling liquid (see illustration).
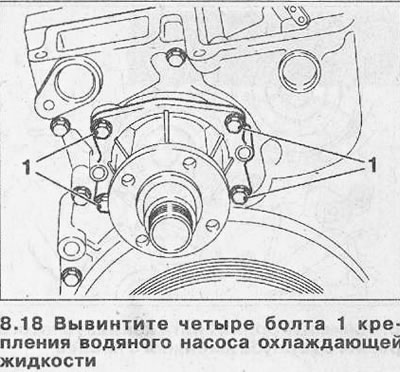
Attention! On vehicles with a 2.0/2.2 liter diesel engine, the water pump is secured with three bolts.
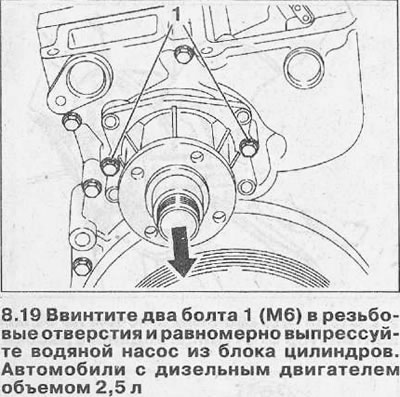
19. Vehicles with a 2.5 liter diesel engine. Screw in two bolts 1 (M6) into the threaded holes and evenly press the water pump out of the cylinder block (see illustration). Do not distort the pump while doing this.
Installation
20. Vehicles with a 2.5 liter diesel engine. Remove the bolts used to remove the water pump, replace with a new pump O-ring and lubricate the O-ring with a thin layer of silicone grease, e.g. Opel 19 70 206 (90 167 353).
21. Install the water pump with a new gasket in place with a gasket and evenly tighten the bolts of its fastening with a force of 10 Nm. For vehicles with a 2.0/2.2 l diesel engine, the tightening torque for the water pump mounting bolts is 20 Nm.
22. Install a belt pulley on the water pump shaft and fasten, depending on the type of engine, with four or three bolts. For vehicles with a 2.0/2.2 l diesel engine, the tightening torque of the water pump pulley bolts is 20 Nm, and with a 2.5 l engine, 10 Nm.
23. Lay and tighten the ribbed belt.
24. Install the viscous radiator fan clutch.
25. Pour coolant into the expansion tank and bleed the cooling system.
26. Warm up the engine and check the tightness of the hose connections and the water pump.
Visitor comments