


Petrol engines 1.2, 1.4 and 1.6 l
1. Disconnect the negative cable from the battery.
2. Drain the coolant into a clean container and immediately put the hose back on and secure it.
3. Remove the timing belt (see Chapter Engines).
4. On oHC engines 1.2 and 1.4 l remove the rear timing belt cover (see Chapter Engines), for which unscrew the mounting bolts and remove the camshaft bed cover, the camshaft and crankshaft gears, as well as the tension roller from the oil pump housing.
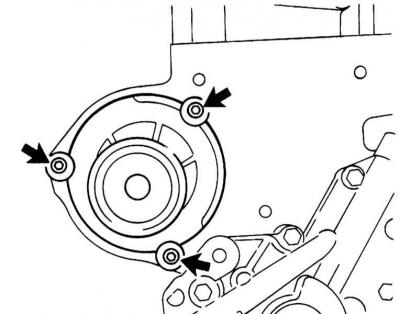
5. Remove the mounting bolts and remove the water pump (shown oHC engine 1.2 or 1.4 l).
Water pump mounting bolts
6. Clean the mating surfaces of the pump and cylinder block.
7. To prevent corrosion of the water pump, lubricate the mating surface of the cylinder block, as well as the sealing ring in the pump housing with silicone grease, for example, OPEL 19 70 206 (90 167 353).
8. Install the water pump with a new sealing ring (2) in the cylinder block and tighten its mounting bolts with force 8 Nm.
On DOHC 1.4 and 1.6 L engines, install the pump so that the mark (2) on the pump coincides with the mark (1) on the cylinder block
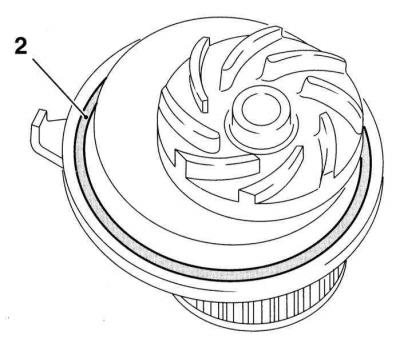
Water pump seal ring
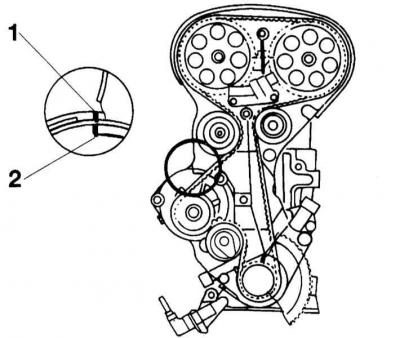
Installation marks
9. On oHC engines 1.2 and 1.4 l install the rear timing belt cover, tighten its mounting bolts with force 12 Nm, and install the crankshaft gear, ensuring that the TDC marks are aligned (see Chapter Engines).
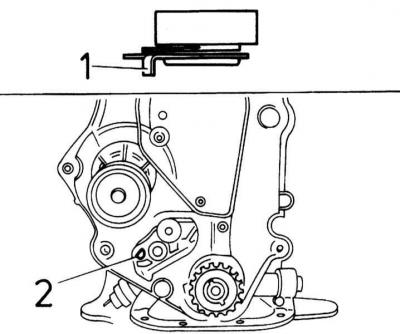
10. On oHC engines 1.2 and 1.4 l install the timing belt tension roller. Observe the installation position: the tab (1) of the roller bar must enter the hole (2) of the oil pump housing. The tab must enter the hole as far as it will go to the right. Tighten the bolt with force 20 Nm.Install the camshaft timing gear (see Chapter Engines).
Installing the timing belt tension roller
(Material copied from the portal: opelbook)
12. Put on the timing belt and tighten it (see Chapter Engines).
13. On oHC engines 1.2 and 1.4 l install the camshaft bed cover with a new sealing gasket and tighten the mounting bolts with force 8 Nm.
14. Fill the cooling system.
Petrol engines DOHC 1.0 and 1.2 l
1. Remove the expansion tank cap and thereby release the pressure in the cooling system.
2. Drain the coolant.
3. Remove the air filter with the MAF sensor.
4. Remove the water pump pulley mounting bolts.
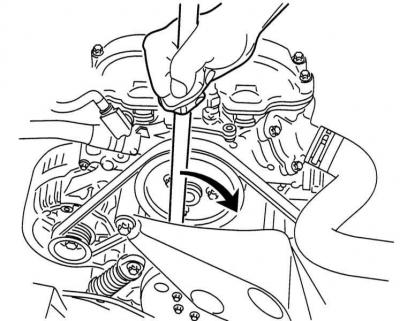
5. Turn the V-belt tension roller by the central bolt in a clockwise direction and thereby move the tensioner, overcoming the force of the spring.
Loose accessory drive belt tension
6. Fix the tensioner position.
7. Remove the V-belt from the pulley.
8. Unscrew the lower tensioner mounting bolt and tilt it towards the generator.
9. Remove the coolant hoses from the pump.
10. Disconnect the ECT sensor connector (2) and clean the timing case.
ECT sensor connector (2) and water pump mounting bolts: 1 – short bolts, arrows – long bolts
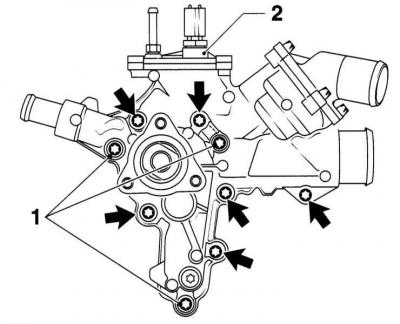
11. Unscrew the mounting bolts and remove the water pump (arrows and 1 in the illustration).
12. Clean the mating surfaces of the pump and timing case.
13. Install a new gasket on the timing case and insert the guide bushings.
Water Pump Gasket and Guide Bushings
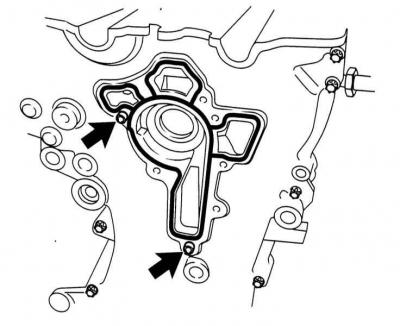
14. Install the water pump and tighten its mounting bolts with force 8 Nm.
Screw the short bolts into the holes (1) and the long bolts into the holes marked with arrows (refer to illustration).
15. Tighten the lower V-belt tensioner mounting bolt to 20 Nm.
16. Put on the V-belt and tighten it (see Chapter Vehicle settings and routine maintenance).
17. Install the air filter with MAF sensor.
18. Fill the cooling system.
Diesel engine
1. Disconnect the negative cable from the battery.
2. Drain the coolant into a clean container, then immediately attach the hose and secure it.
3. Remove the air filter and air intake hose.
4. Remove the V-belt.
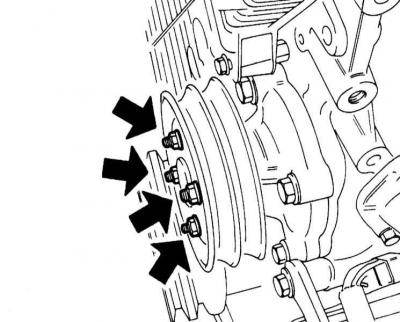
5. Remove the water pump pulley mounting bolts and remove the pulley. While removing the bolts, hold the pulley with an oil filter puller, such as HAZET 2170.
Water pump pulley mounting bolts
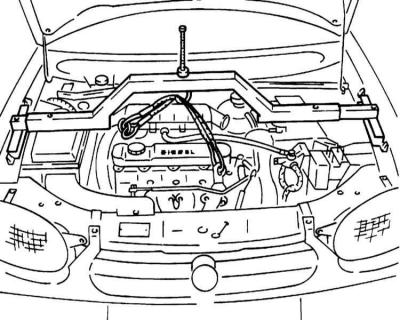
6. Raise the engine slightly.
Using a special device to lift the engine
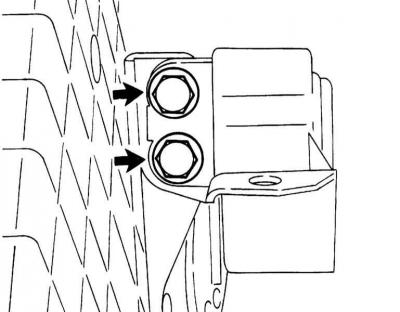
7. Remove the bolts securing the engine damping support to the holder on the cylinder block.
Engine damper mount to bracket mounting bolts
8. Carefully lower the engine and remove the V-belt pulley.
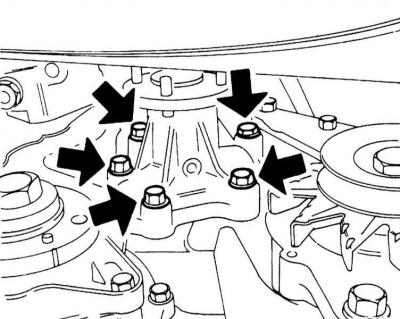
9. Unscrew the water pump mounting bolts and remove it together with the guide from the cylinder block.
Water pump mounting bolts
10. Clean the mating surfaces of the pump and cylinder block.
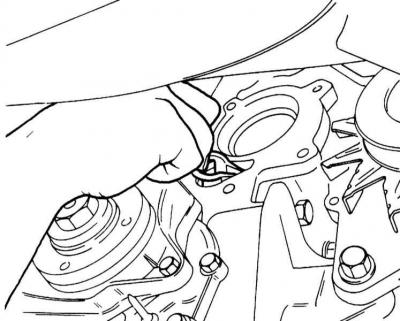
11. Insert the coolant channel guide into the cylinder block.
Coolant channel guide
12. Install the pump with a new gasket into the cylinder block and tighten the pump mounting bolts with force 20 Nm.
13. Install the pump pulley.
14. Raise the engine.
15. Secure the engine damping support to the holder with force 60 Nm.
16. Lower the engine.
17. Tighten the water pump pulley fasteners to 20 Nm.
18. Install the V-belt and tighten it.
19. Install the air filter and air intake hose.
20. Fill the cooling system.
Visitor comments