
Attention! Removal and installation of a gear belt can be made only on the cold engine.
Removing
1. Disconnect the negative cable from the battery, then place piston #1 at TDC on the compression stroke (see chapter 3).
Attention! On models with anti-theft system Opel (ATWS), the negative wire must be separated from the battery terminal within 15 seconds after the ignition is turned off, otherwise the alarm will sound.
2. Remove the crankshaft pulley as described in chapter 5.
3. Make sure that the camshaft sprocket alignment marks are aligned with the marks on the camshaft cover, and the crankshaft sprocket mark is aligned with the slot on the oil pump housing.
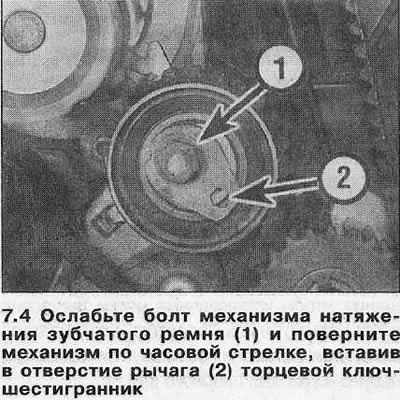
4. Loosen the toothed belt tensioner bolt (see illustration). Using a socket wrench, turn the tensioner lever clockwise to the stop to loosen the toothed belt tension, and re-tighten the mounting bolt.
5. Pull the toothed belt off the sprockets and remove it from the engine. If the belt cannot be replaced, mark the direction of rotation on it. Do not move the crankshaft or camshafts until the toothed belt is reinstalled.
6. Check the toothed drive belt for signs of uneven wear, cracks and oil contamination and replace it if there is even the slightest doubt about the condition of the component. If the engine needs to be overhauled, the vehicle has traveled more than 65,000 km, or the belt has been in operation for more than 4 years, replace the belt, regardless of its condition (since 1997, the belt change interval has been extended to 130,000 km or 8 years). If the belt is contaminated with oil, find the cause of the leak and fix it. Rinse the belt and all associated components to remove any oil.
Installation
7. When reassembling, thoroughly clean the timing belt sprockets and tensioner pulleys.
8. Make sure the crankshaft sprocket alignment mark is still aligned with the slot on the oil pump housing and the camshaft sprocket marks are aligned with the marks on the camshaft cover. If the camshaft cover has been removed, align the sprocket marks with the tabs on the front camshaft bearing caps (see illustration).
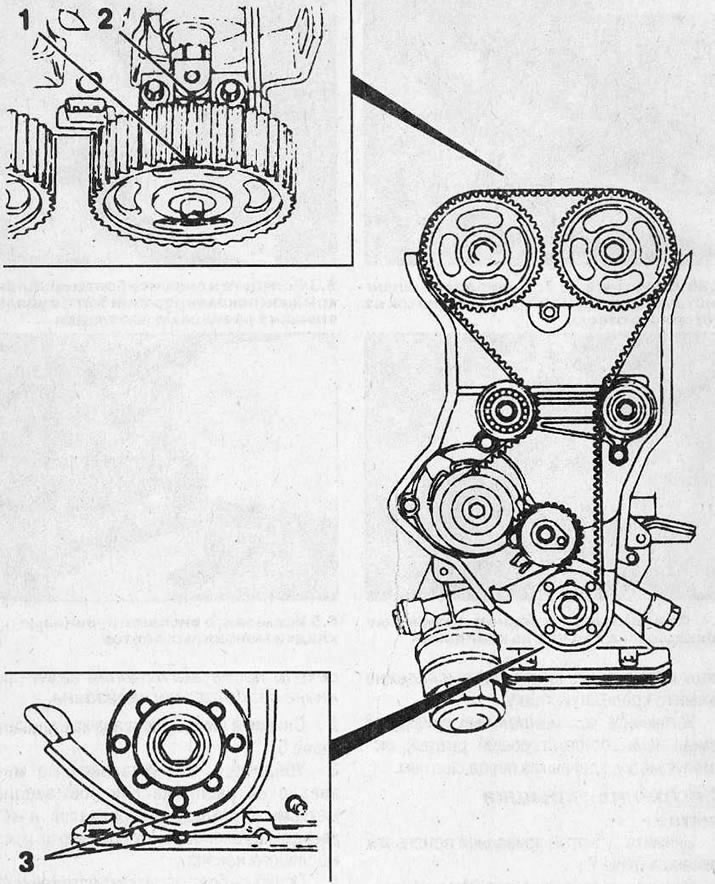
7.8 Align the camshaft sprocket marks (1) with marks on bearing caps (2) or camshaft cover, and the crankshaft sprocket mark with a slot on the oil pump (3)
9. Install the toothed belt over the camshaft and crankshaft sprockets and over the intermediate pulleys so that the left section of the belt is taut (i.e. all slack must be on the side of the belt tensioner), then pass the belt over the water pump sprocket and tensioner pulley. Make sure the belt teeth are seated in the sprocket slots and that the timing marks are still aligned. If the old belt is installed, orient it according to the direction of rotation mark made before removal.
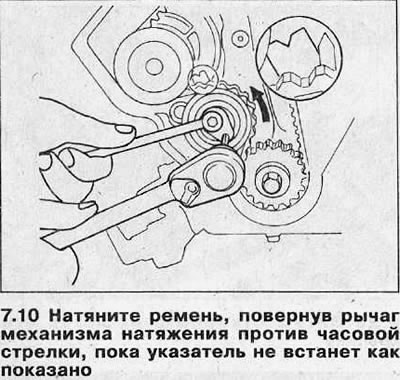
10. Loosen the toothed belt tensioner bolt to release the mechanism spring. Rotate the tension lever counterclockwise to the stop (see illustration). While holding the mechanism in this position, securely tighten the mounting bolt.
11. Make sure the sprocket alignment marks are still aligned. If this is not the case, release the tensioner again, then remove the belt from the sprockets and make the necessary adjustments.
12. Install the socket on the crankshaft sprocket bolt and turn the crankshaft two full turns (720°) in the direction of rotation to adjust the position of the timing belt components.
13. Make sure that the alignment marks of the camshaft and crankshaft sprockets are aligned, then loosen the tensioner bolt again.
14. If a new toothed belt is being installed, position the tensioner so that the pointer is aligned with the slot or mark «NEW» (depending on the type of tension mechanism) on the support plate (see illustration). While holding the tension mechanism in this position, tighten the fastening bolt with a tightening torque regulated specifications. Rotate the crankshaft two full turns in the direction of rotation so that the timing marks on the sprockets line up again. Make sure the tensioner pointer is still level with the notch/mark in the support plate.
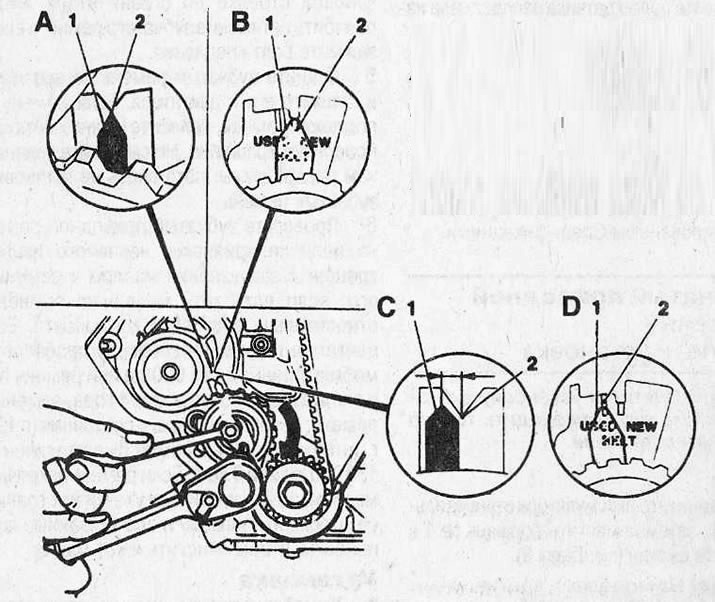
7.14 Check that the toothed belt tensioner lever is (1) correctly positioned in relation to the slot/mark of the support plate (2) (see text)
A Correct position for a new belt - slotted tensioner
B Correct position for a new belt - tensioner with marks
C Correct position for old belt - slotted tensioner
D Correct position for the old belt - tensioner with marks
15. If the old belt is installed, position the tensioner so that the pointer is 4 mm to the left of the slot or aligned with the mark «USED» (depending on the type of tension mechanism) on the support plate (see illustration 7.14). While holding the tension mechanism in this position, tighten the fastening bolt with the tightening force regulated by the Specifications. Rotate the crankshaft two full turns in the direction of rotation. Make sure the tensioner pointer is still level with the notch/mark in the support plate.
16. If the position of the pointer of the tension mechanism has gone astray, repeat the procedure described in paragraph 14 (new belt) or 15 (former belt).
17. Install the timing belt cover and crankshaft pulley as described in chapter 5 and Chapter 6.
Visitor comments