
OpelBook.ru
Cars AvtoVAZ Cars Mitsubishi Cars BMW Cars Mercedes Cars Nissan Cars Toyota Cars Chevrolet
English Русский
Български
Беларускі
Український
Српски
Hrvatski
Română
Polski
Slovenský
Magyar
 |  Sitemap  |  Contacts  |    


Main Astra Corsa Insignia Kadett Omega Vectra Zafira Others Articles
Corsa B (1993-2000) Corsa C (2000-2006, petrol) Corsa C (2000-2006)
  • Main
  • Corsa
  • Corsa C
  • Power unit
  • Control system
  • Removal and installation of fuel injectors (diesel)

Removal and installation of fuel injectors (diesel) (Opel Corsa C)

            0

Contents: Z13DT Engine ⬇ Engines Y17DT(L)/Z17DTH ⬇
Caution: Do not allow dirt to enter the fuel system tract!


Caution: Remember that injectors are precision equipment and must be handled with extreme care!


Caution: Before working on the fuel supply system on models equipped with engines with a fuel injection system, "Common Rail", you must wait approximately 1 minute after turning off the ignition - during this time the pressure in the fuel line is automatically reduced!


Z13DT Engine


1. Disconnect the cable from the negative terminal of the battery (see Chapter 5) and remove the engine cover (see Chapter 2).

2. Remove the throttle valve inlet pipe, disconnect the ventilation hose, loosen the union nuts and remove the high-pressure fuel lines, remove the return oil line from the injectors (see illustration 16.2).

3. Disconnect the injector wiring connectors.

4. Loosen the 2 nuts of the injector mounting brackets and remove the injectors from their mounting sockets (see accompanying illustration).
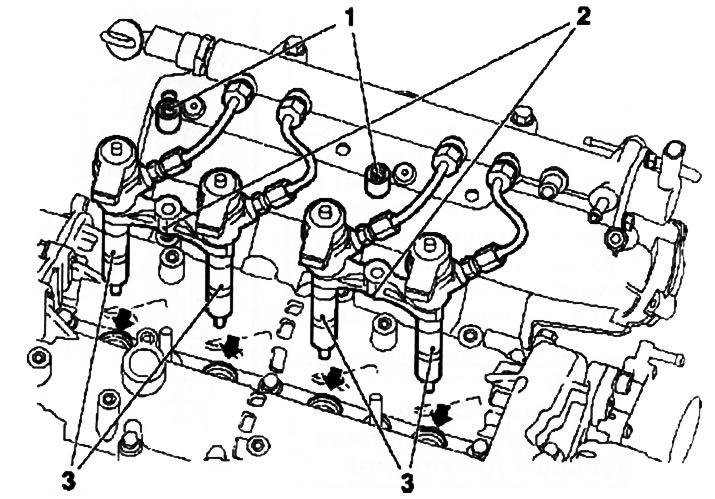
17.4. Brackets (2) of injectors (3) (z13DT engine) - the arrows indicate the mounting sockets of…

17.4. Brackets (2) of injectors (3) (z13DT engine) - the arrows indicate the mounting sockets of the injectors: 1. Nuts for fastening the brackets


5. Clean the inner surfaces of the mounting seats, replace the injector sealing gaskets.

6. Installation is carried out in reverse order.

Engines Y17DT(L)/Z17DTH


Note: When replacing injectors, it is necessary to first enter an individual QR-CODE into the ECM memory (adjustment data to compensate for different manufacturing tolerances).


7. Remove the camshaft housing cover (see Chapter 2, Section 10).

8. Mark the installation positions of the injectors - they must be in their places during installation.

9. Unscrew the mounting bolts of the mounting brackets (see accompanying illustration) and remove the injectors from the engine. If, when removing the injectors, any of them are pulled out together with the heat-protective sleeve, replace the sealing rings on the sleeve and install it in place using the KM-6357 device.
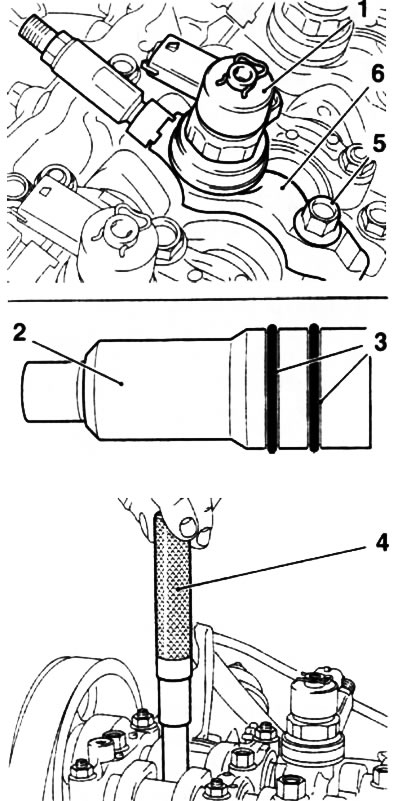
17.9. Removing the injector (1) (using the Z17DTH engine as an example): 2. Heat-protective sleeve;…

17.9. Removing the injector (1) (using the Z17DTH engine as an example): 2. Heat-protective sleeve; 3. Sealing gaskets; 4. Device KM-6357; 5. Mounting bolt; 6. Mounting bracket


Note: The heat shield bushings can be removed using the same tool.


10. Replace the rubber and copper injector seals (see accompanying illustration) and seals of other removed components.
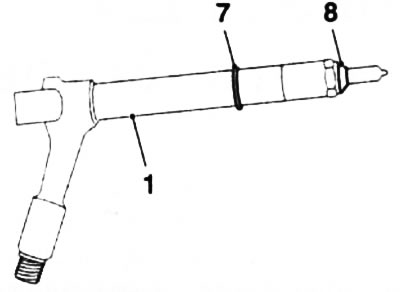


17.10. Sealing ring (7) and copper gasket (8) of the injector (1) (using the Z17DTH engine as an…

17.10. Sealing ring (7) and copper gasket (8) of the injector (1) (using the Z17DTH engine as an example)


11. Installation is performed in the reverse order of removal. Before tightening the injector mounting bolts, align them using a special device (see accompanying illustration).
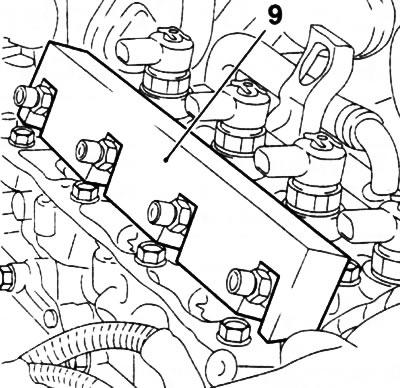
11/17. KM-6358 (9) tool for aligning injectors

11/17. KM-6358 (9) tool for aligning injectors


This article is available at russian, bulgarian, belarusian, ukrainian, serbian, croatian, romanian, polish, slovak, hungarian
Checking the article: Kornev Georgy

Share information:

Previous articles
Opel Corsa C: Control system
Next articles

Removal and installation of the fuel distribution line of the Z13DT engine
The principle of operation of fuel injection systems of diesel engines
Diesel Engine Control System
Removal and installation of fuel injectors (petrol)
Operating principle of petrol engine injection systems/Opel-Twinport system
General information and precautions
Removal and installation of fuel injection pump (diesel)


See similar ones from other Opel car manuals:
▶ Diesel engine fuel filter Opel Astra G (1998-2004, petrol)
▶ Diagnostics and cleaning of fuel injectors Opel Insignia A (2008-2017)
▶ Diesel fuel system — general description Opel Kadett D (1979-1984)
▶ Fuel system of diesel engine Opel Omega A (1986-1993)
▶ Maintenance of the fuel system of diesel engines Opel Vectra A (1988-1995)
Link to this page in different formats

Visitor comments


No comments yet


How much will 30 + 33 =


Corsa C (2000-2006) 
  • General information
  • Introduction to guide
  • Troubleshooting
  • Vehicle device
  • User manual
  • Maintenance
  • Power unit
  • Engine repair
  • Cooling system
  • Power and exhaust system
  • Control system
  • Engine electrical equipment
  • Transmission
  • Clutch
  • Mechanical gearbox
  • Automatic gearbox
  • Drive shafts
  • Chassis
  • Brake system
  • Wheel suspension
  • Steering
  • Body
  • Exterior
  • Interior
  • Doors and windows
  • Heating and air conditioning
  • Electrical equipment
  • Equipment and devices
  • Lamps and lighting
  • Electrical circuits
Corsa C (2000-2006, petrol) 
  • User manual
  • Car access
  • Governing bodies
  • Seat control
  • Heating and air conditioning
  • Driving and maintenance
  • Engines 1.0 and 1.2 l
  • Engine repair
  • Cooling and lubrication system
  • Injection system
  • Engines 1.4, 1.6 and 1.8 l
  • Engine repair
  • Cooling and lubrication system
  • Injection system
  • Transmission
  • Clutch
  • Mechanical gearbox
  • Automatic gearbox
  • Drive shafts
  • Chassis
  • Wheels and tires
  • Wheel suspension
  • Steering
  • Brake system
  • Body
  • Exterior
  • Doors and windows
  • Electrical equipment
  • Equipment and devices
  • Lighting system
  • Electrical circuits
Corsa B (1993-2000) 
  • General information
  • Introduction to guide
  • User manual
  • Maintenance
  • Power unit
  • SOHC gasoline engines
  • DOHC gasoline engines
  • Diesel engines
  • Engine repair
  • Cooling system
  • Supply system
  • Injection system (gasoline)
  • Injection system (diesel)
  • Exhaust systems
  • Control system (gasoline)
  • Preheat system (diesel)
  • Charge and launch system
  • Transmission
  • Mechanical gearbox
  • Automatic gearbox
  • Clutch and drive shafts
  • Chassis
  • Brake system
  • Front suspension
  • Rear suspension
  • Steering
  • Body
  • Ventilation and heating
  • Exterior
  • Interior
  • Doors and windows
  • Electrical equipment
  • Equipment and devices
  • Lamps and lighting
  • Electrical circuits
OpelBook.ru © 2017–2026 · Mobile version · · Sitemap: EN BG BY UA RS HR RO PL SK HU · Feedback · Site search
Astra F, petrol · Astra G, petrol · Astra G · Astra H · Astra J, petrol · Corsa B · Corsa C, petrol · Corsa C · Insignia A · Kadett D · Kadett E · Omega A · Omega B · Omega B2 · Vectra A, petrol · Vectra A · Vectra B, petrol · Vectra B · Vectra C · Zafira A, petrol · Frontera A, petrol · Frontera B · Ascona C · Vivaro A ·
We want your visit to be comfortable 🤝! We use cookies 🍪 to make that happen.